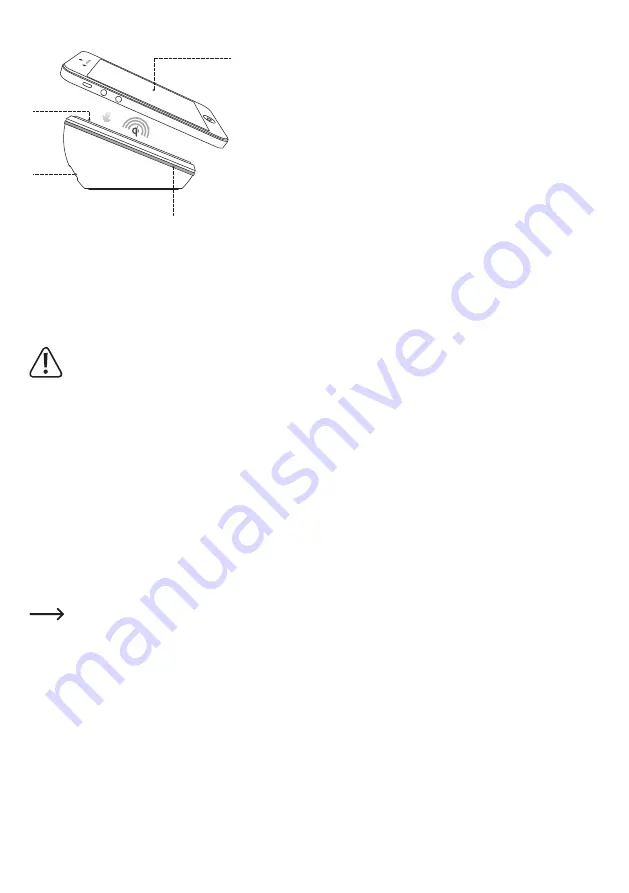
Operating elements
1
3
4
2
1 Ring LED (multicoloured)
2 Micro USB port
3 Charging surface
4 Qi-compatible mobile device (not included)
Operation
Ensure that the connection specifications for
your mobile device comply with the connection
data for the product (see technical data).
Always read the operating instructions for your
mobile device.
Do not short-circuit the USB port.
The USB cable included with the product is not
designed for data transfer.
• Place the charger on a smooth, level and fireproof surface.
Press the suction feet downwards so that the product will not
slip.
• Connect the micro USB port (2) to a USB power adapter using
the USB cable included with the product. Ensure that the power
adapter has the correct specifications (see "Technical data"). It
must be able to deliver the necessary current. The ring LED (1)
turns red.
Only use the USB cable included with the product
to connect the charger to a suitable USB power
adapter. The power adapter must be able to deliver
a 5 V/DC voltage and a current of up to 2 A. Do not
use computer USB ports (USB 2.0 and USB 3.0)
as the power source, as this may damage the USB
ports.
• Place the Qi-compatible mobile device that you want to charge
onto the charging surface (3). Do not attempt to charge
incompatible mobile devices.
• The ring LED (1) turns blue to indicate that the device is
charging.
• Charging begins as soon as a current is induced in the mobile
device's secondary coil.
• Monitor the charging process of your mobile device.
• A full charge normally takes approximately 3 hours. The
charging time can vary depending on the initial battery level,
the battery capacity and the charging conditions (e.g. the
available charging current).
• The ring LED changes colour to indicate the charger status.
-
A red LED indicates that the charger is in standby.
-
A flashing blue LED indicates that the charger is attempting to
establish a connection with a mobile device.
-
A constant blue LED indicates that the mobile device is
charging.
-
If the red and blue LEDs are flashing, this indicates an error.
Tips and important information
• To ensure an optimum connection between the charger and
the mobile device, place the back of the mobile device in the
middle of the charging surface (3). This helps to ensure quick
and lossless charging.
• Do not place any objects (e.g. paper or thin metal sheets)
between the charging surface and the back of the mobile
device during charging. This prevents the device from charging
normally.
• Remove any protective covers from your mobile device, as
these can impair the charging process or even prevent your
device from charging (when the maximum transfer range is
exceeded). Experiment with different types of covers to see
which covers impair the charging process.
• Always keep the charging surface (3) and the back of your
mobile device clean.
• The charger may become warm during charging. This is entirely
normal and does not normally have any negative impact on the
charger or mobile device.
• If you upgrade your device to make it compatible with the Qi
standard, ensure that you install third-party charging receiver
cards in accordance with the instructions. Improper installation
can affect the wireless charging process.
Care and cleaning
• Under no circumstances should you service any of the
components in the interior of the product, therefore never open/
dismantle it.
• Always disconnect the product from the power supply before
cleaning it.
• Disconnect the USB cable and any connected mobile devices
from the product before cleaning.
• Do not immerse the product in water.
• Never use aggressive detergents, rubbing alcohol or other
chemical solutions, as these could damage the casing or even
impair the functioning of the product.
• Use a dry, lint-free cloth to clean the product. Remove any dust
on the charging surface or suction feet by applying and then
removing a piece of adhesive tape.


