28
h) Current measurement
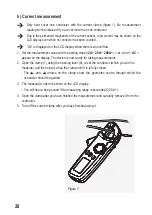
Only ever cover one conductor with the current clamp (figure 1). No measurement
reading will be obtained if you cover more than one conductor.
Due to the permanent magnetism of the current sensor, a low current may be shown on the
LCD display even when no conductor has been covered.
"OL" is displayed on the LCD display when there is an overflow.
1. Set the measurement value with the setting wheel (2A~, 20A~, 200A~). < A > and < AC >
appear on the display. The device is now ready for taking measurements.
2. Open the clamp (1) using the opening lever (8), cover the conductor (which you wish to
measure) and then slowly close the clamp until it is is fully closed.
- The and arrows on the clamp show the geometric centre through which the
conductor should be guided.
3. The measured current is shown on the LCD display.
- You will hear a beep sound if the measuring range is exceeded (200 A~).
4.
Open the clamp after you have finished the measurement and carefully remove it from the
conductor.
5.
Turn off the current clamp after you have finished using it.
Figure 1
Содержание 1307543
Страница 8: ...8 7 BEDIENELEMENTE 1 2 3 4 5 A B C D E F G H I 6 7 8 CAT II 600V CAT III 300V 200A...
Страница 23: ...23 7 OPERATING ELEMENTS 1 2 3 4 5 A B C D E F G H I 6 7 8 CAT II 600V CAT III 300V 200A...
Страница 38: ...38 7 EL MENTS DE FONCTIONNEMENT 1 2 3 4 5 A B C D E F G H I 6 7 8 CAT II 600V CAT III 300V 200A...
Страница 53: ...53 7 BEDIENINGSELEMENTEN 1 2 3 4 5 A B C D E F G H I 6 7 8 CAT II 600V CAT III 300V 200A...
Страница 62: ...62...
Страница 63: ...63...


