8
Getting Connected
Connecting Power
1. Ensure the main power switch on the rear panel is set to OFF.
2. Connect the power adapter to the power input on the rear panel.
3. Plug the power adapter into a power outlet, or a surge protector.
Note: A surge protector is recommended to protect your equipment from power surges.
Connecting Audio
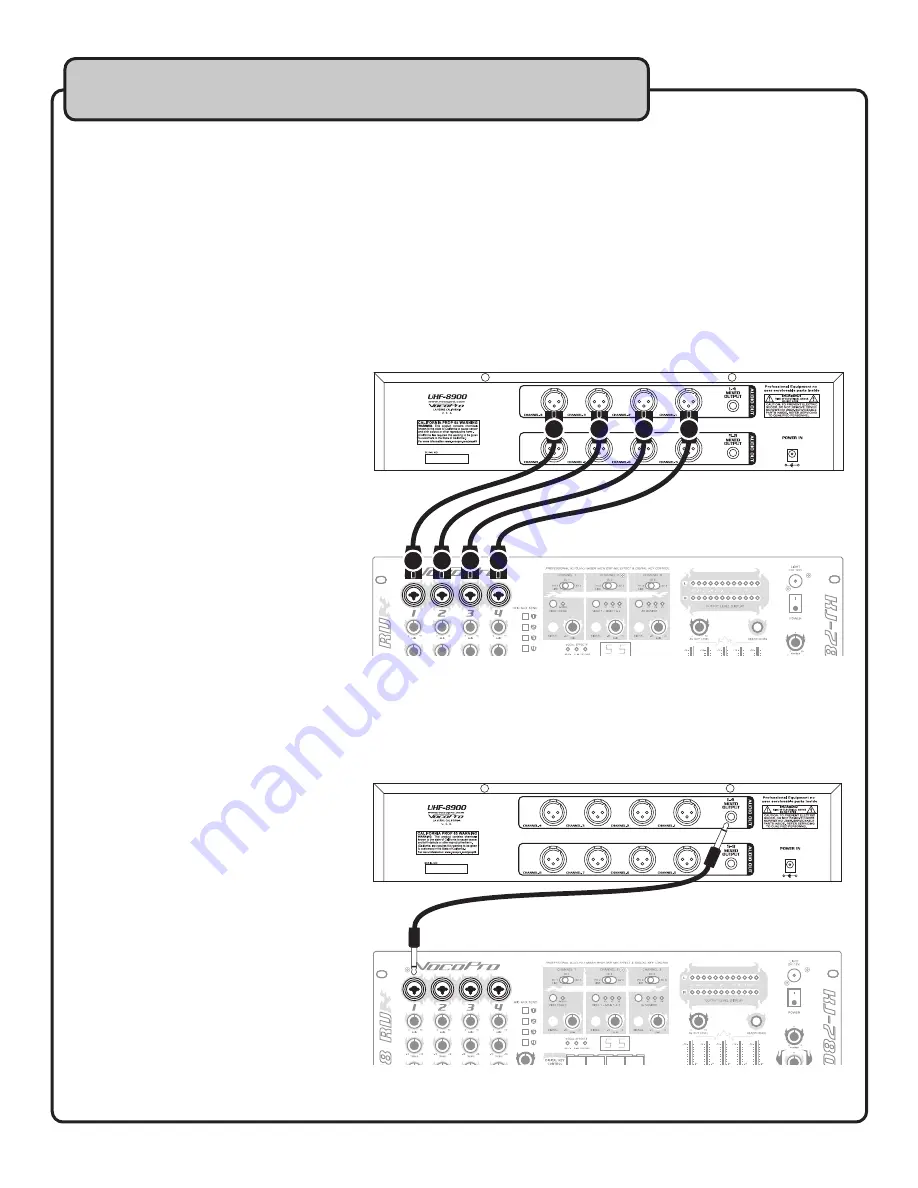
Using the XLR outputs
The XLR outputs allow you to connect each channel to the mixer independently. This gives you more control over the
individual microphone channels when connected to a mixer.
You will need:
• UHF-8900
• 8 XLR patch cables (not included)
• An input device, such as a mixer or
amplifier (not included)
To Connect the XLR outputs:
1 . Ensure the main power switch on the
rear panel is turned off .
2 . Connect one end of an XLR cable to the
CH.1 output of the UHF-8900.
3 . Connect the other end of the XLR cable
to the desired input on your mixer.
Note: To avoid confusion, it’s recommended
that the XLR jacks are attached
correspondingly (e.g. CH.1 to CH. 1,
CH. 2 to CH. 2, etc. The illustrated setup is for
clarity only.)
4. Repeat steps 2 and 3 until all the XLR outputs are connected.
Using the ¼” mixed output
The ¼” mixed output is useful if you do not have a mixer or if you have limited inputs available on your mixer. All 4
microphone signals are mixed together in
this output .
You will need:
• UHF-8900
• (2) ¼” patch cables (included)
• An input device, such as a mixer or
amplifier (not included)
To Connect the ¼” output:
1. Ensure the main power switch on the
rear panel is turned off .
2. Connect one end of a ¼” cable to one of
the ¼” mixed output on the rear panel of
the UHF-8900.
3. Connect the other end of the ¼” cable
to the desired input on your mixer or
amplifier.
4. Repeat steps 2 and 3 for the second ¼” mixed output jack.
Mixer
UHF-8900 rear panel
1
2
3
4
1
2
3
4
Mixer
UHF-8900 rear panel


