background image

8

1.  Connect the AC POWER ADAPTER to the UHF-3205 receiver’s POWER INPUT connector, then plug the ADAPTER 

     into a compatible AC electrical outlet.

2.  Attach the antennas by screwing in until secure. Be sure the antennas are pointing as straight up as possible.


3.  Connect the UHF-3205’s receiver to a sound system, mixer or amplifier’s microphone input(s) with ¼” output 

     jacks. 

NOTE: 

 There are two options when connecting the UHF-3205 to a mixer or amplifier.

1.  Independent Mic Channels


a.  Connect each mic channel independently to separate input channels on a mixer or amp.  Do this by 

                connecting a 1/4” cable from each mic channel (CH. A OUT and CH. B OUT) to individual inputs on your  

                mixer or amp.

2.  Mixed Mic Channels


b.  Use the mixed output to connect both microphone channels to a single mixer or amp channel.  Do this by 

                connecting a 1/4” cable from the MIX OUT jack to an input jack on your mixer or amp.

Getting connected

Connecting

LEVEL

V.CANCEL

V.PARTNER

POWER

VOCAL CANCEL/PARTNER

TAPE REC.

TAPE REC.

LOW

HIGH

DSP

REVERB

DSP ECHO

SONIC 

ENHANCER

��

�����

�����

�����

����

����

�����

������

�������

��������

���������

��������

��������������

���������

������

���������

�������

���������

���������

��������������������������

�����������������������������

!

CAUTION

RISK OF ELECTRICAL SHOCK

          DO NOT OPEN

CAUTION: TO PREVENT ELECTRIC SHOCK,

DO NOT REMOVE COVER SCREWS

NO USER-SERVICEABLE PARTS INSIDE.

REFER SERVICING TO QUALIFIED

PERSONNEL       

����������

www.vocopro.com

�������������������

���������������

���������

������

������

������

Содержание UHF-3205

Страница 1: ...o w n e r s m a n u a l THE S INGER S ULTIMA TE CHOICE TM R UHF 3205 Professional Rechargeable Dual Channel UHF Wireless Microphone System ...

Страница 2: ...etime 5 Specifications and Features 6 Getting Started 7 Getting Connected 8 Charging the Microphones 9 Microphone Descriptions 10 Front and Rear Panel Descriptions 11 Microphone Basics 12 Operations 13 Troubleshooting 14 THE S INGERS ULTIMA TE CHOICE TM R Table of Contents ...

Страница 3: ...ng amplifiers that produce heat The appliance should be connected to a power supply only of the type described in the operating instructions or as marked on the appliance Precautions should be taken so that the grounding or polarization means of an appliance is not defeated Power supply cords should be routed so that they are not likely to be walked on or pinched by items placed upon or against th...

Страница 4: ... manual carefully Keep it in a safe place for future reference Install your unit in a cool dry clean place away from windows heat sources and too much vibration dust moisture or cold Avoid sources of hum transformers v motors To prevent fire or electrical shock do not expose to rain and water Do not operate the unit upside down Never open the cabinet If a foreign object drops into the set contact ...

Страница 5: ... La Verne CA 91750 Toll Free 800 678 5348 TEL 909 593 8893 FAX 909 593 8890 VocoPro Company Email Directory Customer Service General Information info vocopro com Tech Support techsupport vocopro com Remember Our Website Be sure to visit the VocoPro website www vocopro com for the latest information on new products packages and promos And while you re there don t forget to check out our Club VocoPr...

Страница 6: ...ave it there Pay attention to the different levels in various recordings Taking a minute to do this now will help to prevent hearing damage or loss in the future After all we want you listening for a lifetime Used wisely your new sound equipment will provide a lifetime of fun and enjoyment Since hearing damage from loud noise is often undetectable until it is too late this manufacturer and the Ele...

Страница 7: ... 200mV Seperate 0 400mV Power DC12 15V Power consumption 3W Dimensions 8 5 W x 5 5 D x 1 7 H FEATURES 2 wireless rechargeable handheld mics included Included microphone charger charges both microphones at the same time 2 unbalanced mic outputs 1 4 and 1 mixed output 1 4 UHF Band 570 MHZ 550MHZ Rugged mic grills protect the microphone cartridge and prevent the mic from rolling Individual Volume con...

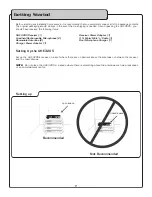
Страница 8: ...HF 3205 s receiver in a spot where there are no barriers above the antennas or between the receiver and the microphones NOTE Do not place the UHF 3205 in a space where there is something above the antennas such as a rackspace or an entertainment center Getting Started Setting up open space closed space Recommended Not Recommended UHF 3205 Receiver 1 Handheld Rechargeable Microphones 2 Removable An...

Страница 9: ...ly to separate input channels on a mixer or amp Do this by connecting a 1 4 cable from each mic channel CH A OUT and CH B OUT to individual inputs on your mixer or amp 2 Mixed Mic Channels b Use the mixed output to connect both microphone channels to a single mixer or amp channel Do this by connecting a 1 4 cable from the MIX OUT jack to an input jack on your mixer or amp Getting connected Connect...

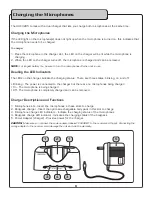
Страница 10: ...here are three states blinking on and off Blinking The power is connected to the charger but there are no microphones being charged On The microphone is being charged Off The microphone is completely charged and can be removed Charger Descriptions and Functions 1 Microphone slots Insert the microphones in these slots to charge 2 Bodypack charger Insert the optional rechargeable body pack in this s...

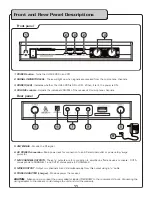
Страница 11: ...er is ON when the switch is in the ON position and the power is OFF when the switch is in the OFF position 3 CHARGE INDICATOR LED The color of this LED indicates the microphone s charge level Green means the charge is high Blinking Red and Green means that the charge is getting low and should be charged and Red means the charge is very low and must be charged immediately 1 2 3 Microphone ...

Страница 12: ... to an AC electrical outlet or power strip surge protector 7 MIC CHANNEL OUTPUTS These outputs are for connection to amplifiers effects devices or mixers OUT A corresponds to CHANNEL 1 and OUT B corresponds to CHANNEL 2 8 MIXED OUTPUT Output mic channels A and B simultaneously from this output using a cable 9 POWER ADAPTER charger Provides power the receiver CAUTION Make sure you connect the power...

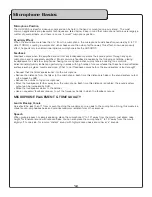
Страница 13: ...gh ratios of room surfaces that have hard and reflective surfaces such as glass marble and wood What to do if feedback occurs before the sound system is loud enough Request that the talker speak louder into the microphone Reduce the distance from the talker to the microphone Each time this distance is halved the sound system output will increase by 6dB Reduce the number of open microphones Move th...

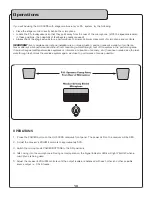
Страница 14: ...ting a walkthrough test of the system in the performing area If major changes additional wireless systems or intercoms relocation of scenery etc have been made since the last walk through test check the wireless system again as close to performance time as possible OPERATIONS 1 Press the POWER button on the UHF 3205 receiver s front panel The power LED on the receiver will be RED 2 Adjust the rece...

Страница 15: ...per connection between receiver and external amplifier mixer Talk into the mic and observe the receiver s RF signal LEDs If they glow the problem is elsewhere in the sound system Check microphone batteries and charge or replace if power is low Remove local sources of RF interference such as lighting equipment Two transmitters may be operating at the same frequencies or frequencies which are too cl...

Страница 16: ...C T M R ...

Отзывы: