background image

APPENDIX B: TWO LABEL PRINT MODES

27  

VOCERA EDGE ZEBRA PRINTER SETUP AND CONFIGURATION USER GUIDE

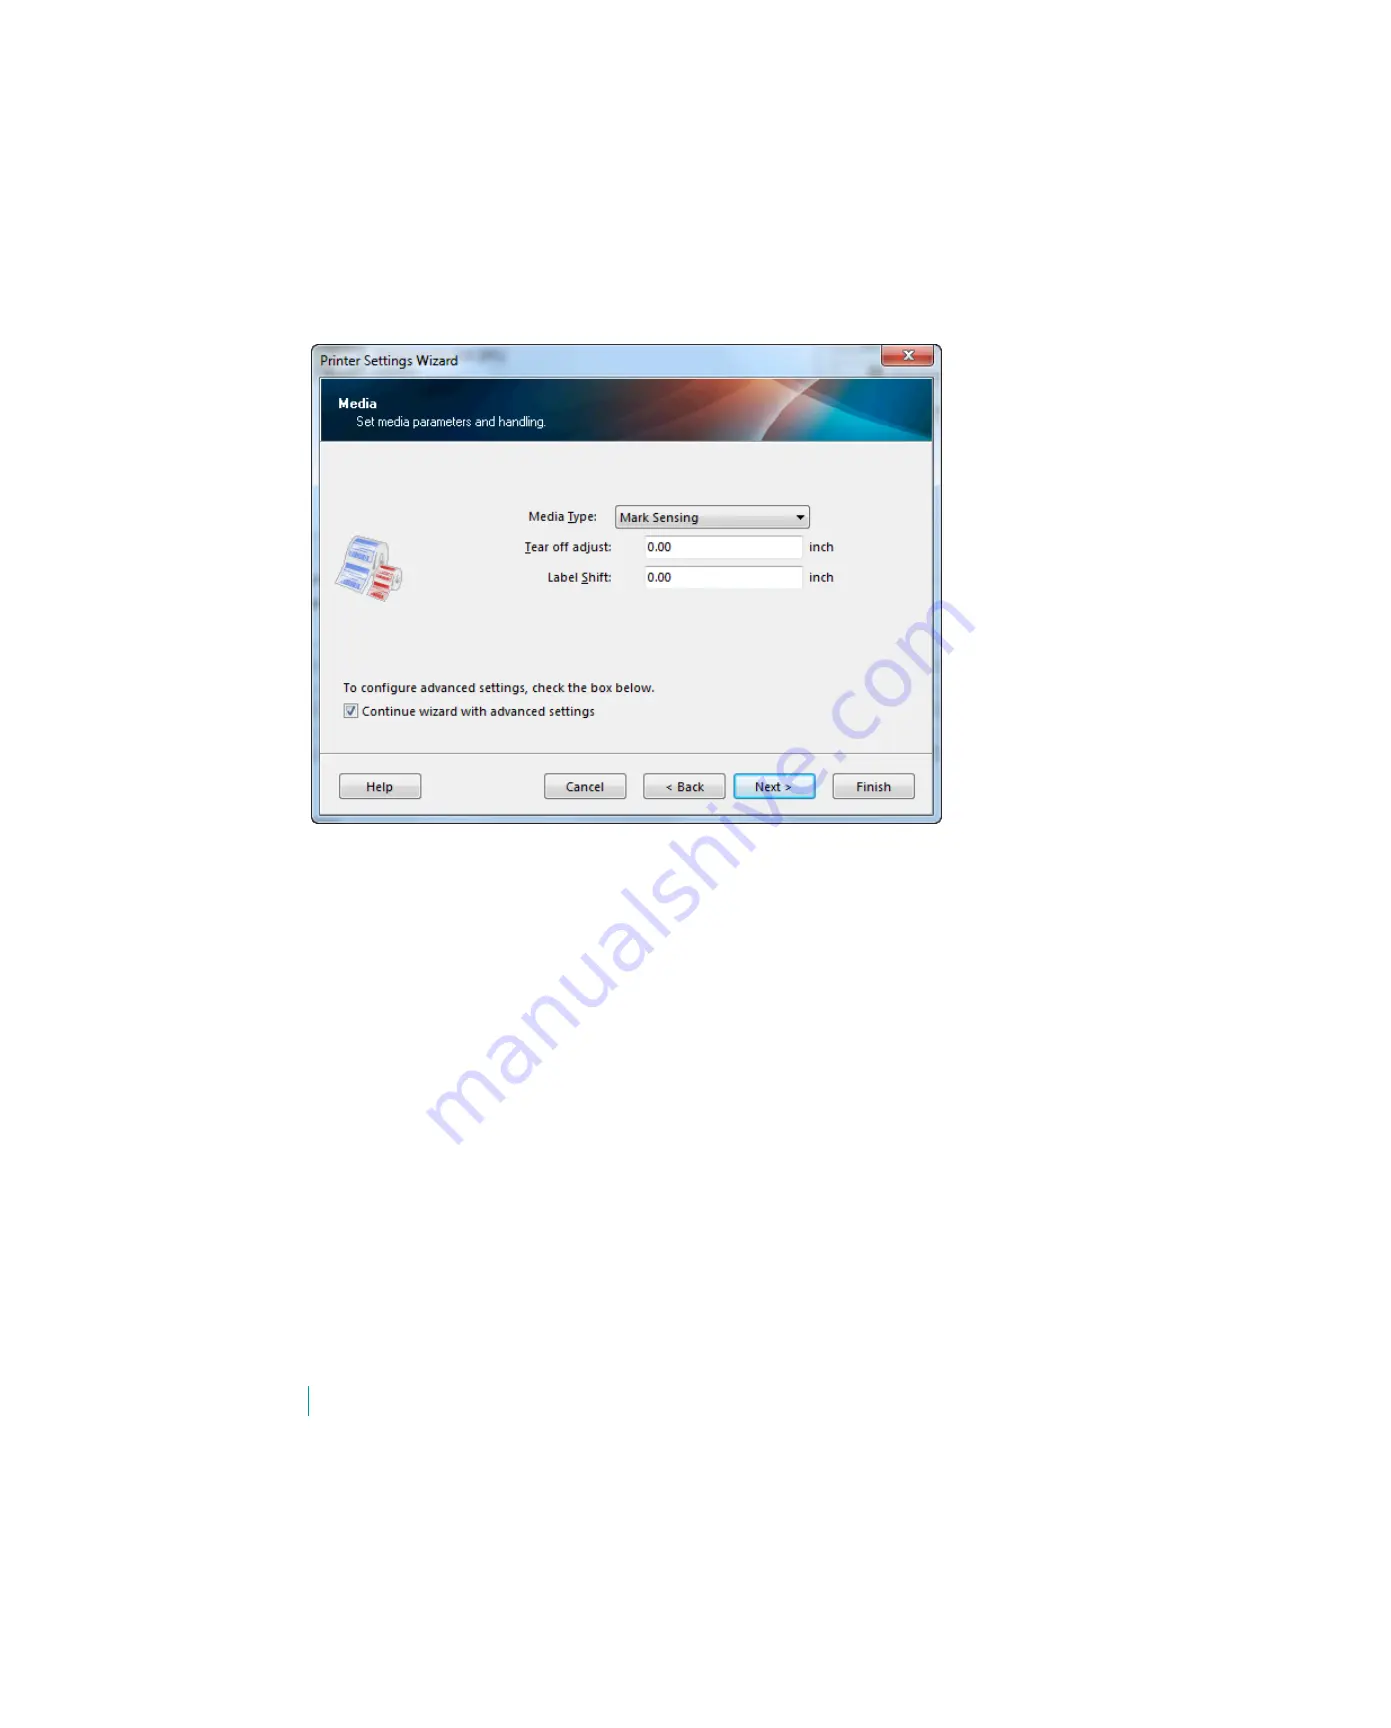
10. Set Media Handling to Peel Off.
11. Leave the remaining fields as the default.
12. Click 

Finish

.

Содержание QH2-AUNA0M00-00

Страница 1: ...Vocera Edge Zebra Printer Setup and Configuration User Guide Version 4 11 0 ...

Страница 2: ...from that reseller Certain portions of Vocera s product are derived from software licensed by the third parties as described at https www vocera com legal Microsoft Windows Windows Server Internet Explorer Excel and Active Directory are registered trademarks of Microsoft Corporation in the United States and other countries Java is a registered trademark of Oracle Corporation and or its affiliates ...

Страница 3: ...s 8 Create Wireless Configuration File 8 Load Wireless Settings on to the Printer 11 Step 3 Label Setup 14 Web Sensing 14 Calibration 17 Step 4 Add Label Printer to Clinical Manager 20 Appendix A Power Options 22 Appendix B Two Label Print Modes 24 Manually Setup Peel Off Mode 24 Change Printer to Peel Off Mode 28 Change Printer Back to Tear Off Mode 29 Appendix C Prevent Print Mode Override 30 Pr...

Страница 4: ...or 802 11 a b g n dual radio Part Number for the Zebra QLn220HC QH2 AUNA0M00 00 Part Number for the Zebra ZQ610HC ZQ61 HUWA000 00 If your facility utilizes many label printers consider using Zebra s Link OS printer management software like an MDM for printers More information can be found on the following website https www zebra com us en products software barcode printers link os html Requirement...

Страница 5: ...printer 1 Access the following website https www zebra com us en products software barcode printers zebralink zebra setup utility html 2 If you don t have a username and password click Register and create an account 3 After you register you will receive an email confirmation of your user account Once you receive the confirmation return to the zebra com website click Download and sign in 4 Continue...

Страница 6: ...CERA EDGE ZEBRA PRINTER SETUP AND CONFIGURATION USER GUIDE 5 At the prompt connect the Zebra ZQ610HC or QLn220HC printer to the computer via mini USB cable 6 Click Finish 7 The printer should show up in the list of installed printers as ZDesigner QLn220 ZPL ...

Страница 7: ...STEP 1 INSTALLING THE ZEBRA SETUP UTILITY SOFTWARE 7 VOCERA EDGE ZEBRA PRINTER SETUP AND CONFIGURATION USER GUIDE ...

Страница 8: ...e computer you will need to configure the connection between the computer and the printer Create Wireless Configuration File Create the configuration file on the computer This configuration file contains the wireless connection configuration information that the printer needs to connect to the computer 1 Click Configure Printer Connectivity ...

Страница 9: ...STEP 2 CONFIGURE WIRELESS SETTINGS 9 VOCERA EDGE ZEBRA PRINTER SETUP AND CONFIGURATION USER GUIDE 2 Choose Wireless and click Next ...

Страница 10: ...GURE WIRELESS SETTINGS 10 VOCERA EDGE ZEBRA PRINTER SETUP AND CONFIGURATION USER GUIDE 3 Enter your wireless configuration settings Note There are multiple screens to configure your settings that are not shown here ...

Страница 11: ... to save the configuration to the printer Note Passwords are hashed in the configuration file 4 Watch the printer it will read Printer Ready when the setup is complete Load Wireless Settings on to the Printer After the wireless configuration file is created on the computer you need to load the file on the printer Use the steps below to apply wireless connection settings to a new printer 1 Click Op...

Страница 12: ...STEP 2 CONFIGURE WIRELESS SETTINGS 12 VOCERA EDGE ZEBRA PRINTER SETUP AND CONFIGURATION USER GUIDE 2 Click the Action tab 3 Select Send file 4 Click the to locate your wireless config file ...

Страница 13: ...STEP 2 CONFIGURE WIRELESS SETTINGS 13 VOCERA EDGE ZEBRA PRINTER SETUP AND CONFIGURATION USER GUIDE 5 Click Send The printer may restart ...

Страница 14: ...ed to the computer you need to configure the settings for the labels Web Sensing If you are using labels without marks on the liner the printer must be set to web sensing before calibration Note If using labels with black marks on the liner you can skip to the calibration procedures below 1 Click Configure Printer Settings ...

Страница 15: ...STEP 3 LABEL SETUP 15 VOCERA EDGE ZEBRA PRINTER SETUP AND CONFIGURATION USER GUIDE 2 Set the label size 2 labels default to 1 89 printable width ...

Страница 16: ...16 VOCERA EDGE ZEBRA PRINTER SETUP AND CONFIGURATION USER GUIDE 3 Most printers can use the default darkness and speed settings This can be adjusted later as needed 4 Select Web Sensing from the Media Type drop down list ...

Страница 17: ...abels without black markings on the liner 5 Click Finish Calibration If you are using labels with black marks on the liner follow the steps below to calibrate the printer If you are using the recommended Zebra label media 2 wide x 1 25 tall the printer can calibrate it automatically 1 Click Open Printer Tools ...

Страница 18: ...STEP 3 LABEL SETUP 18 VOCERA EDGE ZEBRA PRINTER SETUP AND CONFIGURATION USER GUIDE 2 Click the Action tab 3 Select Calibrate media ...

Страница 19: ...P 19 VOCERA EDGE ZEBRA PRINTER SETUP AND CONFIGURATION USER GUIDE 4 Click Send The printer will slowly feed labels to calibrate 5 Basic setup is now complete Next you will need to add the printer to the Clinical Manager ...

Страница 20: ...e the printer labels in Vocera Edge Clinical Manager 1 Log into the Clinical Manager 2 Click Configuration Label Printers 3 Click New 4 Complete the Label Printer screen Enter Friendly Name Network Name or IP Address and Barcode Click the Label Printer Model drop down menu and select Zebra 5 Click Test Printer and make sure the printer is working 6 Click OK ...

Страница 21: ...STEP 4 ADD LABEL PRINTER TO CLINICAL MANAGER 21 VOCERA EDGE ZEBRA PRINTER SETUP AND CONFIGURATION USER GUIDE The new label printer displays ...

Страница 22: ...e printer from going to sleep 1 Click Open Communication With Printer 2 In the top window enter the following command U1 setvar power inactivity_timeout 0 U1 do device reset Note Remember to have a carriage return at the end of the last line 3 Click Send to Printer 4 The printer will restart and end at Printer Ready ...

Страница 23: ...APPENDIX A POWER OPTIONS 23 VOCERA EDGE ZEBRA PRINTER SETUP AND CONFIGURATION USER GUIDE ...

Страница 24: ...abel is separated from the liner for easy application Note Refer to Appendix C Prevent Print Mode Override to use script to set your printer to one mode over the other Manually Setup Peel Off Mode Label setup can be done manually and saved to a configuration file for ease of use when installing on additional printers This step must be completed in order for peel off mode to work 1 Select the print...

Страница 25: ... LABEL PRINT MODES 25 VOCERA EDGE ZEBRA PRINTER SETUP AND CONFIGURATION USER GUIDE Height 1 25 inches 3 Leave the Orientation set to Normal 4 Click Next 5 Leave the Speed and Darkness set to the default 6 Click Next ...

Страница 26: ...TWO LABEL PRINT MODES 26 VOCERA EDGE ZEBRA PRINTER SETUP AND CONFIGURATION USER GUIDE 7 Set the Media Type to Mark Sensing if using recommended Zebra label 8 Leave the remaining fields as the default 9 Click Next ...

Страница 27: ...APPENDIX B TWO LABEL PRINT MODES 27 VOCERA EDGE ZEBRA PRINTER SETUP AND CONFIGURATION USER GUIDE 10 Set Media Handling to Peel Off 11 Leave the remaining fields as the default 12 Click Finish ...

Страница 28: ...ER GUIDE Change Printer to Peel Off Mode After you have manually setup Peel Off Mode you can change the printer so that the label peels off from the liner 1 Open the cover of the printer 2 Press the Peeler Lever The Peeler Bail will pop out 3 Load the paper as normal Zebra QLn220HC Printer ...

Страница 29: ...ATION USER GUIDE Zebra ZQ610HC Printer Change Printer Back to Tear Off Mode Use the steps below to change the printer back to tear off mode 1 Open the cover of the printer 2 With both thumbs press the Peeler Bail back into the printer until it clicks in place 3 Load paper as normal ...

Страница 30: ...ow To prevent accidental change of print mode from the template ZPL command MM can be ignored by sending the command U1 setvar device command_override add MM Note that this will also prevent the Setup Utility from making changes so can be cleared with U1 setvar device command_override clear Or toggled off with U1 setvar device command_override active no Print Mode scripts Below are command sequenc...

Страница 31: ...ommand_override add MM U1 setvar device command_override active no XA MMP N XZ XA JUS XZ U1 setvar device command_override active yes U1 do device reset Set Printer to Tear Off Mode U1 setvar device command_override add MM U1 setvar device command_override active no XA MMT N XZ XA JUS XZ U1 setvar device command_override active yes U1 do device reset ...

Отзывы: