background image

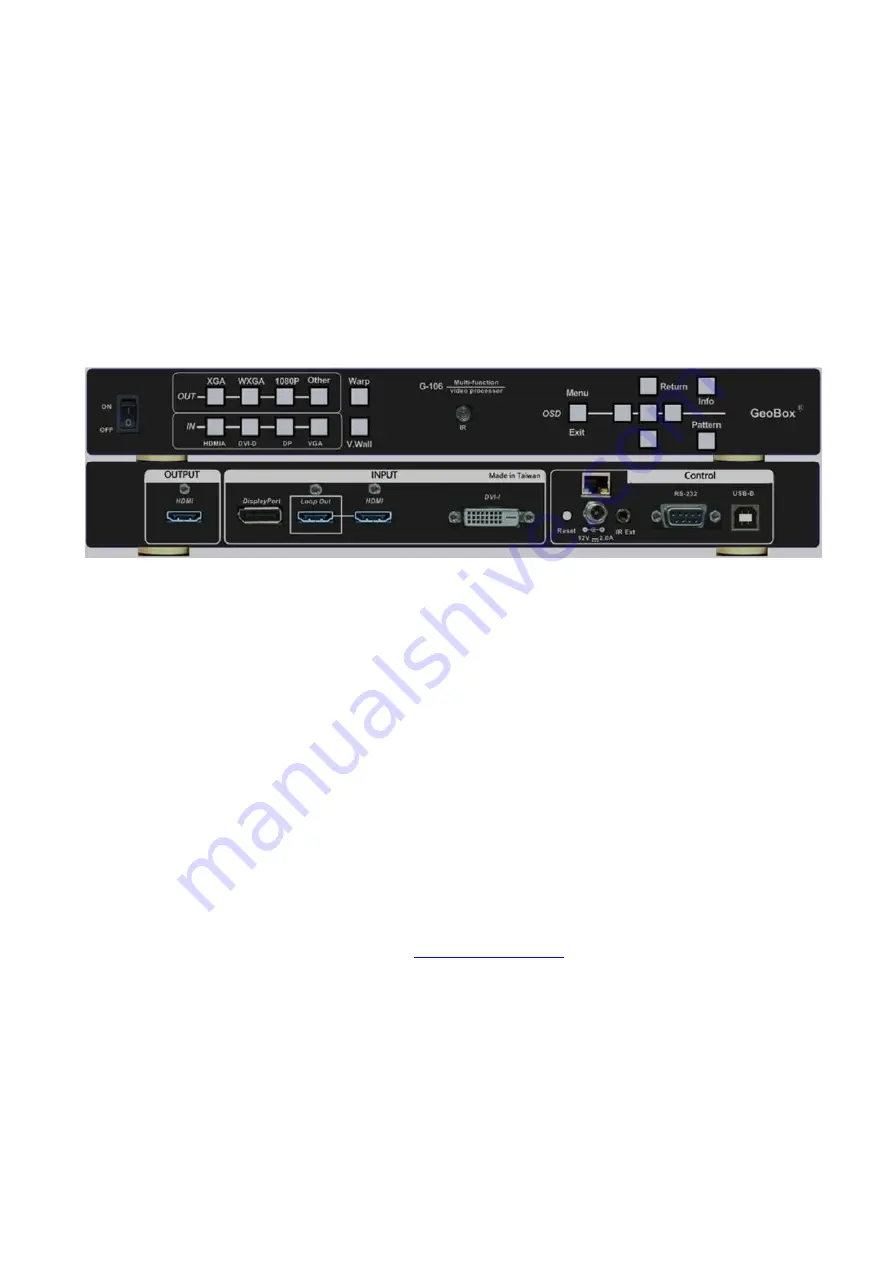
G-106 


G-106 / G-106Ex Operation Manual 


(Single channel Warp processor / Edge Blender) 


Technical support: 

E-mail: [email protected] 

Tel: +886-2-8751-2785 ext. 301 

Cell: +886-935-678-033 

Skype: vns-inc 

Version: 1.01 


Website: 

www.vnstw.com.tw


Содержание G-106

Страница 1: ...06 G 106Ex Operation Manual Single channel Warp processor Edge Blender Technical support E mail sales vnstw com Tel 886 2 8751 2785 ext 301 Cell 886 935 678 033 Skype vns inc Version 1 01 Website www vnstw com tw ...

Страница 2: ...ern for Geometry Adjustment 13 9 OSD menu and operation 14 9 1 Picture Color Adjustment 14 9 2 Image Setup for PC graphics from VGA input 14 9 3 Image Properties 15 9 3 1 Color Preset mode Custom color 15 9 3 2 Input Signal selection 15 9 3 3 Scaling Display aspect ratio 16 9 3 4 Output Mode selection 16 9 3 5 PIP POP setting Picture in Picture Side by Side 16 9 3 6 Orientation Flip Rotation 18 10...

Страница 3: ... Shift Edge blending area shift 33 14 5 6 Color Individual projector white balance and color correction 33 14 6 Gwarp PC tool 34 14 6 1 When Gwarp PC tool is necessary 34 14 6 2 System configuration 35 14 6 3 Gwarp operation 35 14 6 3 1 System connection 35 14 6 3 2 Warp Adjust 35 14 6 3 3 Video Wall 36 14 6 3 4 Edge Blend 36 14 6 3 5 Color Uniformity correction 36 14 6 3 6 Save file Save to Box 3...

Страница 4: ...facturer will pay shipping charges for return shipments to customers Manufacturer does not assume responsibility for consequential damages expenses or loss of revenue inconvenience or interruption in operation experienced by the customer Warranty service shall not automatically extend the warranty period FCC CE statement This equipment has been tested and found to comply with the limits for a Clas...

Страница 5: ...o 17x17 grids Each corner geometry adjustment range is up to H _600 pixels and V _400 pixels in full HD output through remote controller If using PC tool the range can be double G 106Ex can perform curved screen edge blending with color adjustment and white balance correction Edge blending region gamma correction and non edge blending area black level uplift are also standard function in G 106Ex H...

Страница 6: ...s 1x HDMI Preset output resolution 720x480 XGA WXGA 1280x1024 1366x768 1400x1050 1600x1200 1920x1080 1920 1200 3 Loop out port 1x HDMI supports 3840 2160 30Hz for daisy chain connection and monitoring 4 Audio input output HDMI embedded audio B Image warp geometry alignment and edge blending 1 With full functions for quick 4 corner alignment vertical and horizontal keystone correction Pincushion Ba...

Страница 7: ...nals for passive 3D display including signal source from Blue Ray STB game console media player and PC 2 Auto decode Stereoscopic Player Nvidia 3D Vision 1080p 120Hz 3D format and Blue Ray 1080p 24Hz 3D signal into 720p XGA WXGA 120Hz signal for active 3D display 3 Support standard HDMI 1 4a 3D format including 1080p 24Hz full HD Side by Side Top Bottom frame sequential Line interleaved Line by Li...

Страница 8: ...d pattern for easy geometry alignment 4 Programmable EDID for user to create any EDID with timing between 1024x768 and 3840x2160 5 BOX ID for convenient multiple units control at the same time 6 Five preset Profiles to save user settings and can be recalled at any time 7 Automatic power ON OFF through input signal control While no input signal is detected it will shut down output so that user can ...

Страница 9: ...e the adjustment range h During installation setup process please apply FHD signal to the system for easy setup After finish the setup user can select optimized EDID from OSD menu to get optimized video quality i The optimized EDID resolution should be the final resolution after edge blending For instance if user uses three XGA projectors for edge blending with 250 overlapped pixels then the best ...

Страница 10: ...ON GeoBox it will maintain the final settings v User needs to save the final setting into Profile under Options menu for long tern stored inside the system Even the system is reset the Profile settings will be kept without change w Continuously press PATTERN button internal test pattern will show different colors for easy installation White Red Green Blue Blank When in Blank user can see OSD and t...

Страница 11: ...G 106 10 7 Applications case study 7 1 Image warp and geometry alignment 7 2 Conventional curved screen edge blending ...

Страница 12: ...e blending system 7 5 Edge Blending with projector at portrait position Able to execute edge blending with projector at portrait position to increase image height G 106Ex can rotate the content and implement edge blending It is not necessary to rotate the content in advance ...

Страница 13: ...sition adjustment through OSD or IR controller Max PIP size is 1024x768 resolution POP function with selectable full screen or original aspect ratio Dual landscape contents displayed at portrait TV 7 7 Corner wall display 7 8 Image flip and rotation Image flip at 90 180 270 degrees with full screen display Image flip at Front Rear Right Left Top Bottom direction ...

Страница 14: ...the pixel number This internal pattern can t co exist with OSD menu During geometry adjustment user needs to select adjusting item then click Enter to pop up grid pattern If user wants to use external grid pattern from PC or other signal sources or see OSD menu instead of internal grid pattern user can continuously click pattern key to show it A flashing indicator at the adjusting point will appea...

Страница 15: ...b This menu is only active under below conditions Picture menu will be grayed out and not functional when the color setting is in Preset Mode under Image Properties menu User needs to get into Custom menu and press Save menu to activate Picture menu When the input signal is in YUV domain all the items under menu are free to be accessed If the input signal is in RGB domain only Brightness and Contr...

Страница 16: ...temperature adjust independent RGB color select input port output resolution set display aspect ratio set PIP POP function and image flip rotation There are six sub menus 9 3 1 Color 9 3 2 Input Signal Image Setup menu can only be activated when video signal input is from VGA analog input port Under Color menu 4 Preset modes for color temperature selection Custom Independent RGB color adjustment U...

Страница 17: ...ation or Video wall setting to perform different display styles Full Screen To fit source image for full screen display Original AR To display source image with the same aspect ratio as source image The setting will also affect POP image display with full screen or original aspect ratio User can select input port from this menu or shortcut keys on remote controller and front control panel VGA and ...

Страница 18: ... the best video quality f If PIP POP image needs to be across entire screen user needs to use the first processor as PIP POP processor and output the image to HDMI port in next processor then daisy chain connection to all other processors After edge blending user can see PIP POP across entire screen Display Under Display menu there are three items Disable to Disable PIP or POP function PIP to sele...

Страница 19: ...image or Original AR the same aspect ratio as PIP input source POP image aspect ratio can be adjusted through Scaling under Image Properties OSD menu Source User can select the input source for PIP POP image from all input ports By selecting different input ports for Main PIP POP images user can have different combination of the display User can save different settings into Profile under Option me...

Страница 20: ...usted pixel by pixel so that the video wall can meet the requirements in different application environment The maximum video wall can be up to 15x15 matrix display with overlap up to 900 pixels for edge blending 10 1 Zoom split the image Press Menu Keypad on Front Panel or remote controller to enter Video Wall OSD menu Video Wall hotkey on the bottom right position of the remote controller is avai...

Страница 21: ...region It can compensate geometry mis alignment and let image become much clearer Use Pan to determine the location of each split image in the display in both horizontal and vertical directions Default setting Horizontal Pan 1 Vertical Pan 1 Use Overlap to determine overlapped pixels between two adjacent displays It will change image cropping area and can change image aspect ratio In projector edg...

Страница 22: ... GeoBox into signals for Right Left eyes The signal needs to be displayed through two projectors Each projector will display signal only for right eye or left eye User needs to set a polarized filter in front of the projector and also wears polarized glasses The glasses need to match the polarized filter in front of the projectors so that the right eye can only see the scene for right eye and the ...

Страница 23: ... projector for right left eye display e Install polarized filter at some distance from projector lens to avoid thermal damage at least 5 10 cm f Setup the polarized filter and glasses so that right left eye can only see the scene for one eye g Use geometry alignment function to align the images from two projectors completely matching together Please place the polarized filter in front of the proje...

Страница 24: ...t Right Eye Frame for RH projector and Left Eye Frame for LH projector Output Fromat setting is based on the filter location If RH optical filter is installed at LH projector then user needs to set LH projector at Right Eye Frame User can swap Output Format setting to fix wrong position installation Select Automatic if the 3D signal is standard 3D formats from Blue Ray player or sources with 3D IN...

Страница 25: ...ter glasses will only synchronize with one emitter among these 3D Ready projectors G 106 can support 100 120Hz frame sequential 3D signal up to full HD and also 1080p 24Hz frame packed 3D format from Blue Ray player execute geometry warp edge blending or stacking for these signals and output 720p XGA WXGA 100 120Hz signals for active 3D display In multiple projector active 3D applications edge ble...

Страница 26: ...f user selects other output resolution except XGA or 720P 3D Ready menu will be grayed out and user can t select 120Hz output d Projector needs to have 3D Ready DLP Link or Nvidia 3D Vision function This 3D function needs to be open while playing active 3D e It is possible for user to see inverse image in R L eyes image User need to swap R L signal through projector internal function 3D Sync Inver...

Страница 27: ...setting Therefore higher output resolution will have more adjustment pixels b Under XGA output resolution the adjustment range are as follows 2x2 Corner adjustment in one side Horizontal 150 Pixels Vertical 100 pixels 3x3 curved 5x3 Curved adjustment Horizontal 150 Pixels Vertical 100 pixels Maximum adjustment range in one side Horizontal 300 Pixels Vertical 200 pixels Maximum adjustment range in ...

Страница 28: ...g to get uniform display across entire screen c After finish 5x3 and 9x5 alignment user can go back to 2x2 alignment to fine tune the corner positions d After 9x5 Curved alignment it still can t meet expected result or manual adjustment range is not enough user needs to apply Gwarp PC Tool for the geometry alignment e Gwarp PC tool can apply 5x5 9x9 and 17x17 grid pattern adjustment It also has do...

Страница 29: ...wo grids 32 or 64 pixels in overlap area to increase the flexibility for accurate alignment between adjacent projectors c 9x5 Curved alignment for two projector edge blending area as an example in 1024 resolution If the overlap is 256 pixels 25 in XGA resolution total adjusting points are 15 User will have less adjustment flexibility If increasing two grids 64 pixels to 320 overlap pixels user can...

Страница 30: ... level uplift in non overlapped area to compensate light leakage in projectors Corner to do precise Offset location alignment Shift shift the location in edge blend area In some case it may help color fine tune Shift can also do Edge Mask for non overlap edges with black background Color to do discrete color adjustment for individual projector 14 5 1 Edge selection and settings a Edge is to select...

Страница 31: ...d Please note a User needs to press Enter key after selecting gamma value to see the result b Banding effect in edge blending area is related to projector color setting and gamma curve The User needs to select correct edge for edge blending For 3 projector edge blending as example To select Left Edge for RH projector To select Right Edge for LH projector To select both Right Edge Left Edge for cen...

Страница 32: ...k environment In overlapped area the offset value is the sum from two projectors Low contrast ratio projector will be more serious Left picture is to show banding effect in edge blending area This issue is related to many factors Screen gain value under 1 5 is recommended Projector should be the same model with the same gamma and Display Mode settings Usually DLP projector will get better result S...

Страница 33: ...ending border The maximum difference should be under 300 pixels c Projector display imager such as DMD LCD and LCOS will have some image borders due to active display window is not at full range of the imager In dark environment viewer may see this kind of black level uplift in image borders It is outside active display area and can t be corrected User can find Non transition and Transition offset...

Страница 34: ... the top and bottom points to get accurate positions Maximum adjustment range is 300 pixels If users still see some deviation in the border line It means the geometry alignment in overlapped area is not accurate enough Please correct this issue from geometry alignment Shift is to shift the whole edge blending area to other location The width of the edge blending area will remain the same and only ...

Страница 35: ...are system can execute complete edge blending function without Gwarp PC tool In below conditions Gwarp PC tool may be still necessary in edge blending operation a The grid pattern for manual geometry alignment is up to 9 5 only It can meet most of the application requirements However if the screen is irregular curve or more precise alignment is required Gwarp PC tool is needed for further geometry...

Страница 36: ...olled by Gwarp PC tool If only some projectors need Gwarp alignment user can set the grid size with 32x32 pixels to match manual alignment grid size 14 6 3 Gwarp operation 14 6 3 1 System connection Connect G 7106 and PC via USB type B cable The interface is standard Windows HID and no special driver is required Open Gwarp exe Click Connect to connect COM port After connection it will show output ...

Страница 37: ... to 2x2 alignment and will not affect curved alignment result For edge blending please align all the grids in edge blending area stacked together to ensure clear image can be obtained After finish geometry alignment user needs to execute Video wall setting and Edge Blend in Gwarp2 or GeoBox hardware system to complete the whole edge blending process 14 6 3 3 Video Wall Video wall settings include ...

Страница 38: ...After save the file please turn off Pattern in Gwarp2 Hotkey on keyboard CTRL P so that user can see the system OSD through keypad or remote controller Next step is to activate GeoBox OSD to load Gwarp result under Anyplace Gwarp menu Select the same UserMap as saved in Gwarp2 to load the result into GeoBox Please combine with Video Wall and Edge Blend functions through OSD to complete edge blendi...

Страница 39: ...ctivate Options Menu by Front Panel keypad or Remote Controller In Information menu it will show the information in GeoBox such as output mode input mode Model name and Microcode version In Reset menu three types of Reset can be done Reset All reset Video Wall and reset Anyplace function In Language menu three languages can be selected as OSD Language English Simplified Chinese and Traditional Chi...

Страница 40: ...eat Rate OSD Button Repeat Rate Off OSD only responds once when every time OSD key is pressed Default OSD will respond slowly at the beginning but will increase the speed of the response when OSD key is pressed continuously Slow OSD behavior is similar to Default but the response speed will be slower than Default 15 4 2 Menu Time Out Under Accessibility menu there are four sub menu OSD Button Repe...

Страница 41: ...omplete system through signal source 15 5 Setting 15 5 1 Audio Mute There are 4 items under Settings menu Mute Audi mute or enable Box ID Set control ID Profile Save profile settings Network set RS232 and network control To set the time to show Splash screen If zero is selected then the splash screen will not be showed during system booting up period If it is set to 60 G 106 will automatically Pow...

Страница 42: ...ching Mode is only available when the signal change is in same vertical frequency such as within NTSC or Pal If the input timing change is between NTSC or PAL there will be still temporary signal break and the display devices will re synchronize the input signal again When Frame Lock is Disable GeoBox will shorten the time for mode change The system will also conduct HDCP verification This verific...

Страница 43: ...rofile setting function to show different display styles in the applications If you have 3x1 display setup 1 User can implement Switching among different input ports 3 projector edge blending as one seamless screen all in one Two projector edge blended and one independent display 2 1 All projector display different content 1 1 1 2 User can switch among different display styles profiles within seco...

Страница 44: ...implemented via RS 232 USB Ethernet or other forthcoming communication methods Detailed RS 232 protocol can be provided as needed 15 5 5 2 RS232 setting a Serial port setup b Terminal setup Two choices under Network menu RS232 Ethernet User can only select one control method between RS232 and Ethernet If no addition Ethernet module in GeoBox only RS232 can be selected ...

Страница 45: ... through RJ45 User can save up to 5 settings into Profile User can connect this RS232 controller with each G 106 through RS232 cable in parallel Click Profile button in RS232 controller to power on off the system or select display Profile If separate RS232 control is required user needs to set different Box ID for each G 106 and put ID into RS232 command ...

Страница 46: ...WiFi connection to control OSD operation or implement RS232 commands Use Ethernet cable to connect GeoBox and WiFi router through LAN port Connect WiFi between PC or smart phone and WiFi Router Activate Ethernet OSD Options Setting Ethernet Select HDCP IP then user should see IP Address If not please click Renew in OSD menu User should see IP address If still fails please unplug WiFi Router or tur...

Страница 47: ...fter connection it will show below content in the webpage It includes virtual keys for the operation of the OSD menu If user has Ethernet connection problem please power ON OFF GeoBox or WiFi router again GeoBox Static IP can be programmed through OSD keypad or remote controller to have the same domain name in network User can connect the system through IP address User can also select Static IP It...

Страница 48: ... Different display modes may show different final image aspect ratio User can ultilize different EDID setting to change input signal timing and get different output aspect ratio Activate EDID setting menu Options Setting EDID Use IR remote controller to select desired EDID After select EDID signal source will auto change the output timing setting Press INFO key to check if the input and output tim...

Страница 49: ...gain value under 1 0 will be recommended to avoid color difference at different viewing angles c Motorized screen position may be shifted from time to time It will affect the image stacking in edge blending area and may cause blurred image Fixed screen is recommended 17 Projector Selection and settings a The projectors for the edge blending should be the same model and the same production lot If t...

Страница 50: ...ctor with big ZOOM and lens shift will be more convenient for the installation h Ultra short throw ratio projector is not suitable for curved screen display due to too much image position distortion It will increase geometry alignment and cause lower video quality The focus issue in the projector is also one of the concern ...

Страница 51: ...vel adjustment for each projector 9 One PC tool can control 4 processing channels simultaneously 10 Able to perform flat curved screen seamless edge blending including irregular curved screen and 360 degrees curved screen Video Wall 1 Magnify scroll pan through all inputs 2 Image split cropping and assign display location 3 Pixel based overlap adjustment in all edges up to 15x15 matrix displays 4 ...

Страница 52: ...nt features for system integrators 1 Reliable and durable design for long term industrial and commercial applications 2 Able to use low cost projector no lens shift warping or edge blend function are required 3 Full functional keypads IR control 4 ID for each GeoBox Convenient for system installation and control through IR RS232 and Ethernet 5 Gwarp PC tool is available to control G 106 through US...

Страница 53: ...G 106 52 19 Revision History Revision Date Originator Comments V 1 01 2016 11 10 Steve Wang First revision ...

Отзывы: