VMS CS-I-VZ Скачать руководство пользователя страница 3

ins or setting Internet

’s security level to default. For further details, please refer to the User’s Manual in the supplied 

CD. 


ActiveX Controls and Plug-ins Settings 

Internet Security Level 

Step 1:

  Start the Internet Explorer (IE). 

Step 2: 

Select  <Tools>  from  the  main  menu  of  the 


browser. Then click on <Internet Options>. 

Step 3: 

Click  on  the  <Security>  tab  and  select 


<Internet>,  and  click  on  <Custom  level>  to 


change ActiveX settings. 

Step 4: 

Set 

“ActiveX  controls  and  plug-ins” items  to 


<Prompt> or <Enable>.


Step 1:

  Start the Internet Explorer (IE). 

Step 2: 

Select  <Tools>  from  the  main  menu  of  the 


browser. Then click on <Internet Options>. 

Step 3: 

Click  on  the  <Security>  tab  and  select 


<Internet>. 

Step 4:

  Down the page, click <Default Level> and click 


on  <OK>  to  confirm  the  setting.  Close  the 


browser window, and open a new one later for 


accessing the IP camera.


Camera Login 


The default IP address of the camera is: 

192.168.0.250

. Therefore, to access the camera for the first time, please 

set the IP address of the PC as: 192.168.0.XXX; for example: 


IP Address: 192.168.0.100 

Subnet Mask: 255.255.255.0 


Login ID and Password 

  Key in the camera

’s IP address in the URL bar of the web browser window and hit on “Enter”.  

  Enter the default username (

Admin

) and password (

1234

) in the prompt request dialogue. Note that username 

is case sensitive. 


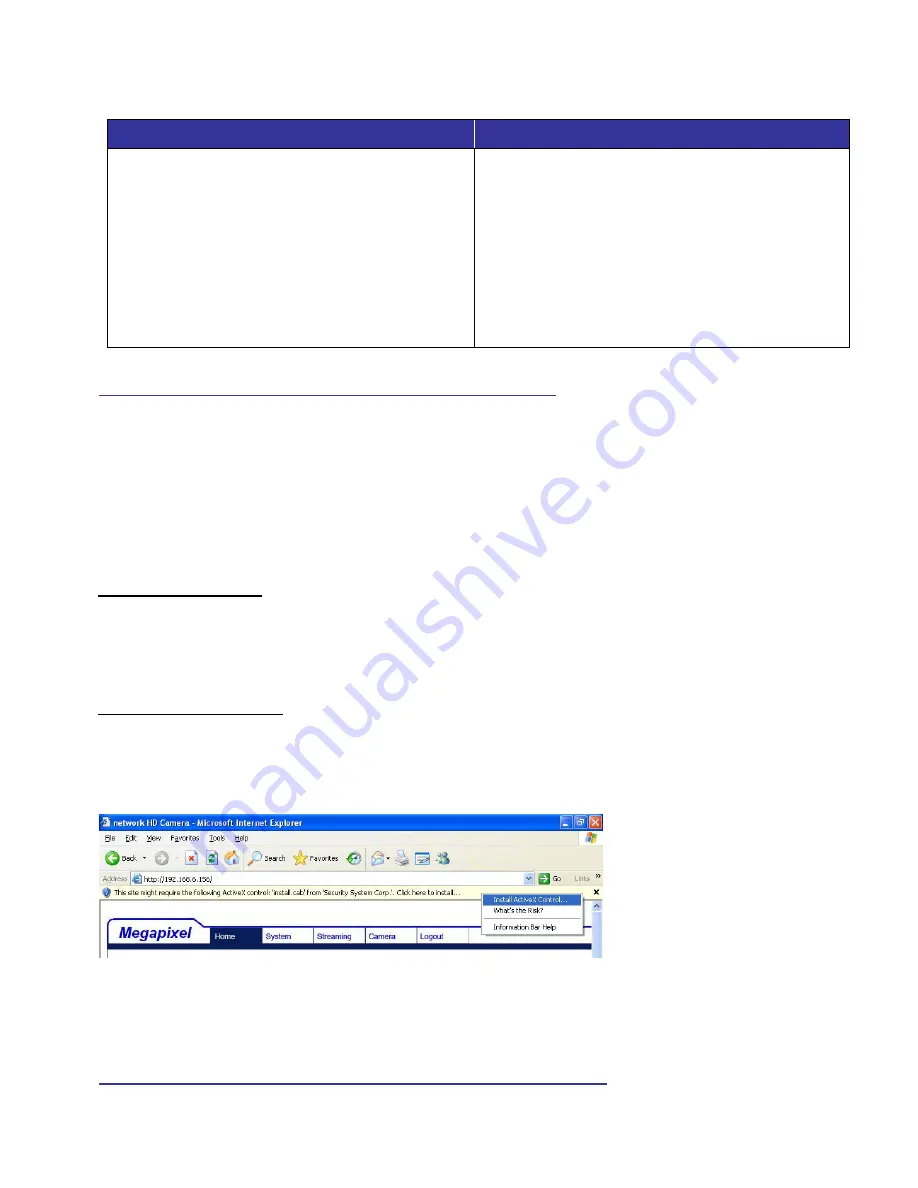
Install the ActiveX Control 

  After connecting to the camera, the request for installing the ActiveX control will appear just below the URL bar. 

  Right  click  on  the  information  bar,  and  then  click  on  <Install  ActiveX  Control

…>  to  permit  ActiveX  control 

installation. 


  In the pop-up security warning window, click on <Install> to start downloading DC Viewer software on the PC. 

  Click on <Finish> after DC Viewer installation is completed. 


Browser-based Viewer  


Содержание CS-I-VZ

Страница 1: ...era s Connectors No Connector Definition 1 Audio I O Two way audio transmission 2 Power LED For power connection indication green light 3 Default Button Press the button with a proper tool for at least 20 seconds to restore the system 4 RJ 45 For network and PoE connections 5 Network LEDs For network connection and activity indication 6 Alarm I O 1 Alarm Out 5 GND 2 Alarm Out 6 D 3 Alarm In 7 D 4 ...

Страница 2: ... 45 connector of the camera and a Power Sourcing Equipment PSE switch NOTE If PoE is used make sure PSE is in used in the network Ethernet Cable Connection Connect one end of the Ethernet cable to the RJ 45 connector of the camera and plug the other end of the cable to the network switch or PC NOTE In some cases Ethernet crossover cable might be needed when connecting the camera directly to the PC...

Страница 3: ...ndow and open a new one later for accessing the IP camera Camera Login The default IP address of the camera is 192 168 0 250 Therefore to access the camera for the first time please set the IP address of the PC as 192 168 0 XXX for example IP Address 192 168 0 100 Subnet Mask 255 255 255 0 Login ID and Password Key in the camera s IP address in the URL bar of the web browser window and hit on Ente...

Страница 4: ... au E vmssales opticalsolutions com au E vmssales opticalsolutions com au P 61 2 9395 1400 P 61 3 9646 4166 P 61 2 6162 4600 F 61 2 9647 0014 F 61 3 9646 4155 F 61 2 6162 4605 NSW Sydney City QLD WA Unit 10 10 Bradford Street Unit 2 40 Borthwick Ave 28a Teddington Rd Alexandria NSW 2015 Murarrie QLD 4172 Burswood WA 6100 E vmssales opticalsolutions com au E vmssales opticalsolutions com au E vmssa...

Отзывы: