background image

Operation Manual 


Eccellenza Pod 


3


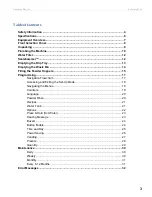
Table of Contents 


Safety Information ........................................................................................................ 4


Specifications................................................................................................................ 6


Equipment Overview ..................................................................................................... 7


Front Selection Panel ................................................................................................... 8


Unpacking ..................................................................................................................... 9


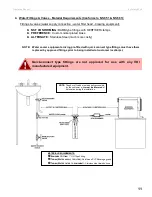
Plumbing the Machine ................................................................................................ 10


Water Filter .................................................................................................................. 12


Scalehammer™ ........................................................................................................... 12


Emptying the Drip Tray ............................................................................................... 13


Emptying the Waste Bin ............................................................................................. 14


Filling the Powder Hoppers ........................................................................................ 15


Programming............................................................................................................... 17


Navigation Flowchart ......................................................................................... 17


Accessing and Exiting the Set-Up Mode ............................................................ 18


Navigating the Menus ........................................................................................ 18


Counters ............................................................................................................ 19


Language .......................................................................................................... 20


Powder Rinse .................................................................................................... 20


Recipes ............................................................................................................. 21


Water Tank ........................................................................................................ 21


Options .............................................................................................................. 22


Press & Hold (Hot Water) .................................................................................. 23


Heating Message .............................................................................................. 23


Buzzer ............................................................................................................... 24


Button Enable .................................................................................................... 24


Time and Day .................................................................................................... 25


Power Saving .................................................................................................... 26


Vending ............................................................................................................. 27


Presets .............................................................................................................. 28


Quantity ............................................................................................................. 29


Maintenance ................................................................................................................ 30


Daily .................................................................................................................. 30


Weekly .............................................................................................................. 30


Monthly .............................................................................................................. 31


Every 6-12 Months ............................................................................................ 31


Error Messages ........................................................................................................... 32


Содержание Eccellenza Pod

Страница 1: ...VKI Publication 100283 001 May 2013 Operation Manual Customer Service 800 567 2951 Technical Support 888 854 0207 ...

Страница 2: ...Eccellenza Pod Operation Manual 2 ...

Страница 3: ...Waste Bin 14 Filling the Powder Hoppers 15 Programming 17 Navigation Flowchart 17 Accessing and Exiting the Set Up Mode 18 Navigating the Menus 18 Counters 19 Language 20 Powder Rinse 20 Recipes 21 Water Tank 21 Options 22 Press Hold Hot Water 23 Heating Message 23 Buzzer 24 Button Enable 24 Time and Day 25 Power Saving 26 Vending 27 Presets 28 Quantity 29 Maintenance 30 Daily 30 Weekly 30 Monthly...

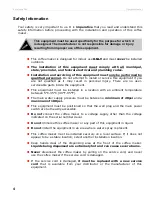
Страница 4: ...ipment must be positioned so that the wall plug and the main power switch are both easily accessible Do not connect the coffee maker to a voltage supply other than the voltage indicated on the serial number decal Do not immerse this coffee maker or any part of this equipment in liquid Do not install the equipment in an area where water spray is present This coffee maker must be installed securely ...

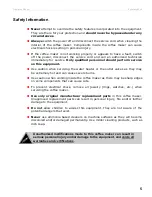
Страница 5: ...r heater or the outlet valves as they may be extremely hot and can cause severe burns Use caution when working inside the coffee maker as there may be sharp edges on some components that can cause cuts To prevent electrical shock remove all jewelry rings watches etc when servicing the coffee maker Use only original manufacturer replacement parts in this coffee maker Unapproved replacement parts ca...

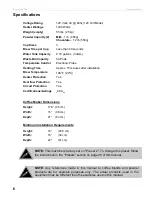
Страница 6: ...emperature 198 F 92 C Heater Protection Yes Overflow Protection Yes Circuit Protection Yes Certifications Listings cCSAus Coffee Maker Dimensions Height 17 8 45 cm Width 15 38 cm Depth 21 53 cm Minimum Installation Requirements Height 18 45 5 cm Width 15 38 cm Depth 24 61 cm NOTE Any references made in this manual to coffee blends and powder products are for example purposes only The actual produc...

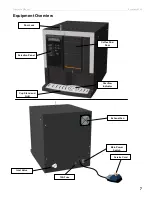
Страница 7: ...Operation Manual Eccellenza Pod 7 Equipment Overview Coffee Pod Door Cup Stand and Grill Selection Panel Door Lock Overflow Indicator Exhaust Fan Main Power Switch Inlet Valve 15A Fuse Service Cord ...

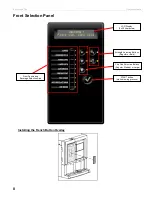
Страница 8: ...ion Panel Installing the French Button Overlay LCD Display 2 x 20 characters Strength Selection Buttons Regular or Bold Cup Size Selection Buttons Regular Medium or Large START button starts brewing process Front Fascia and Beverage Selection Area ...

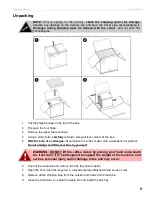
Страница 9: ...keys are in a small envelope attached to the service cord 8 Remove all the shipping tape from the outside and inside of the machine 9 Close the front door re install the waste bin and install the drip tray WARNING DO NOT lift the coffee maker by placing your hand underneath the front door It is not designed to support the weight of the machine and serious personal injury and or damage to the unit ...

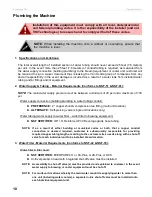
Страница 10: ...FIED 3 8 I D Reinforced PVC Beverage grade hose tubing NOTE If as a result of either building or municipal codes or both that a copper conduit connection is deemed required customer is subsequently responsible for providing required copper tubing length according to the customer site s needs along with a shut off valve for each individual unit to be installed at said location 3 Water Filter Materi...

Страница 11: ...ent arriving pre fitted with quick connect type fittings must have them replaced by approved fittings prior to being installed at customer location s NOTE The shut off valve must be easily accessible by the customer who must be informed of its location during the installation MATERIAL REQUIREMENTS EQUIPMENT FITTING 1 GH Type Fitting TUBING WATER SUPPLY TO FILTER Reinforced PVC Beverage grade TUBIN...

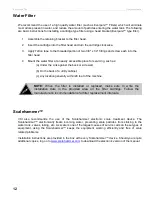
Страница 12: ...de wall b On the back of a utility cabinet c Any location generally within 20 feet of the machine Scalehammer VKI also recommends the use of the Scalehammer electronic scale treatment device The Scalehammer electronically treats incoming water preventing scale particles from sticking to the water tank valves tubing etc As scale is one of the largest causes of service calls on these types of equipm...

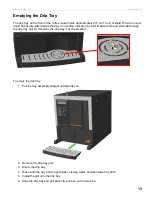
Страница 13: ...tor a small float will rise and protrude through the drip tray grill At this point the drip tray must be emptied To empty the drip tray 1 Pull the tray assembly straight out towards you 2 Remove the drip tray grill 3 Empty the drip tray 4 Rinse both the tray and the grill under running water and then towel dry both 5 Install the grill onto the drip tray 6 Slide the drip tray and grill back into po...

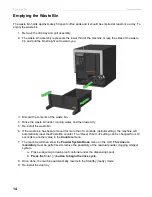
Страница 14: ...ry 5 Re install the waste bin 6 If the waste bin has been removed for more than 10 seconds default setting the machine will automatically reset the Waste Bin counter The Reset Time Out setting can be changed from 10 seconds to another value in the Counters menu 7 The machine will then show the Powder System Rinse menu on the LCD This rinse is mandatory must be performed to reduce the possibility o...

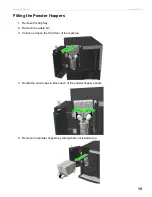
Страница 15: ...ng the Powder Hoppers 1 Remove the drip tray 2 Remove the waste bin 3 Unlock and open the front door of the machine 4 Rotate the spout caps to block each of the powder hopper spouts 5 Remove the powder hoppers by sliding them out towards you ...

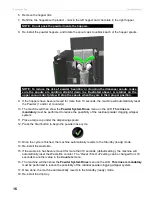
Страница 16: ...how the Powder System Rinse menu on the LCD This rinse is mandatory must be performed to reduce the possibility of the residual powder clogging whipper system 11 Place a large cup under the dispensing spouts 12 Press the Start button to begin the powder rinse cycle 13 Once the cycle is finished the machine automatically reverts to the Standby ready mode 14 Re install the waste bin 15 If the waste ...

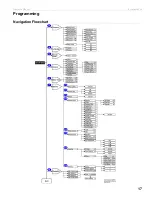
Страница 17: ...Operation Manual Eccellenza Pod 17 Programming Navigation Flowchart ...

Страница 18: ...ting through the Set Up mode of the equipment The buttons and their functions are identified in the table below Button Function for Navigating Scroll UP through the menus in the Set Up Increase values while in a specific selection in the Set Up Scroll DOWN through the menus in the Set Up Decrease values while in a specific selection in the Set Up Enter Button o Enter a menu o Enter a specific sele...

Страница 19: ...verages dispensed specialty beverages are not included Pod Powder this counter displays the number of specialty coffee beverages dispensed Powder Only this counter displays the number of straight powder beverages dispensed non pod beverages 7 To reset the counters scroll to the Clear All option and press the Enter button NOTE Selecting the Clear All option resets all of the resettable counters to ...

Страница 20: ...h Powder Rinse Access this menu to periodically rinse the Powder System the whipper motor whipper components and hoses To access the powder rinse cycle 1 Enter the Set Up mode and scroll to the Powder Rinse menu 2 Place a large cup or leak proof container under the dispensing spout 3 Press the Enter button to begin the rinse cycle 4 Repeat step 3 if more rinsing is required NOTE The Powder System ...

Страница 21: ...rease the setting as required 8 Press the Enter button to save the change Water Tank The Set Point for the water tank temperature can adjusted in this menu please note that if using powdered milk the maximum temperature should never exceed 92 C or 197 F The Vend Enable feature which prevents the machine from being used until the pre set minimum temperature is reached is also set while in this menu...

Страница 22: ...ration Manual 22 Options The Options section of the Set Up allows you to change settings that impact the functionality of the machine These options are described in greater detail in the next several pages of this manual ...

Страница 23: ...utton 5 Scroll UP to the setting required and then press the Enter button to save the changes Heating Message This option tells the machine to display the heating message if the water in the tank is not up to proper brewing temperature This menu allows you to set the way this message is displayed or to switch it off completely To set the Reminder Messages 1 Enter the Set Up mode and scroll to the ...

Страница 24: ...e Enter button to access this option 4 Scroll to the setting required and press the Enter button Button Enable In this menu you can set the beverage defaults and disable any button that is not going to be used on the selection panel To set the defaults 1 Enter the Set Up mode and scroll to the Options menu 2 Press the Enter button 3 Scroll to the Button Enable menu and press the Enter button to ac...

Страница 25: ...me and day are not displayed on the LCD To set the time and day 1 Enter the Set Up mode and scroll to the Options menu 2 Press the Enter button 3 Scroll to the Time and Day menu and press the Enter button to access this option 4 To set the time select the Time option and press the Enter button 5 Use the Regular or Bold Strength buttons to set the Hour Once set press the Enter button to shift to th...

Страница 26: ...nd press Enter 2 Use the Regular or Bold Strength buttons to set the Hour Once set press the Enter button to shift to the Minutes setting Once again use the Regular or Bold Strength buttons to set the Minutes Once set press the Enter button to save the settings To set the Wake Time ending time of the Power Saving option 1 From the Power Saving menu select the Wake Time option and press Enter 2 Use...

Страница 27: ...ble Changer enable or disable the coin changer unit Force Vending when enabled the user is forced to purchase a beverage and cannot cancel the transaction The user s funds remain as a credit until a beverage is dispensed If set to Smart the coin return feature is disabled when a 1 or 2 coin is inserted 5 Using the Strength buttons toggle the setting for a device to ON or OFF 6 Press the Enter butt...

Страница 28: ...eset 3 8 oz 10 oz 12 oz 4 Using the main power switch at the rear of the machine switch the power OFF for ten seconds and then switch it back ON again The selected preset settings are now loaded To reset the machine settings to the factory default settings 1 Enter the Set Up mode and scroll to the Options menu and press the Enter button 2 Select the Reset to Default option 3 To reset press the Ent...

Страница 29: ...n to begin calibration The screen will display 6 The machine will now dispense a preset amount of water for several seconds Measure the quantity of water that is dispensed In this case we ll use 68ml as an example 7 Once done dispensing the screen will show the following 8 Press the Enter button to set the quantity measured 9 Use the Regular or Bold Strength buttons to increase or decrease the set...

Страница 30: ...erform a Whipper Rinse Cycle this should be done immediately after refilling the powder hoppers to flush any product that may have fallen into the whipper Wipe Exterior and Countertop using the clean towel wipe any coffee grounds and spills from the exterior of the machine and the countertop Weekly Wipe Interior Walls and Door using the clean towel wipe any spills from the interior of the machine ...

Страница 31: ...ld be emptied of product and given a thorough cleaning to remove stains and deposits that may have accumulated inside them Clean the Brewer to clean the brewer make a vend as you normally would however instead of inserting a coffee pod into the brewer you need to insert a special cleaning tab The hot water dissolves the cleaning tab which in turn cleans all of the areas in which it comes into cont...

Страница 32: ...eset the Waste Bin counter Fill Powder 1 Powder 1 dispenser is low and requires refilling Refill the dispenser for powder 1 Reset the Refill message for the Powder 1 dispenser Fill Powder 2 Powder 2 dispenser is low and requires refilling Refill the dispenser for powder 2 Reset the Refill message for the Powder 2 dispenser Heating Water Water inside the hot water tank is heating Normal operating m...

Страница 33: ...Error The thermister is not functioning correctly Replace the thermister Water Level Error The water tank is overfilling Clean the water level probes The water temperature may be too high lower the temperature Inlet valve may be leaking replace inlet valve Water Source Error The water tank is not filling with water At this point the water tank is not full and this message has to be reset To reset ...

Страница 34: ...Eccellenza Pod Operation Manual 34 ...

Страница 35: ...Operation Manual Eccellenza Pod 35 ...

Страница 36: ...Eccellenza Pod Operation Manual 36 ...

Отзывы: