background image

17

LED Indicators are located here:

ADJUSTING SOUND BAR SETTINGS

Press the button on the remote (indicated in the table below) to access the different functions and acoustic settings of the Sound Bar. The LED 

Indicators will behave differently with each function.
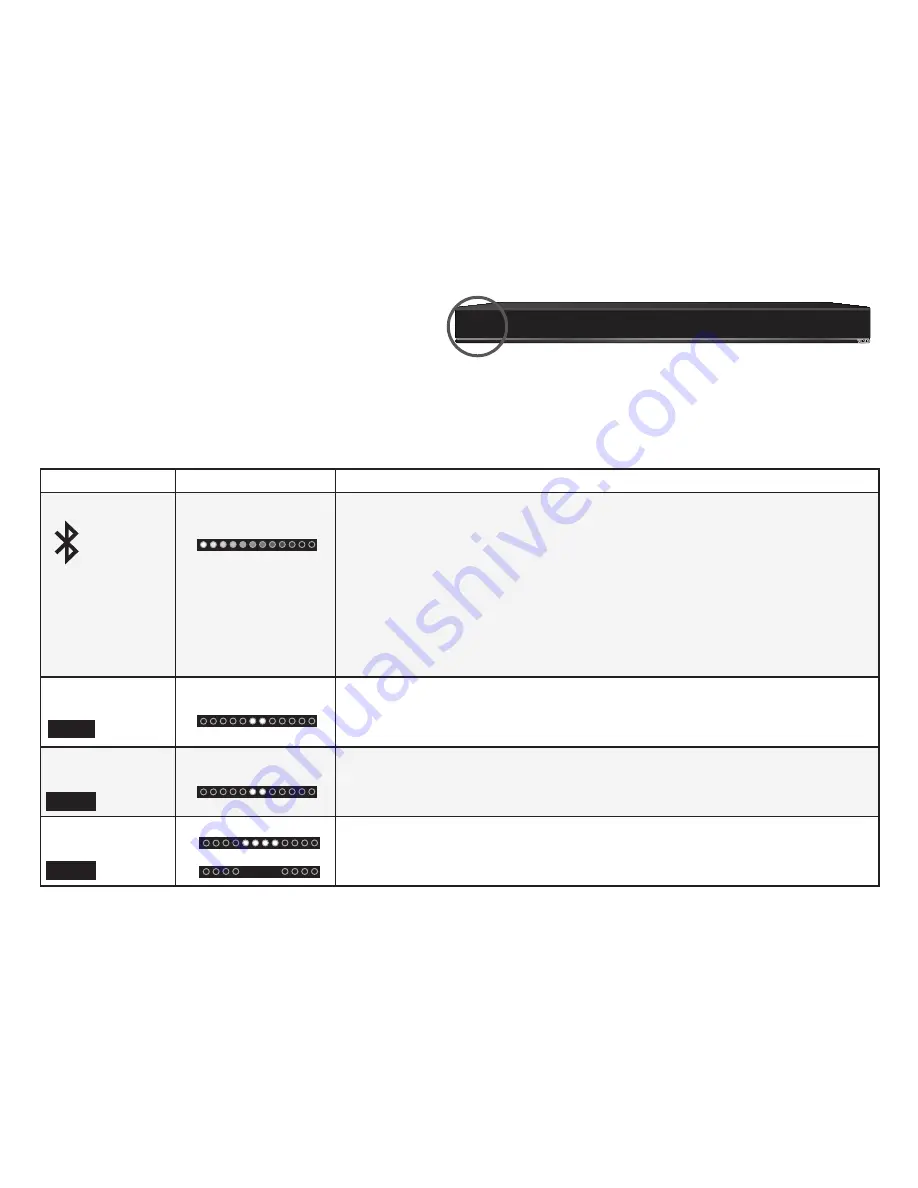
Function

LED Behavior

Description

Bluetooth Pairing

(When searching for device) 

Flash from Left to Right  

and back continuously.

Hold the 

Bluetooth

 button on the remote for 5 seconds. The Sound Bar switches 

to Bluetooth input and enters discoverable mode, where the  LED array enters 

“knight rider” sequence.  

Note

:  The “knight rider” sequence steps the LED array 

from 1 to 12 and from 12 back to 1, a single LED at a time every 80 milliseconds.

You can now search for the Sound Bar (VIZIO S4220w) using your Bluetooth 

Device. The sound bar will power down if no device is found.

Note:

 Set your Bluetooth device into pairing mode prior to the Sound Bar.

Further functionality definition can be found in the “Bluetooth” section of 

this document.  

Note

: On all models, this is a redundant feature – it can be 

accessed by a remote control IR command and by holding the 

Bluetooth


button on the Sound Bar.

Bass Levels


Two center LEDs 

indicate Bass level 0.

Press the 

Bass 

and

 Next/Previous

 button to increase/decrease the bass level. 

The LED indicators will move to the right with increasing levels and to the left with 

decreasing levels.

Treble Levels


Two center LEDs 

indicate Treble level 0.

Press the 

Treble

 button to increase/decrease the treble level. The LED indicators 

will move to the right with increasing levels and to the left with decreasing levels.

DTS TruVolume 

On/Off


TruVolume On:

TruVolume Off:

Press the 

TVOL

 button to enable/disable TruVolume. When enabled (On), 

TruVolume provides a consistent and comfortable volume level for a more 

enjoyable listening experience.

 Bass

 Treble

 TVol

Содержание S4220w-E4

Страница 1: ...QUICK START GUIDE Model S4220w E4 VIZIO ...

Страница 2: ...on use and maintenance Please read the following safety instructions before operating your Unit Keep these instructions in a safe place for future reference Read these instructions Keep these instructions Heed all warnings Follow all instructions Do not use this apparatus near water Clean only with a dry cloth Do not block any ventilation openings Install in accordance with the manufacturer s inst...

Страница 3: ...Connections 5 FIrst Time Setup 7 Bluetooth Pairing 12 Using Bluetooth Mode 13 Advanced Setup 14 Wall Mounting the Sound Bar 15 Adjusting Sound Bar Settings 17 Help Troubleshooting 19 One Year Limited Warranty 22 Legal Compliance 23 TABLE OF CONTENTS ...

Страница 4: ...ide Remote Control with Batteries High Definition Sound Bar Digital Optical Cable Stereo RCA to 3 5mm Audio Cable Coaxial Audio Cable Power Cable 2 x Sound Bar Wall Mount Brackets Wall Mount Template 2 x Wall Mount Screws Size M4 x 10 ...

Страница 5: ...5 CONTROLS CONNECTIONS Power Port Back of Sound Bar USB 5 USB Port Optical 4 Digital Optical Audio In Digital 3 Coaxial In Aux 2 Analog Audio In Aux 1 Analog Audio In ...

Страница 6: ...6 Control Buttons are located here Back of Sound Bar Input Power Volume Bluetooth Input Hold to force pair See Bluetooth Pairing on page 12 ...

Страница 7: ... to ONE TV audio output as shown 1 Connection ports are located here AND CONNECT IT TO YOUR TV CHOOSE ONE CABLE BETTER GOOD GOOD GOOD BETTER BETTER 3 5MM TO RCA CABLE 3 5MM TO RCA CABLE DIGITAL COAXIAL CABLE DIGITAL OPTICAL CABLE When using either of the Digital Inputs if there is no audio A try setting the TV output to PCM or B Connect directly to your Blu ray other source some TVs do not pass th...

Страница 8: ...8 2 3 Connect a power cable to the sound bar Plug the power cable into a power outlet ...

Страница 9: ...9 For the best surround sound experience position the sound bar as shown The sound bar should be close to ear level Sound bar is centered below the TV 3 ...

Страница 10: ...gently slide the battery cover back into place 6 Turn your TV on then press the Power button on the remote to turn the Sound Bar on Press the Input button to switch between audio sources For example if you connected your TV to Input 1 set the sound bar to Input 1 Hardware setup is complete Power Input Top Top ...

Страница 11: ...hange input source Enter Play Pause Press to select an option Press to play or pause Next Press to skip to the next track Changes Treble and Bass levels Treble Press to enter treble adjustment mode Bass Press to enter bass adjustment mode TruVolume Press to enable disable TruVolume TruSurround HD Press to enable disable TruSurround HD Bluetooth Press to enter Bluetooth input To enter force pair mo...

Страница 12: ...ing Mode the LED Indicators on the Display Panel on the front of the Sound Bar will light sequentially from left to right and back again Once the device is paired the LED Indicators will stop flashing 2 You can now search for the Sound Bar VIZIO S4220w using your Bluetooth device For more information see the documentation that came with your device 3 Play audio from your Bluetooth device Volume ca...

Страница 13: ...pared to a wired connection Try the following if your sound quality is less than optimal If you hear any break up or disconnect while streaming music from your device move the source device closer to the Sound Bar Be sure that there are no solid obstructions in the line of sight between the Sound Bar and the source device Other wireless devices can affect Bluetooth range including wireless securit...

Страница 14: ...o listen to a device change the input source on the Sound Bar Optical Coaxial and 3 5mm cables transmit audio only If connecting a video device you will need a separate video connection from the device to your TV Game Console Network Media Player Tablet MP3 Player Laptop USB THUMB DRIVE 3 5mm AUDIO CABLE DIGITAL COAXIAL CABLE RCA AUDIO CABLE Supports WAV file format playback only ...

Страница 15: ...r Wall Mount Screw Holes Insert and tighten twoWall Mount Screws with a Phillips head screwdriver into the Wall Mount Screw Holes 1 2 Place the included wall mounting template against the wall under your TV Mark the four bracket holes using a pencil ...

Страница 16: ...ywall or concrete anchors for brick concrete walls Wall mounting hardware is not included If you are unfamiliar with power tools or the layout of electrical wiring in the walls of your home consult a professional installer 15 75 in 400 mm Wall Mount Screw Screw Size M4 x 10 3 ...

Страница 17: ...vice is found Note Set your Bluetooth device into pairing mode prior to the Sound Bar Further functionality definition can be found in the Bluetooth section of this document Note On all models this is a redundant feature it can be accessed by a remote control IR command and by holding the Bluetooth button on the Sound Bar Bass Levels Two center LEDs indicate Bass level 0 Press the Bass and Next Pr...

Страница 18: ...vior Description DTS TruSurround On Off Surround On Surround Off Press the TSHD button to enable disable DTS TruSurround When enabled On TruSurround will produce a wider sound for a more enjoyable listening experience TSHD ...

Страница 19: ...io Your TV may be set to variable audio output Confirm that the audio output setting is set to FIXED or STANDARD not VARIABLE Consult your TV s user manual for more detailed information If using Bluetooth ensure that the volume on your source device is turned up and that the device is not muted I hear buzzing or humming Ensure all cables and wires are securely connected Connect a different source ...

Страница 20: ...ZIO com http store VIZIO com support Hours of operation Monday Friday 5 am to 9 pm PST Saturday Sunday 8 am to 4 pm PST The VIZIO support team is highly trained and is based in the United States We can help with New Product Setup Connecting Your Devices Technical Problems And More We speak English Se habla Español Nous parlons Français ...

Страница 21: ... The VIZIO E series LED TV is shattering the mold in a way only VIZIO can with high quality design and picture at the best value With a stunningly slim outer frame design and LED with 1080p Full HD for rich colors and vivid details this HDTV gives you the best picture at the best value VIZIO RECOMMENDS ...

Страница 22: ...imitations and Exclusions VIZIO s one year limited warranty only covers defects in materials and workmanship This warranty does not cover for example cosmetic damage normal wear and tear improper operation improper voltage supply or power surges signal issues damages from shipping acts of God any type of customer misuse modifications or adjustments as well as installation and set up issues or any ...

Страница 23: ... requirements for exposure to radio waves This device is designed and manufactured not to exceed the emission limits for exposure to radio frequency RF energy set by the Federal Communications Commission of the U S Government This device complies with FCC radiation exposure limits set forth for an uncontrolled environment IC Statement Operation is subject to the following two conditions 1 This dev...

Страница 24: ... 2014 VIZIO INC ALL RIGHTS RESERVED 140624MH US NC ...

Отзывы: