Vizio S3820w-C0NA Скачать руководство пользователя страница 29

3

Brancher le câble d'alimentation 

à la barre de son.

Brancher le câble d'alimentation 

dans une prise murale.

2

Содержание S3820w-C0NA

Страница 1: ...QUICK START GUIDE Model S3820w C0NA VIZIO...

Страница 2: ...es should be observed for its installation use and maintenance Please read the following safety instructions before operating your Unit Keep these instructions in a safe place for future reference Rea...

Страница 3: ...uide Remote Control with Batteries High Definition Sound Bar Digital Optical Cable Stereo RCA to 3 5mm Audio Cable Coaxial Audio Cable Power Cable 2 x Sound Bar Wall Mount Brackets Wall Mount Template...

Страница 4: ...CONTROLS CONNECTIONS Back of Sound Bar Power Port SUB OUT Subwoofer Out OPTICAL 4 Digital Optical Audio In DIGITAL 3 Coaxial In AUX 1 Analog Audio In AUX 2 Analog Audio In Service Port...

Страница 5: ...Control Buttons are located here Back of Sound Bar Input Power Volume Bluetooth Input Hold to force pair See Bluetooth Pairing for more information...

Страница 6: ...nual 1 AND CONNECT IT TO YOUR TV CHOOSE ONE CABLE BETTER GOOD GOOD GOOD BETTER BETTER 3 5MM TO RCA CABLE 3 5MM TO RCA CABLE DIGITAL COAXIAL CABLE DIGITAL OPTICAL CABLE When using either of the Digital...

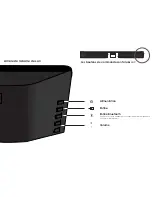
Страница 7: ...3 Connect the Power Cable to the Sound Bar Plug the Power Cable into a power outlet 2...

Страница 8: ...For the best surround sound experience position the Sound Bar as shown The Sound Bar should be close to ear level Sound Bar is centered below the TV 4...

Страница 9: ...tly slide the battery cover back into place 11 Turn your TV on then press the Power button on the remote to turn the Sound Bar on Press the Input button to switch between audio sources For example if...

Страница 10: ...nge input source Enter Play Pause Press to select an option Press to play or pause Next Press to skip to the next track Changes Treble and Bass levels Treble Press to enter treble adjustment mode Bass...

Страница 11: ...able disable TruVolume When enabled On TruVolume provides a consistent and comfortable volume level for a more enjoyable listening experience DTS TruSurround On Off TruSurround On TruSurround Off Pres...

Страница 12: ...e LED Indicators on the Display Panel on the front of the Sound Bar will light sequentially from left to right and back again Once the device is paired the LED Indicators will stop flashing 2 You can...

Страница 13: ...red to a wired connection Try the following if your sound quality is less than optimal If you hear any break up or disconnect while streaming music from your device move the source device closer to th...

Страница 14: ...listen to a device change the input source on the Sound Bar Optical Coaxial and 3 5mm cables transmit audio only If connecting a video device you will need a separate video connection from the device...

Страница 15: ...ass level to the center position 3 Power Off the Sound Bar and Subwoofer Connect an RCA cable from the Sound Bar to the Subwoofer 4 Power On the Sound Bar and Subwoofer 5 Manually adjust the SUB gain...

Страница 16: ...all Mount Screw Holes Insert and tighten twoWall Mount Screws with a Phillips head screwdriver into the Wall Mount Screw Holes 1 2 Place the included wall mounting template against the wall under your...

Страница 17: ...ll or concrete anchors for brick concrete walls Wall mounting hardware is not included If you are unfamiliar with power tools or the layout of electrical wiring in the walls of your home consult a pro...

Страница 18: ...rted format is present Set the source to output PCM Your TV may be set to variable audio output Confirm that the audio output setting is set to FIXED or STANDARD not VARIABLE Consult your TV s user ma...

Страница 19: ...IO com http store VIZIO com support Hours of operation Monday Friday 5 am to 9 pm PST Saturday Sunday 8 am to 4 pm PST The VIZIO support team is highly trained and is based in the United States We can...

Страница 20: ...The VIZIO E series LED TV is shattering the mold in a way only VIZIO can with high quality design and picture at the best value With a stunningly slim outer frame design and LED with 1080p Full HD for...

Страница 21: ...and Exclusions VIZIO s one year limited warranty only covers defects in materials and workmanship This warranty does not cover for example cosmetic damage normal wear and tear improper operation impr...

Страница 22: ...quirements for exposure to radio waves This device is designed and manufactured not to exceed the emission limits for exposure to radio frequency RF energy set by the Federal Communications Commission...

Страница 23: ...GUIDE DE D MARRAGE RAPIDE Mod le S3820w C0NA VIZIO...

Страница 24: ...les instructions de s curit suivantes avant de faire fonctionner votre unit Conservez ces instructions dans un lieu s r en vue d une future r f rence Lire ces instructions Conserver ces instructions...

Страница 25: ...vec piles Barre de son haute d finition C ble optique num rique C ble audio st r o RCA pour prise de 3 5 mm C ble audio coaxial C ble d alimentation 2 supports pour montage mural de la barre de son Mo...

Страница 26: ...re de la barre de son Port d alimentation SORTIE DU CAISSON Sortie du caisson de basse OPTIQUE 4 Entr e audio num rique optique NUM RIQUE 3 Entr e coaxiale AUX 1 Entr e audio analogue AUX 2 Entr e au...

Страница 27: ...es boutons de commande sont situ s ici Arri re de la barre de son Entr e Alimentation Volume Entr e Bluetooth Tenir pour forcer l appariement consultez l Appariement Bluetooth pour plus d informations...

Страница 28: ...NCHEZ LA VOTRE T L VISEUR CHOISISSEZ UN C BLE MEILLEUR BON BON BON MEILLEUR MEILLEUR 3 5 MM AU C BLE RCA 3 5 MM AU C BLE RCA C BLE COAXIAL NUM RIQUE C BLE OPTIQUE NUM RIQUE S il n y a pas d audio lors...

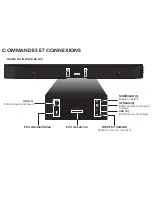
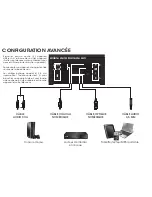
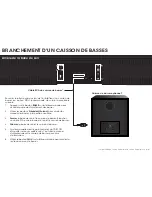
Страница 29: ...3 Brancher le c ble d alimentation la barre de son Brancher le c ble d alimentation dans une prise murale 2...

Страница 30: ...une meilleure exp rience de son ambiophonique placez la barre de son comme il est indiqu La barre de son devrait se trouver au niveau de l oreille La barre de son est plac e sous le t l viseur au mili...

Страница 31: ...sa place 11 Allumez votre t l viseur puis appuyez sur le bouton Alimentation de la t l commande pour mettre en marche la barre de son Appuyer sur le bouton Entr e pour basculer entre les sources audio...

Страница 32: ...e Entr e Jouer Pause Appuyez pour s lectionner une option Appuyez pour lire ou mettre en pause Suivant Appuyez pour passer la piste suivante Change les niveaux des aigus et des basses Aigu Appuyez pou...

Страница 33: ...On il fourni un niveau de volume uniforme et confortable pour une exp rience d coute des plus agr able DTS TruSurround Allum teint TruSurround activ TruSurround d sactiv Appuyer sur le bouton TSHD po...

Страница 34: ...etooth les indicateurs DEL sur le panneau avant de la barre de son s allumeront en s quence de gauche droite et de nouveau Une fois l appareil appari les indicateurs DEL arr teront de clignoter 2 Vous...

Страница 35: ...exion avec fils Si la qualit n est pas optimale essayer ce qui suit Si vous la musique est interrompue ou la connexion est perdue lorsque vous coutez de la musique en temps r el sur votre appareil d p...

Страница 36: ...r couter un appareil changer l entr e source de la barre de son Les c bles optique coaxial et 3 5 mm transmettent l audio seulement Si vous branchez un appareil vid o il vous faudra une connexioin vid...

Страница 37: ...osition centrale 3 Fermer la barre de son et le caisson de basses Brancher un c ble RCA entre la barre de son et le caisson de basses 4 Allumer la barre de son et le caisson de basses 5 Ajuster manuel...

Страница 38: ...NTRE LA BARRE DE SON ET VOTRE T L VISEUR Mod le de support mural 22 5 571 5 mm 2 Placez le mod le du support mural sur le mur sous votre t l viseur Marquez les emplacements des 4 trous des supports av...

Страница 39: ...n pour les murs en briques b ton Le mat riel n cessaire pour le montage mural n est pas inclus Si vous n tes pas familier avec les outils lectriques ou l agencement des c bles lectriques se trouvant d...

Страница 40: ...rmat non compatible est pr sent R gler la source la sortie PCM Votre t l viseur peut tre r gl sur une sortie audio variable V rifiez que la sortie audio est r gl e sur FIXED FIXE ou STANDARD et non VA...

Страница 41: ...p store VIZIO com support Heures d ouverture DU Lundi AU Vendredi 5 h 21 h HNP samedi ET dimanche De 8 h 16 h HNP L quipe de soutienVIZIO a une grande exp rience et est bas e aux tats Unis Nous pouvon...

Страница 42: ...t les d fauts de mat riaux et de fabrication Cette garantie ne couvre pas par exemple les dommages superficiels l usure normale la mauvaise utilisation l alimentation inappropri e de la tension ou les...

Страница 43: ...et fabriqu pour ne pas d passer les limites d mission concernant l exposition aux radiofr quences RF d termin es par la Federal Communications Commission FCC du gouvernement am ricain Cet appareil es...

Страница 44: ...2013 VIZIO INC ALL RIGHTS RESERVED 2013 VIZIO INC TOUS DROITS R SERV S 130510OC NC...

Отзывы: