background image

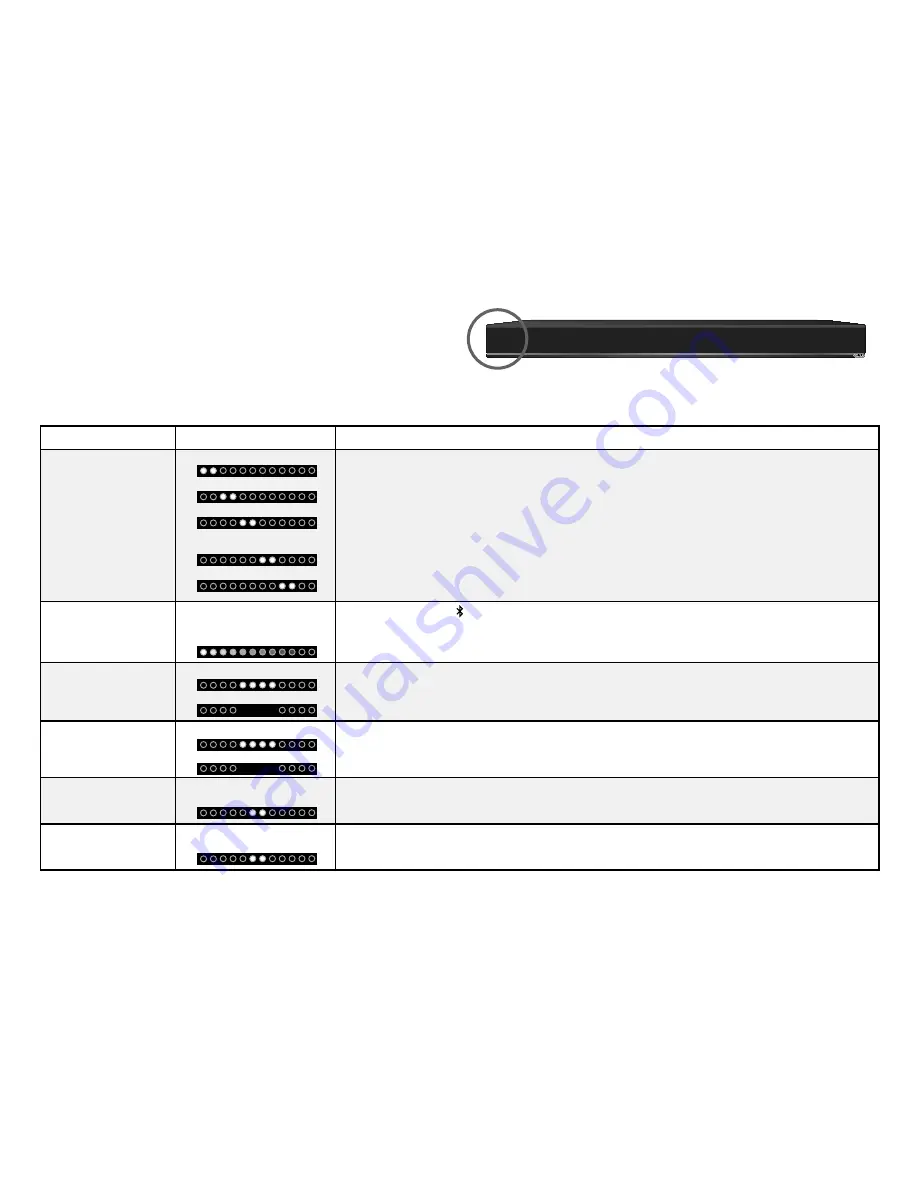
LED Indicators are located here:

The LED Indicators will behave differently with each button on the remote control.

LED INDICATORS

Function

LED Behavior

Description


Input

Press the 

INPUT

 button on the remote to cycle through each available input: 

• 

Analog Audio In - AUX (1)

• 

Analog Audio In - AUX (2)

• 

Coaxial In- Digital (3)

• 

Digital Optical Audio In - Optical (4)

• 

Bluetooth


Bluetooth Pairing

(When searching for device)


Flash from Left to Right  

and back continuously.

Press and hold the 


button on the remote. The Sound Bar will be discoverable for 15 

minutes.  You can now search for the Sound Bar (VIZIO S3821w) using your Bluetooth Device. 

The sound bar will power down if no device is found.

Note:

 Set your Bluetooth device into pairing mode prior to the Sound Bar.


DTS TruVolume  

On/Off

TruVolume On:

TruVolume Off:

Press the 

TVOL

 button to enable/disable TruVolume. When enabled (On), TruVolume 

provides a consistent and comfortable volume level for a more enjoyable listening 

experience.


DTS TruSurround  

On/Off

TruSurround On:

TruSurround Off:

Press the 

TSHD

 button to enable/disable DTS TruSurround. When enabled (On), all inputs will 

produce virtual surround sound. When disabled (Off), all sources will playback in 2.1 stereo.


Treble Levels

Two center LEDs indicate 

Treble level 0.

Press the 

TREBLE

 button then press the 

Next/Previous

 button to increase/decrease the 

treble level. The LED indicators will move to the right with increasing levels and to the left with 

decreasing levels.


Bass Levels

Two center LEDs indicate 

Bass level 0.

Press the 

BASS

 button then press the 

Next/Previous

 button to increase/decrease the bass 

level. The LED indicators will move to the right with increasing levels and to the left with 

decreasing levels.

Analog Audio In - AUX (1)

Analog Audio In - AUX (2)

Coaxial In - Digital (3)

Digital Optical Audio In - 

Optical (4)

Bluetooth

Содержание S2920w-C0R

Страница 1: ...QUICK START GUIDE Model S2920w C0R VIZIO...

Страница 2: ...es should be observed for its installation use and maintenance Please read the following safety instructions before operating your Unit Keep these instructions in a safe place for future reference Rea...

Страница 3: ...nition Sound Bar Power Adapter 2 x Sound Bar Wall Mount Brackets This Quick Start Guide Digital Optical Cable Wall Mount Template Remote Control with Batteries Stereo RCA to 3 5mm Audio Cable 2 x Wall...

Страница 4: ...ECTIONS Back of Sound Bar Power Port Service Port OPTICAL 4 Digital Optical Audio In DIGITAL 3 Coaxial In SUB OUT Subwoofer Out AUX 1 Analog Audio In AUX 2 Analog Audio In For use by authorized servic...

Страница 5: ...Control Buttons are located here Back of Sound Bar Input Power Volume Bluetooth Input Hold to force pair See Bluetooth Pairing for more information...

Страница 6: ...d Bar Note Not all TVs have the audio outputs shown above To connect the Sound Bar directly to your other devices Blu ray player game system etc see your device s user manual Coaxial cable not include...

Страница 7: ...3 Connect the Power Adapter to the Sound Bar Plug the Power Adapter into a power outlet 2...

Страница 8: ...For the best surround sound experience position the Sound Bar as shown The Sound Bar should be close to ear level Sound Bar is centered below the TV 4...

Страница 9: ...tly slide the battery cover back into place 7 Turn your TV on then press the Power button on the remote to turn the Sound Bar on Press the Input button to switch between audio sources For example if y...

Страница 10: ...nge input source Enter Play Pause Press to select an option Press to play or pause Next Press to skip to the next track Changes Treble and Bass levels Treble Press to enter treble adjustment mode Bass...

Страница 11: ...button to enable disable TruVolume When enabled On TruVolume provides a consistent and comfortable volume level for a more enjoyable listening experience DTS TruSurround On Off TruSurround On TruSurr...

Страница 12: ...n the Display Panel on the front of the Sound Bar will light sequentially from left to right and back again Once the device is paired the LED Indicators will stop flashing 2 You can now search for the...

Страница 13: ...red to a wired connection Try the following if your sound quality is less than optimal If you hear any break up or disconnect while streaming music from your device move the source device closer to th...

Страница 14: ...listen to a device change the input source on the Sound Bar Optical Coaxial and 3 5mm cables transmit audio only If connecting a video device you will need a separate video connection from the device...

Страница 15: ...ass level to the center position 3 Power Off the Sound Bar and Subwoofer Connect an RCA cable from the sound bar to the subwoofer 4 Power On the Sound Bar and Subwoofer 5 Manually adjust the SUB gain...

Страница 16: ...all Mount Screw Holes Insert and tighten twoWall Mount Screws with a Phillips head screwdriver into the Wall Mount Screw Holes 1 2 Place the included wall mounting template against the wall under your...

Страница 17: ...all or concrete anchors for brick concrete walls Wall mounting hardware is not included If you are unfamiliar with power tools or the layout of electrical wiring in the walls of your home consult a pr...

Страница 18: ...ve set VIZIO TV Remote Control Enable VIZIO TV Remote Disable VIZIO TV Remote Enable disable the use of a VIZIO TV remote control to power on and adjust the volume of the sound bar To enable disable t...

Страница 19: ...IO com http store VIZIO com support Hours of operation Monday Friday 5 am to 9 pm PST Saturday Sunday 8 am to 4 pm PST The VIZIO support team is highly trained and is based in the United States We can...

Страница 20: ...the streaming application e g Pandora doesn t support the Back button HELP TROUBLESHOOTING There is no sound Increase the volume Press Volume Up on the remote control or on the top of your Sound Bar...

Страница 21: ...LED Smart TV with Theater 3D has arrived With an ultra modern design brilliant Razor LED picture quality and the new faster VIZIO Internet Apps Plus Smart TV experience it s the must have entertainmen...

Страница 22: ...tations and Exclusions VIZIO s one year limited warranty only covers defects in materials and workmanship This warranty does not cover for example cosmetic damage normal wear and tear improper operati...

Страница 23: ...Exposure Information This device meets the government s requirements for exposure to radio waves This device is designed and manufactured not to exceed the emission limits for exposure to radio frequ...

Страница 24: ...2013 VIZIO INC ALL RIGHTS RESERVED 130625OC NC...

Отзывы: