background image

8


E190VA / E220VA / E260VA

Changing the Parental Control Passcode ............................................ 27
Resetting the Content Locks ............................................................... 27

Viewing System Info and Resetting to Factory Defaults ......................... 28

Displaying System Information ............................................................ 28
Restoring the TV to the Factory Default Settingss............................... 28
Restarting the Setup App .................................................................... 28

Setting Up Closed Captioning ................................................................ 29

Changing the Appearance of Digital Closed Captions ........................ 29

Troubleshooting & Technical Support........................................30

The TV displays “No Signal.” ............................................................... 30
There is no power. ................................................................................ 30
The power is on, but there is no image on the screen. ........................ 30
There is no sound. ............................................................................... 30
The colors on the TV don’t look right. .................................................. 30
The buttons on the remote aren’t working. .......................................... 30
The image quality is not good. ............................................................. 30
The picture is distorted. ....................................................................... 30
The display image does not cover the entire screen. .......................... 31
The TV has pixels (dots) that are always dark or always lit. ................ 31
I see “noise” or static on the screen. ................................................... 31
When I change input source, the volume changes. ............................. 31
When I change input source, the display image changes size. ........... 31

Specifications ..........................................................................32

Limited Warranty .....................................................................34

ON PARTS AND LABOR ......................................................................... 34

Parts and Labor ................................................................................... 34
Type of Service .................................................................................... 34
Limitations and Exclusions .................................................................. 34
Personal Data ...................................................................................... 34
Zero Bright Pixel Defect Guarantee ..................................................... 34

Legal & Compliance .................................................................35

FCC Class B Radio Interference Statement ........................................ 35
Notice ................................................................................................... 35
FCC warning ........................................................................................ 35
Caution ................................................................................................. 35
Open Source Software Notice ............................................................. 35

Содержание Razor LED E220VA

Страница 1: ...E190VA E220VA E260VA user manual RAZOR LED LCD HDTV...

Страница 2: ...r features will increase power consumption that could exceed the limits necessary to qualify for ENERGY STAR rating SRS TruSurround HD and SRS TruVolume are trademarks of SRS Labs Inc TruSurround HD a...

Страница 3: ...on card and mail it Extended Warranties For peace of mind and to protect your investment beyond the standard warranty VIZIO offers on site extended warranty service plans These plans provide additiona...

Страница 4: ...d The lightning flash with arrowhead symbol within an equilateral triangle is intended to alert the user to the presence of un isolated dangerous voltage within the inside of your TV that may be of su...

Страница 5: ...TV in environments with heavy dust or high humidity may cause fire or electric shock Follow instructions for moving your TV Ensure that the power cord and any other cables are unplugged before moving...

Страница 6: ...ationwide switch to digital television broadcasting was complete on June 12 2009 Analog only television sets that receive TV programming through an antenna now need a converter box to continue to rece...

Страница 7: ...avings 14 Enabling or Disabling Automatic Date and Time Updates 14 Setting the Date and Time 14 Adjusting the TV Settings for Use with A PC 15 Using the Other Menu Settings 16 Navigating the On Screen...

Страница 8: ...colors on the TV don t look right 30 The buttons on the remote aren t working 30 The image quality is not good 30 The picture is distorted 30 The display image does not cover the entire screen 31 The...

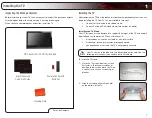
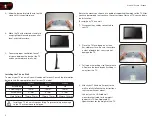
Страница 9: ...he included stand On a wall using a VESA standard wall mount not included Installing the TV Stand Your TV includes a stand designed to support the weight of the TV and keep it from falling over Howeve...

Страница 10: ...a UL listed wall mount bracket rated for the weight load of this TV See Appendix A Specifications for the weight of this TV 3 Slide the base plate into the slot on the stand until it snaps into place...

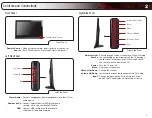
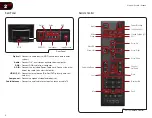
Страница 11: ...t USB thumb drive to play photo slideshow or to update firmware Right Side Panel Right Side Panel Power Menu Channel Up Down Volume Up Down Input Ambient Light Sensor Ambient Light Sensor Activate thr...

Страница 12: ...uded Power Cable here Connect the other end of the cable to an electrical outlet HDMI 1 2 Connect external device Blu Ray DVD player game con sole etc Component Connect component video audio devices C...

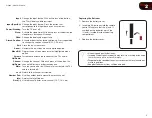
Страница 13: ...e the loudness of the TV s audio Channel Up Down Change the channel With each press of the button the channel will increase or decrease by one Mute Turn the sound off or on When mute is activated the...

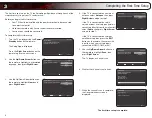
Страница 14: ...input location Next Back Select Home Retail Mode Setting Exit EXIT 4 If the TV is connected to an external antenna select Antenna then press Right Arrow and go to step 5 If the TV is connected to a c...

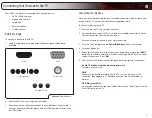
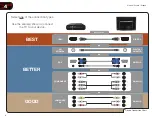
Страница 15: ...ding cable To connect a device to the TV 1 Ensure both the TV and your device are off 2 Connect the device and the TV Use the best available connection See the Device Connection Chart on the next page...

Страница 16: ...ne OR OR OR OR BETTER GOOD BEST HDMI RF COAXIAL RGB COMPONENT COMPOSITE AV DIGITAL DIGITAL ANALOG ANALOG ANALOG ANALOG Device Connection Chart Select one of the connection types Use the cable s shown...

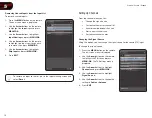
Страница 17: ...een menu Customizing and Removing Input Names When you have multiple devices connected to your TV it can become difficult to remember the inputs to which they are connected Your TV features the abilit...

Страница 18: ...e Input Naming screen and select Reset Setting Up Channels From the channel menu you can Change the signal source Customize the master channel list Scan for new additional channels Start a new channel...

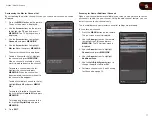
Страница 19: ...l available channels to the list highlight Mark All and press MENU OK v To remove all available channels from the list highlight Unmark All and press MENU OK To include only digital channels in the li...

Страница 20: ...s MENU OK The channel scan begins 6 Wait for the channel scan to reach 100 then press EXIT Customizing Channel Names Your TV features the ability to customize channel names making them easy to identif...

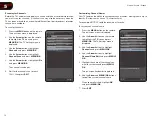
Страница 21: ...age and press MENU OK 5 Press EXIT Setting the TV s Date and Time From the Date Time menu you can Set the time zone Adjust the time for daylight savings Enable or disable automatic date and time updat...

Страница 22: ...ot manually set the date and time To enable or disable automatic updates 1 Press the MENU button on the remote The on screen menu is displayed 2 Use the Arrow buttons on the remote to highlight the TV...

Страница 23: ...press MENU OK The TV Settings menu is displayed 3 Use the Arrow buttons to highlight PC Setting and press MENU OK 4 Use the Arrow and MENU OK buttons to adjust each of the following options Horiz Pos...

Страница 24: ...Timer When activated the TV s sleep timer will turn the TV off after a set period of time To use the sleep timer 1 Press the MENU button on the remote The on screen menu is displayed 2 Use the Arrow b...

Страница 25: ...the Arrow buttons on the remote to highlight the photo you would like to be displayed first then press the Play button The slideshow begins To pause the slideshow press the Pause button To go to the...

Страница 26: ...mic and Stretch Each mode displays content according to the content s original format Original Content Format 480p 480i 4 3 720p 16 9 1080p 1080i 16 9 RGB 4 3 RGB 16 9 Normal Wide Zoom Panoramic Stret...

Страница 27: ...y image This option is only available when the TV is displaying a 480i 480p source Stretch expands the display image to fill the screen Images may appear wider than intended If you are watching widesc...

Страница 28: ...press EXIT Adjusting the Equalizer Settings Your TV features six preset equalizer settings These settings allow you to customize your TV s sound to match the type of programming you most often enjoy T...

Страница 29: ...buttons to highlight Bass or Treble and press MENU OK 5 Use the Left Right Arrow buttons to increase or decrease the level When you are finished press EXIT Adjusting the Speaker Balance The built in...

Страница 30: ...ital Output Mode Using this menu option you can force the TV to downsample unsupported audio formats to PCM audio You may want to use this option if you have an older audio receiver connected to the T...

Страница 31: ...OK button on the remote The on screen menu is displayed 2 Use the Arrow buttons to highlight Audio and press MENU OK 3 Use the Arrow buttons to highlight Analog MTS or Digital MTS and press MENU OK R...

Страница 32: ...f the picture When this setting is too low the picture may be too dark to distinguish details When this setting is too high the picture may appear faded or washed out Contrast Adjusts the white level...

Страница 33: ...Response 1 Press the MENU OK button on the remote The on screen menu is displayed 2 Use the Arrow buttons to highlight Picture and press MENU OK 3 Use the Arrow buttons to highlight Fast Response 4 U...

Страница 34: ...e not set a custom passcode the default is 0000 The Parental Control menu is displayed Enabling or Disabling Program Ratings To manage program content according to its rating you must enable the Progr...

Страница 35: ...locked Content with this rating cannot be viewed 4 When the rating type is unblocked the Lock icon appears unlocked Content with this rating can be viewed 5 If you want to block all unrated content h...

Страница 36: ...ttings all changes you have made to the settings will be lost To restore the TV to its factory default settings 1 Press the MENU button on the remote The on screen menu is displayed 2 Use the Arrow bu...

Страница 37: ...ay different languages For example CC1 may display English captions and CC2 may display Spanish captions Changing the Appearance of Digital Closed Captions Digital closed captions can be displayed acc...

Страница 38: ...Ensure the speakers are set to On Ensure no headphones are connected to the TV Check the audio connections of external devices Blu ray player game console cable satellite box that are connected to th...

Страница 39: ...he signal is up converted improved to match your TV s display capabilities This up converting can sometimes cause irregularities in the image If you are using an antenna the signal strength of the cha...

Страница 40: ...80 1366 x 768 Dynamic Contrast Ratio 20 000 1 20 000 1 20 000 1 Response Time 5 ms 5 ms 8 ms Brightness 250 nits 250 nits 350 nits HDMI Inputs 2 2 2 Component Video Inputs 1 1 1 Composite Inputs 1 1 1...

Страница 41: ...B 33 E190VA E220VA E260VA Power Consumption 22W 26W 40W Voltage Range 100 240 VAC 50 60Hz 100 240 VAC 50 60Hz 100 240 VAC 50 60Hz...

Страница 42: ...tomer misuse modifications or adjustments as well as installation and set up issues or any repairs attempted by anyone other than by a VIZIO authorized service center Products with unreadable or remov...

Страница 43: ...not expressly approved by the party responsible for compliance with the FCC Rules could void the user s authority to operate this equipment Caution Always use an AC DC power adapter that is properly...

Страница 44: ...36 Notes...

Страница 45: ...37 E190VA E220VA E260VA...

Страница 46: ...38 E190VA E220VA E260VA...

Страница 47: ......

Страница 48: ...SED ARE FOR ILLUSTRATION PURPOSES ONLY VIZIO THE V LOGO WHERE VISION MEETS VALUE AND OTHER VIZIO TRADEMARKS ARE THE INTELLECTUAL PROPERTY OF VIZIO INC PRODUCT FEATURES AND SPECIFICATIONS ARE SUBJECT T...

Отзывы: