background image

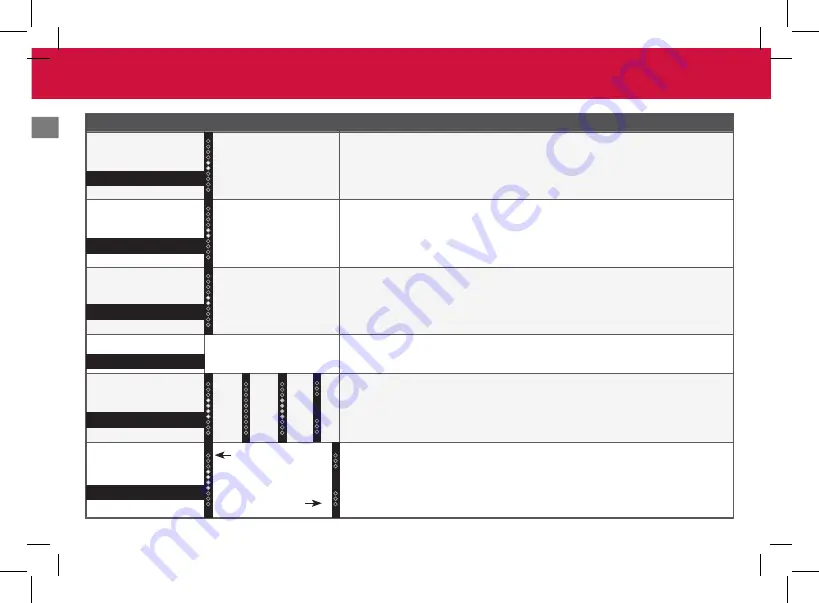
Mode & Level Settings

Function

LED Behavior

Description

Surround Level

Two center LEDs indicate 
surround level 0.

LEVEL > Surr Lvl > 

Use the 

Next/Previous

 buttons to increase/decrease the surround 

sound level. The LED indicators will move to the top with increasing level and to the bottom 
with decreasing level.

Note:

 Surround must be ON to adjust the surround level.

Surround Balance

Two center LEDs 
indicate surround 
balance is centered.

LEVEL > Surr Bal >

 Use the 

Next/Previous

 buttons to increase/decrease the surround 

balance level on each side. The LED indicators will move to the top with balance levels to the 
right and down with balance levels to the left. 

Height Level

Two center LEDs 
indicate height level 0.

LEVEL > HeightLvl >

 Use the 

Next/Previous

 buttons to increase/decrease the level of the 

height speakers. The LED indicators will move to the top with increasing height level. Use 
this adjustment to accommodate various ceiling heights and seating distances. 

Info

SETUP > Info > OK

 to have the sound bar verbally announce the current sound bar input 

and audio type being played with corresponding LED indicators.

Auto VA

SETUP > Auto VA > 

Use the 

Next/Previous

 buttons to toggle between connecting 

the sound bar to a Voice Assistant through Bluetooth (BT), AUX, Both, or OFF. Refer to 

Connecting to a Voice Assistant

 on page 23 for more information.

Note

: Default setting is Both. 

Eco Power Mode

Eco Power Mode  

On

SETUP > EcoPwr >

 Use the 

Next/Previous

 buttons to enable/disable Eco Power Mode. 

When ON, the sound bar will go into standby after a period of inactivity. The sound bar will 
automatically turn off when no audio signal is detected. Off disables this feature.

Note

: If you would like to cast content without the need to manually turn on the sound bar, 

set this mode to Off. Default setting is Off.

Eco Power Mode  

Off

Surr Lvl

Surr Bal

Info

Height Lvl

Auto VA 

Eco Pwr 

BT

AU

X

Off

B

oth

Содержание M-Series Elevate 5.1.2

Страница 1: ...Model M512E K6 M Series Elevate 5 1 2 User Manual Please read this guide before using the product Scan to learn more M Series...

Страница 2: ...ENG ii Acc Con Ema Pho Bindi This p Class By us You ha days o Terms...

Страница 3: ...Binding Arbitration Agreement and Class Action Waiver which may be viewed at vizio com en terms terms of service By using this device you accept those Terms and Conditions You have the right to opt o...

Страница 4: ...exposed to rain or moisture does not operate normally or has been dropped To reduce the risk of electric shock or component damage switch off the power before connecting other components to your Unit...

Страница 5: ...illed with liquid near the equipment such as a vase or flower pot or expose it to dripping splashing rain or moisture CAUTION Danger of explosion or fire if batteries are mistreated Replace only with...

Страница 6: ...Combinations 19 Programming the Sound Bar 20 Bluetooth Pairing 21 Using Bluetooth Mode 22 Connecting to a Voice Assistant 23 Advanced Setup 25 Connecting with HDMI ARC 26 Connecting a Subwoofer 28 Wal...

Страница 7: ...tandard RCA RCA To 3 5mm HDMI Satellite Cable 2 x Wall Mount Brackets Surround Speakers User Manual 2 x Wall Mount Brackets Sound Bar Quick Start Guide 2 x Power Cables Remote Control with 2x AAA Batt...

Страница 8: ...ENG 2 Controls Connections Bottom of Sound Bar Digital Optical Audio In Supports WAV and MP3 file format playback only USB In HDMI In HDMI Out eARC to TV...

Страница 9: ...ort to connect a Voice Assistant device not included See Connecting to a Voice Assistant on page 23 for more information Power Port Controls Connections AUX VA Analog Audio In Stereo 3 5mm AUX Analog...

Страница 10: ...ections Top of Sound Bar Volume Increase or decrease the loudness of the audio Bluetooth Input Hold to pair See Bluetooth Pairing for more information Input Press to change the audio source Power Pres...

Страница 11: ...ections Power Port Back of Subwoofer Surround Speaker Ports Connects to surround speakers Left blue cable Right gray cable LED Indicator Power Button Back of Surround Speaker Surround Speaker Port Con...

Страница 12: ...und Bar Some TVs do not pass through digital audio When using the digital input if there is no audio try setting the TV output to PCM or connecting directly to your Blu ray or other source BEST HDMI e...

Страница 13: ...own To connect the sound bar directly to your other devices Blu ray player game system etc see your device s user manual eARC ble First time Setup HOME THEATER DISPLAY QUICK START GUIDE Installation G...

Страница 14: ...ENG 8 2 Connect the power cable to the sound bar AC IN as shown Plug the power cable into an electrical outlet First time Setup Bottom of Sound Bar...

Страница 15: ...fer using the included surround speaker audio cables Cable ties are included to wrap unused cable length 3 Match the color coded speaker cable to the matching speaker port color Blue for left surround...

Страница 16: ...le into a power outlet Connect the power cable to the subwoofer 4 The subwoofer should automatically power on and link to the sound bar when plugged in The LED will glow to solid to confirm 6 First ti...

Страница 17: ...INPUT button to switch between audio sources For example if you connected your TV to HDMI eARC set the sound bar to HDMI eARC Top Top Input Power Occurs only during first time set up Auto detect funct...

Страница 18: ...info Next Skip to the next track Changes audio settings in Menu Display Displays Sound Bar Settings Input Change the input source Long press for Auto Input Search Bluetooth Press to go to Bluetooth Mo...

Страница 19: ...sound speakers as shown The sound bar should be close to ear level You will get the best sound effect if your ceiling is flat and around 7 5 ft to 12 ft high Note Do not block the subwoofer port Speak...

Страница 20: ...o the top with increasing level and to the bottom with decreasing level Dialogue Level LED at the bottom indicates dialogue level 0 LEVEL Dialogue Use the Next Previous buttons to increase decrease th...

Страница 21: ...ve to the top with increasing height level Use this adjustment to accommodate various ceiling heights and seating distances Info SETUP Info OK to have the sound bar verbally announce the current sound...

Страница 22: ...the Power LED Power LED Off Announcements Announcements On SETUP Anncment Use the Next Previous buttons to enable disable the voice announcements Note Some voice announcements will still be turned on...

Страница 23: ...ns to toggle between preset height modes Up Front height speakers will rotate up to provide an immersive movie sound experience Wide Front height speakers will rotate forward good for listening to mus...

Страница 24: ...abled Off all sources will playback without virtualization Virtual X Off Volume Leveling Volume Leveling On EFFECT Vol Lv Use the Next Previous buttons to enable disable Volume Leveling When enabled O...

Отзывы: