background image

5

39

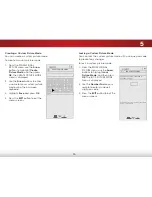
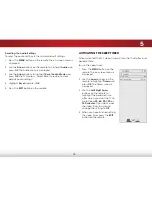
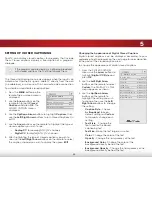
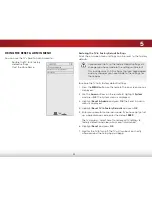
Changing the On-Screen Menu Language

Your TV can display the on-screen menu in different languages.

To change the on-screen menu language:

1.  Press the 

MENU

 button on the 

remote. The on-screen menu is 

displayed.

2.  Use the 

Arrow

 buttons on the 

remote to highlight 

System

 and 

press 

OK

. The SYSTEM menu is 

displayed.

3.  Use the 

Arrow

 buttons on the 

remote to highlight 

Menu 

Language

 and press 

OK

. The 

MENU LANGUAGE menu is 

displayed.

4.  Highlight your preferred 

language (

English

Français

, or 

Español

) and press 

OK

5.  Press the 

EXIT

 button on the 

remote.

Help

VIZIO

Network

Sleep

Timer

Input

CC

ABC

Audio

Wide

Normal

Picture

Settings

Panoramic

Wide

Zoom

2D

3D

Exit

MENU LANGUAGE

English

Français

Español

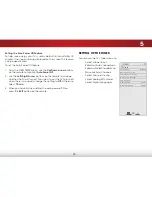
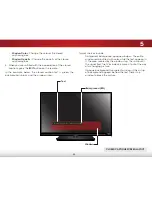
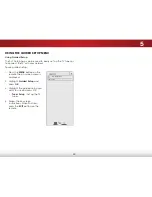
Setting the Time Zone

To ensure the correct time is displayed when you press the 

INFO 

button, set the TV’s time zone:

1.  Press the 

MENU

 button on the 

remote. The on-screen menu is 

displayed.

2.  Use the 

Arrow

 buttons on the 

remote to highlight 

System

 and 

press 

OK

. The SYSTEM menu is 

displayed.

3.  Use the 

Arrow

 buttons on the 

remote to highlight 

Time and 

Local Settings

 and press 

OK

The TIME & LOCAL SETTINGS 

menu is displayed.

4.  Highlight 

Time Zone

 and press 

OK

. The TIME ZONE menu is 

displayed.

5.  Highlight your time zone and 

press 

OK

.

6.  Highlight 

Daylight Saving

 and 

press 

OK

. The DAYLIGHT SAVING 

menu is displayed. Choose 

On


if your locale observes daylight 

savings time, or 

Off

 if it does 

not.

7.  Press the 

EXIT

 button on the remote.

Help

VIZIO

Network

Sleep

Timer

Input

CC

ABC

Audio

Wide

Normal

Picture

Settings

Panoramic

Wide

Zoom

2D

3D

Exit

TIME ZONE

Alaska
Hawaii
Pacific

Mountain

Central
Eastern

Atlantic

Newfoundland

Indiana

Arizona

Содержание E390-B0

Страница 1: ...VIZIO USER MANUAL Model E390 B0...

Страница 2: ...ERGY STAR rating Manufactured under license from Dolby Laboratories Dolby and the double D symbol are trademarks of Dolby Laboratories HDMI the HDMI logo and High Definition Multimedia Interface are t...

Страница 3: ...ctions should be observed for the installation use and maintenance of your TV Read the following safety instructions before operating your TV Keep these instructions in a safe place for future referen...

Страница 4: ...penetrates into Use only with the cart stand tripod bracket or table specified by the manufacturer or sold with the apparatus When a cart is used use caution when moving the cart apparatus combination...

Страница 5: ...shock do not touch the connector with wet hands Insert batteries in accordance with instructions Incorrect polarities may cause the batteries to leak which can damage the remote control or injure the...

Страница 6: ...to grounding electrodes and requirements of the grounding electrode Ground Clamp Antenna Lead In Wire Antenna Discharge Unit NEC Section 810 20 Grounding Conductors NEC Section 810 21 Ground Clamps P...

Страница 7: ...l Picture Settings 22 Adjusting the Color Tuner Settings 22 Renaming the Custom Picture Mode 24 Creating a Custom Picture Mode 25 Locking a Custom Picture Mode 25 Deleting a Custom Picture Mode 26 Adj...

Страница 8: ...Factory Default Settings 41 Using the Guided Setup Menu 42 Using Guided Setup 42 Using the Info Window 43 Using the USB Media Player 44 Using the USB Media Player 44 Connecting a USB Thumb Drive to th...

Страница 9: ...talled in two ways On a flat surface using the included stand On a wall using a VESA standard wall mount not included Installing the TV Stand Your TV includes a stand designed to support the weight of...

Страница 10: ...lace the TV on a soft surface such as a blanket 3 Align the base with the neck and tighten the three 3 included M4 10mm Phillips screws using a Phillips screwdriver as shown 4 Move the TV with attache...

Страница 11: ...ight of the TV After you have determined that you have the correct mount for your TV you can begin the installation To install your TV on a wall 1 Disconnect any cables connected to your TV 2 Place th...

Страница 12: ...Optical Audio Out Connect optical SPDIF audio device such as home audio receiver Stereo Audio Out Connect RCA audio device such as sound bar Component Composite Connect component or composite device U...

Страница 13: ...2 7 SIDE PANEL SIDE PANEL POWER Press and hold to turn TV on or off INPUT Press to change input source...

Страница 14: ...ing the remote aim it directly at this sensor The power indicator flashes on when the TV turns on then goes out after several seconds To keep the power indicator on as long as the TV is on see Turning...

Страница 15: ...ACK Go to the previous on screen menu POWER Turn TV on or off MENU Display the on screen menu INFO Display the info window DASH Use with number pad to manually enter a digital sub channel For example...

Страница 16: ...he Batteries 1 Remove the battery cover 2 Insert two batteries into the remote control Make sure that the and symbols on the batteries match the and symbols inside the battery compartment 3 Replace th...

Страница 17: ...ent etc 2 Turn the TV and your device off 3 Connect the appropriate cable not included to the TV and the device 4 Turn the TV and your device on Set the TV s input to match the connection you used HDM...

Страница 18: ...site cables are the traditional way of connecting your devices to your TV Video signals are sent over the yellow connector while audio is sent over the red and white connectors GOOD BETTER COMPONENT V...

Страница 19: ...mponent cables are designed to carry high definition video signals along with additional audio connections Colors are delivered with color information split up three different ways over three connecto...

Страница 20: ...an available port on the TV HDMI RCA etc 2 Turn the TV and your audio device off 3 Connect the appropriate cable not included to the TV and the device 4 Turn the TV and your device on BETTER OPTICAL...

Страница 21: ...EST HDMI HDMI OPTICAL SPDIF CABLE Optical SPDIF cables transmit audio signals as pulses of light through a cable made of plastic fibers Audio signals are digitally transmitted between devices BETTER P...

Страница 22: ...n HDMI ARC setup the audio connection between your TV and Home Audio Receiver can be removed The HDMI cable will transmit audio signal to and from your TV with an all digital audio video connection Wi...

Страница 23: ...r Standby button on the remote The TV powers on and the Setup App starts 2 Use the Arrow buttons on the remote to highlight Home Use and press OK 3 Use the Arrow buttons on the remote to highlight you...

Страница 24: ...oning Name the TV Inputs Adjust TV Settings Access the Guided Setup Help VIZIO Network Sleep Timer Input CC ABC Audio Wide Normal Picture Settings Panoramic Wide Zoom 2D 3D Exit TV SETTINGS Picture Au...

Страница 25: ...e TV s screen black bars are added to the left and right of the display image Stretch expands the display image to fill the screen Images may appear wider than intended If you are watching widescreen...

Страница 26: ...o Brightness Control automatically adjusts the brightness of the TV screen according to how bright the surrounding is To adjust the sensitivity of the light sensor use the Up Down Arrow buttons on the...

Страница 27: ...ixelation and distortion for mpeg files Select Off Low Medium or High Help VIZIO Network Sleep Timer Input CC ABC Audio Wide Normal Picture Settings Panoramic Wide Zoom 2D 3D Exit ADVANCED PICTURE Col...

Страница 28: ...put CC ABC Audio Wide Normal Picture Settings Panoramic Wide Zoom 2D 3D Exit PROFESSIONAL PICTURE Color Tuner Rename Picture Mode Create Picture Mode Lock Picture Mode Delete Picture Mode Adjusting th...

Страница 29: ...nd then press the Left Right Arrow buttons until the SMPTE Test Pattern menu is displayed 2 Use the Arrow buttons on the remote to highlight Off Use the Left Right Arrow buttons to highlight On to ena...

Страница 30: ...f 3 When you are finished press the EXIT button Ramp Test Pattern Off Renaming the Custom Picture Mode You can rename the custom picture mode from the PICTURE menu To rename the custom picture mode 1...

Страница 31: ...e Settings Panoramic Wide Zoom 2D 3D Exit CREATE PICTURE MODE _ Save a b c d e f g h i j k l m n o p q r s t u v w x y z 0 1 2 3 4 5 6 7 8 9 com Space Locking a Custom Picture Mode You can lock the cu...

Страница 32: ...cture mode 1 From the PROFESSIONAL PICTURE menu use the Arrow buttons to highlight Delete Picture Mode and then press OK The DELETE PICTURE MODE window is displayed 2 Use the Left Right Arrow buttons...

Страница 33: ...Out Sets the volume control properties for the analog RCA red white connectors when connected to a home theater audio system Select Variable to control the external speakers volume from the TV s volu...

Страница 34: ...te ACTIVATING THE SLEEP TIMER When activated the TV s sleep timer will turn the TV off after a set period of time To use the sleep timer 1 Press the MENU button on the remote The on screen menu is dis...

Страница 35: ...will turn off If you don t want the TV to turn off when there is no signal change the setting to Off Otherwise select 10 min 3 When you have finished setting the auto power off time press the EXIT bu...

Страница 36: ...Network Sleep Timer Input CC ABC Audio Wide Normal Picture Settings Panoramic Wide Zoom 2D 3D Exit AUTO CHANNEL SCAN Channels Found 0 Analog 0 Digital 13 Complete Cancel Cancel the channel scan Addin...

Страница 37: ...rtably There may also be some channels you do not want to view You can remove these channels from the TV s memory with the Skip Channel feature Channels that have been removed with the Skip Channel fe...

Страница 38: ...io Programming SAP SAP allows you to listen to broadcasts in multiple languages Analog Audio works with analog channels Digital Language works with digital channels Not all programs are broadcast in m...

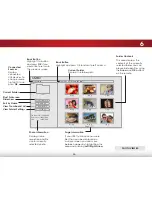
Страница 39: ...d according to your preference See the diagram on the next page for an explanation of the parts of the closed caption area To change the appearance of digital closed captions 1 From the CLOSED CAPTION...

Страница 40: ...lack and the window is red Typical choices include Transparent background opaque window The entire window remains filled with color while the text appears in it The area covered by the window stays th...

Страница 41: ...wish to name and press OK The NAME DEVICE menu is displayed 4 If you would like to use a preset input label highlight the input and press OK Highlight the input label you want to use and press OK If...

Страница 42: ...o Menu Language English Time Local Settings Parental Controls CEC Power Indicator Off Reset Admin View status information for the TV remote current input and your network Viewing System Information To...

Страница 43: ...ou have not set a passcode enter the default 0000 The Parental Controls menu is displayed To set a custom parental passcode see Changing the Parental Control Passcode on page 38 Enabling or Disabling...

Страница 44: ...ngs cannot be viewed 4 When the rating type is unblocked the Lock icon appears unlocked Content with this rating and all lower ratings can be viewed If you want to block all unrated content highlight...

Страница 45: ...U LANGUAGE English Fran ais Espa ol Setting the Time Zone To ensure the correct time is displayed when you press the INFO button set the TV s time zone 1 Press the MENU button on the remote The on scr...

Страница 46: ...EC Function To use CEC you must select Enable System Audio Control When system audio control is on you can control your device s audio using the TV s remote control Device Discovery Use this function...

Страница 47: ...u have added and any changes you have made to the settings for those Apps To restore the TV to its factory default settings 1 Press the MENU button on the remote The on screen menu is displayed 2 Use...

Страница 48: ...on the remote The on screen menu is displayed 2 Highlight Guided Setup and press OK 3 Highlight the guided setup you want to use and press OK Tuner Setup Set up the TV tuner 4 Follow the on screen in...

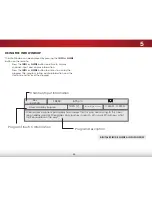
Страница 49: ...m rating audio information and the start and end times of the program DIGITAL EPISODE GUIDE INFO WINDOW Oliver s Holiday Surprise 1080p 6 15pm 11 00AM 12 00PM TV PG V Dolby Digital Stereo Oliver wakes...

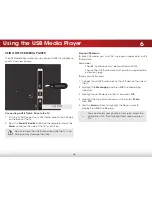
Страница 50: ...The USB thumb drive must be formatted as FAT32 Files on the USB thumb drive must end in a supported file extension jpg To play your USB media 1 Connect your USB thumb drive to the USB port on the sid...

Страница 51: ...age Information If your USB thumb drive has more files than can be displayed on a single screen you can move between pages by highlighting this area and pressing Left Right Arrow Back Button Highlight...

Страница 52: ...FREE techsupport VIZIO com www VIZIO com support Hours of operation Monday Friday 5 AM TO 8 PM PST Saturday Sunday 7 AM TO 4 PM PST The VIZIO support team is highly trained and is based in the United...

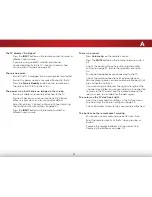
Страница 53: ...source There is no sound Press Volume Up on the remote control Press the MUTE button on the remote to ensure mute is off Check the audio settings See Adjusting the Audio Settings on page 27 Ensure the...

Страница 54: ...not display correctly These types of occurrences are inherent to this type of product and do not constitute a defective product I see noise or static on the screen When your TV s digital capabilities...

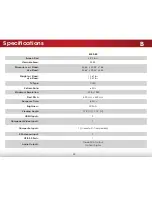
Страница 55: ...d w o Stand 13 67 lbs 12 57 lbs TV Type DLED Refresh Rate 60 Hz Maximum Resolution 1920 x 1080 Pixel Pitch 530 mm x 530 mm Response Time 6 5 ms Brightness 300 nits Viewing Angle 178 H 178 V HDMI Input...

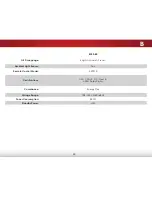
Страница 56: ...nglish Spanish French Ambient Light Sensor Yes Remote Control Model XRT010 Certifications CSA CSA US FCC Class B HDMI Dolby Digital Compliance Energy Star Voltage Range 108 132V 50 60 Hz Power Consump...

Страница 57: ...of customer misuse modifications or adjustments as well as installation and set up issues or any repairs attempted by anyone other than by aVIZIO authorized service center Products with unreadable or...

Страница 58: ...ceiver 3 Connect the equipment into an outlet on a circuit different from that to which the receiver is connected 4 Consult the dealer or an experienced radio TV technician for help This device compli...

Страница 59: ...2013 VIZIO INC ALL RIGHTS RESERVED 131023OC NC...

Отзывы: