background image


  Application  Note 


                                                                                                    8                                                                         

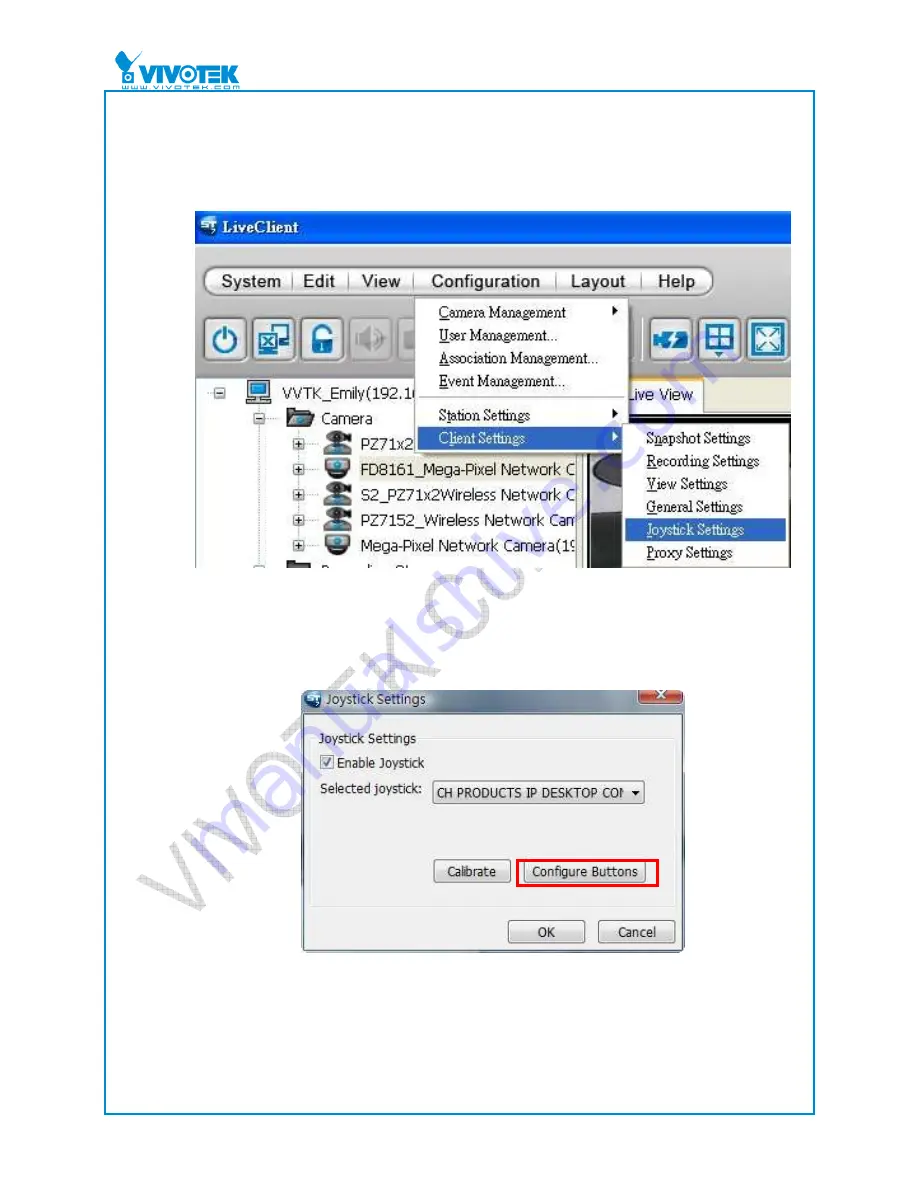
(2) Through software (using the ST7501 as an example): 

a.  Select Configuration > Client Settings > Joystick Settings from the menu bar. 

When the Joystick Settings window appears, the attached joystick should be 

listed in the drop-down menu. 


Figure 7: Selecting Joystick Settings 


b.  Choose the joystick you wish to configure. Select the Enable Joystick checkbox, 

and then click Configure Buttons to open the Button Configuration window. 


Figure 8: The Joystick Settings window 


Содержание HFX 1400

Страница 1: ...Application Note Using a joystick www vivotek com ...

Страница 2: ...ucts only VIVOTEK Other product and company names contained herein may be trademarks of their respective owners No part of this publication may be reproduced or utilized in any form or by any means electronic or mechanical including photocopying and microfilm without permission in writing from VIVOTEK Inc Revision History Version Issue date Author Comment 0 1 2010 09 23 Polly Yang First draft 1 0 ...

Страница 3: ...of contents Introduction 4 1 Why use a joystick 5 2 Setting up a joystick 6 2 1 Connect the joystick to your computer s USB port 6 2 2 Enable the joystick 6 3 VIVOTEK s HFX 1400 joystick 10 3 1 Specifications 10 3 2 Buttons 10 ...

Страница 4: ...describes the setup of a joystick for camera control using VIVOTEK s HFX 1400 joystick as a specific example where necessary It is divided into the following three sections 1 Why use a joystick 2 Setting up a joystick 3 VIVOTEK s HFX 1400 joystick ...

Страница 5: ...nnect the joystick to the USB port and it is immediately ready for use Once properly set up a joystick can be used to control a camera more intuitively than with a mouse or keyboard In the second section joystick settings are described along with the functions that can be configured Figure 1 Joystick 900002500G ...

Страница 6: ... it is connected to the USB port but the hotkey buttons will not be functional On the HFX 1400 to associate the hotkeys with specific actions such as pan patrol and so forth follow these steps a On the Home page right click in the Live View Window then select Joystick Settings from the pop up menu Figure 3 Joystick Settings accessible in the Live View window b In the Joystick Settings window selec...

Страница 7: ...ttons configuration window that appears assign actions to the desired buttons A list of actions available with the HFX 1400 can be viewed in Figure 5 Figure 5 Button configuration window Figure 6 Example showing Stop streaming action being assigned to Button2 ...

Страница 8: ...enu bar When the Joystick Settings window appears the attached joystick should be listed in the drop down menu Figure 7 Selecting Joystick Settings b Choose the joystick you wish to configure Select the Enable Joystick checkbox and then click Configure Buttons to open the Button Configuration window Figure 8 The Joystick Settings window ...

Страница 9: ... being assigned to Button8 Note The HFX 1400 supports the PZ7111 PZ7121 PZ7112 PZ7122 PZ7131 PZ7132 PZ7151 PZ7152 SD7151 SD7313 SD7323 and SD8111 SD8121 as well as all e PTZ models In addition all future VIVOTEK PTZ and speed domes will support joystick controls To view a list of supported device please use the following link http www vivotek com products accessories php type joystick ...

Страница 10: ... x 350 mm 2 Package weight 797 g 3 Joystick Three axis USB interface 4 Joystick travel 36 18 from center 5 Buttons 12 all programmable 6 Housing High impact glass filled nylon 7 Application VIVOTEK Plug in ST7501 VAST and NR7401 8 Weight 441 g 9 Supply voltage USB bus 5 V DC 0 5V 10 Supply current USB bus 32mA 11 Operating temperature 25 to 70 C 12 Certification CE FCC RoHS 13 External dimensions ...

Отзывы: