


D-11049-2, Ver 11
Page 6 of 26
F
IRST
S
TEPS
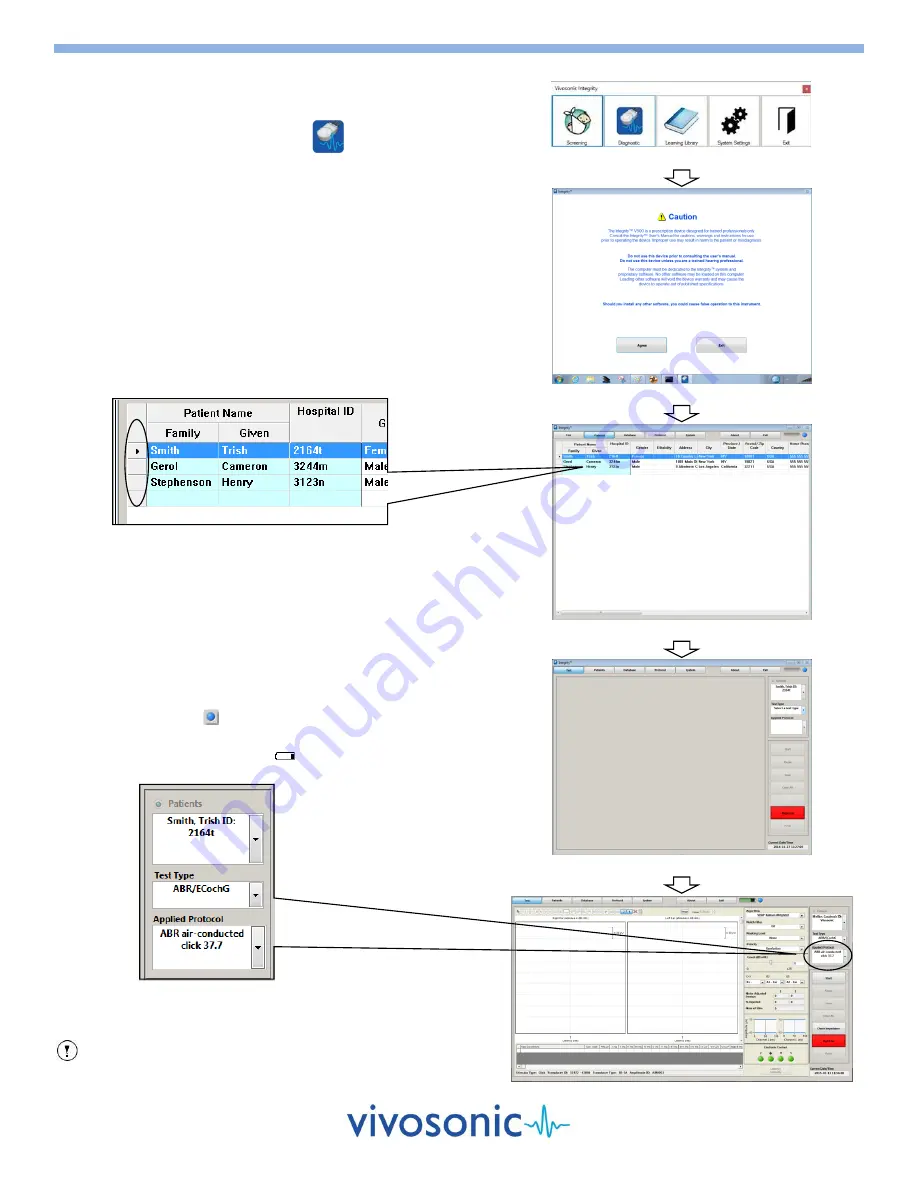
1.
Power on your VivoLink™ and computer.
2.
Double-click on the Integrity™ icon (
) to activate the Launcher,
which presents the user with the following options:
Perform Screening or Diagnostic testing.
Access learning and training materials from the Learning Library.
Configure the system.
If you have not purchased the Screening or Diagnostic test type, the
icon for that option in the Launch Bar will be disabled (grey).
3.
If Screening is selected, refer to the ABR Screening section of this
guide. If Diagnostic testing is selected, read the warnings and select
Agree
to continue to the
Patient Window
.
4.
To create a new patient file you must click on an empty cell for either
Family
name,
Given
name, or
Hospital ID
and enter the information.
5.
Identify patient to be tested from the list by clicking on the left most
row header shown (the grey area shown below).
6.
Click on the
Test
button to display the
Test Window
.
7.
Select a
Test Type
from the side menu.
8.
Wait until the initialization process is complete. This may require up to
20 to 30 seconds. The
wireless (Bluetooth) connection indicator
blinks on and off during this time.
9.
When initialization is completed, check the following:
The
wireless (Bluetooth) connection indicator
on your VivoLink
™
flashes on and off and the indicator on your computer screen is
the color
blue
(
).
The
battery indicator
on your computer, and replace the batteries
when the indicator is low (
).
10.
Select an applied protocol.
11.
Prepare your patient according to the test type you have selected.
12.
Initiate the test by selecting the
Start
button.
TIP
The Bluetooth connection safely operates
within 30 ft. (10 m) of your computer.
Caution Window
Test Window (no test selected)
Connected (ABR test selected)
Click here to select patients
Patient Window
Launcher


