background image

7

WARRANTY

We offer a ONE YEAR warranty for this product. If you have any problems 
with the machine, please contact us directly. We have a 90 Day Return Policy.
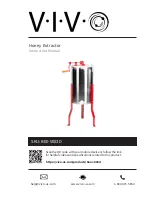
CARE & MAINTENANCE

QUICK CLEANING

Option 1: 

Rinse extractor out with cold water from a hose. If available, a 

pressure washer is very effective. Empty excess water to prevent possible 
surface rust.

Option 2: 

Place open extractor next to hive. Bees will clean it out and use the 

materials.

IN-DEPTH CLEANING

Disassemble extractor (see Disassembly instructions). Using mild dish soap 
and warm water, scrub drum and basket clean. Completely rinse the parts 
and dry with a soft cloth. Reassemble the extractor when dry.

CARE

• 

When not in use, store the extractor in a dry place. Although stainless 

steel is highly resistant to rust and corrosion, light surface rust can form 

in wet conditions. 

• 

If surface rust forms, clean with a light abrasive to remove rust.

• 

If the extractor begins making squeaking noises, lightly lubricate all 

bearings with a food safe grease or oil. Wipe away any excess.

• 

If the roller bearing in the crank shaft support block does not turn freely, 
lubricate with a light grease (such as white lithium) or oil.

• 

The gearbox is permanently sealed and requires no maintenance.

Содержание BEE-V003D

Страница 1: ... code with your mobile device or follow the link for helpful videos and specifications related to this product Instruction Manual https vivo us com products bee v003d help vivo us com www vivo us com 1 800 371 5654 SKU BEE V003D ...

Страница 2: ...iable for damage or injury caused by improper mounting incorrect assembly or inappropriate use WARNING IMPORTANT SAFETY INFORMATION READ AND FOLLOW ALL SAFETY REQUIREMENTS PREPARATION 1 After carefully removing the machine from the packing carton remove all protective film and clean the honey extractor thoroughly with mild soap and water BEFORE first use 2 The honey extractor should be placed on a...

Страница 3: ... and washers 8 ASSEMBLY STEPS PACKAGE CONTENTS 1 x1 Honey Extractor Drum 2 x2 Clear Lid 3 x1 Honey Gate with Lid 4 x1 Hex Nut on Honey Gate 5 x1 O Ring Pre installed on Honey Gate 6 x3 Leg 7 x6 Leg Bolt 8 x6 Washer 9 x1 Wing Nut 10 x1 Handle 11 x3 Stability Bolt ...

Страница 4: ...ate remove large hex nut from gate piece Insert gate through the front side hole and secure backside with hex nut tighten enough to seal O ring STEP 3 Slide crank handle onto the shaft and tighten bolt to the flattened shaft area ...

Страница 5: ...5 STEP 4 Place clear lids on top of honey extractor STEP 5 Optional Bolt feet down to floor or surface for added stability hardware included ...

Страница 6: ...rom the extractor 4 With the drain positioned over a bucket or other container open the honey gate to begin draining honey Tip the extractor forward to drain as much honey as possible DISASSEMBLY To disassemble the extractor remove the two cap nuts on the top of the extractor one on each side then pull the top brace up and off The basket can then be lifted out A steel ball bearing rests below the ...

Страница 7: ...ng mild dish soap and warm water scrub drum and basket clean Completely rinse the parts and dry with a soft cloth Reassemble the extractor when dry CARE When not in use store the extractor in a dry place Although stainless steel is highly resistant to rust and corrosion light surface rust can form in wet conditions If surface rust forms clean with a light abrasive to remove rust If the extractor b...

Страница 8: ...appy to replace parts to ensure you have a fully functioning product For more VIVO products check out our website at www vivo us com Love your new VIVO setup and want to share Tag us in your photo vivo_us help vivo us com www vivo us com 1 800 371 5654 Last Updated 2 27 2019 ...

Отзывы: