background image

Page 2.10


Notes


!"#$%&#'()*&+$)(#,-#.$$&/#0,$%#$%&#
.1&/#234567#8&9-#$%&9#$%&(&#:(&#
9)#;&+%:9,+:8#+)9$()8-#")(#8&9-#

shift.


!"#$%&#8&9-#,-#$)#<&#-%,"$&/#,9#
$0)#/,(&+$,)9-#+);<,9&/=#$%&#
;:1,;>;#(:9?&#,-#-);&0%:$#
8&--=#:-#+:9#<&#-&&9#<&8)0

">88#%)(,@)9$:8#)(#A&($,+:8#-%,"$


0,$%)>$#/,-$)($,)9

+);<,9&/#-%,"$


,-#(&/>+&/

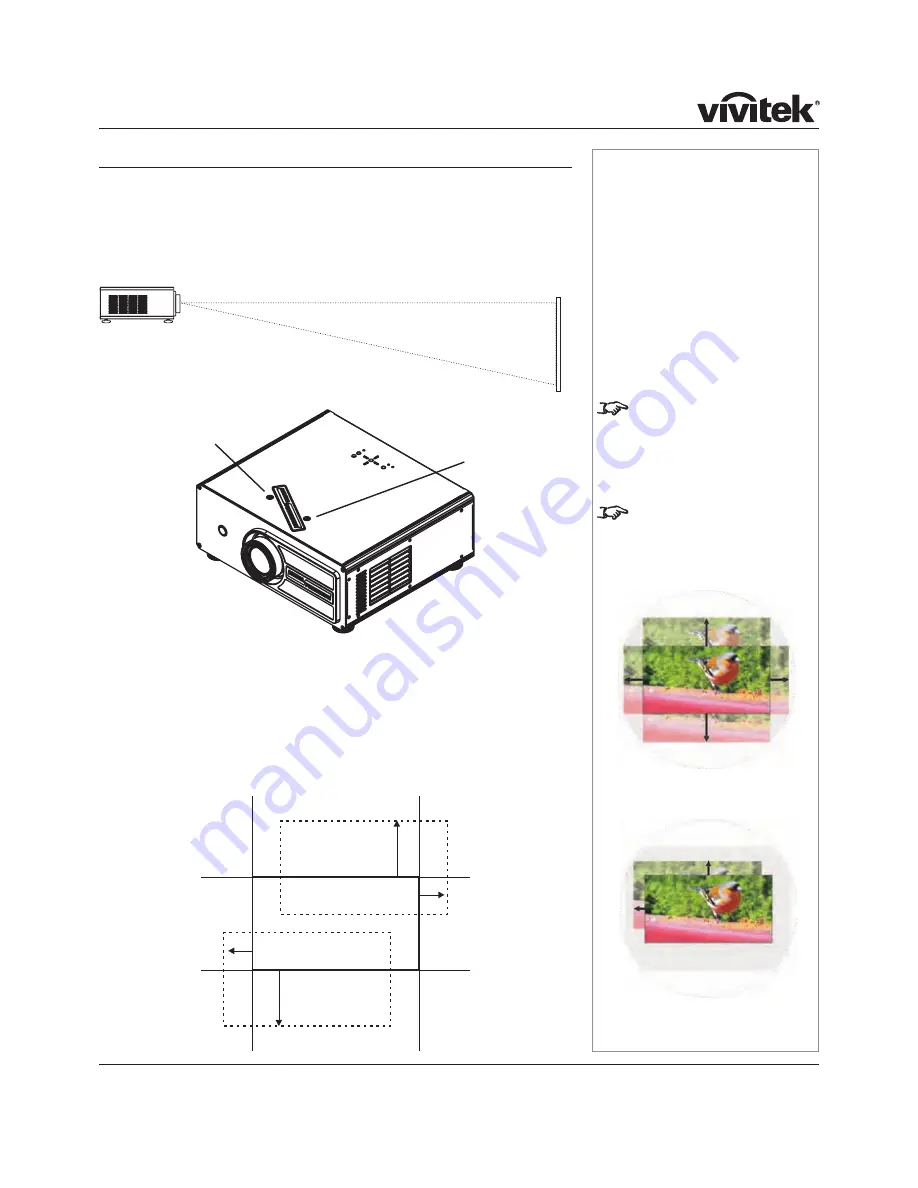
Shifting the image

Ideally, the projector should be positioned perpendicular to the screen.

The normal position for the projector is at the centre of the screen. However, you 
can set the projector above or below the centre, or to one side, and adjust the image 
using the 

Lens shift

 controls on the top of the projector to maintain a geometrically 

correct image.

The image can be shifted by up to:

± 0.6 of the height of a full screen image (known as 120% shift)

± 0.15 of the width of a full screen image (known as 30%)

!$#,-#'%B-,+:88B#')--,<8&#$)#-%,"$#$%&#8&9-#">($%&(#$%:9#$%,-=#%)0&A&(#$%&(&#0,88#<&#-);&#
/,-$)($,)9#)"#$%&#,;:?&#<&B)9/#$%&#(:9?&-#-'&+,.&/#:<)A&3

!

!

C)(,@)9$:8#-%,"$#

:/*>-$;&9$

V

&($,+:8#-%,"$#

:/*>-$;&9$

(Rotate the 

<:/?&D

+ 0.6 H

– 0.15 W

+ 0.15 W

Содержание D8300 Series

Страница 1: ......

Страница 2: ...owed NOTE this symbol indicates that there is some important information that you should read Trademarks IBM is a registered trademark of International Business Machines Corporation Macintosh and PowerBook are registered trademarks of Apple Computer Inc Other product and company names mentioned in this user s manual may be the trademarks of their respective holders Product revision Because we at D...

Страница 3: ...ing any other lamp could damage both projector and lamp and will invalidate the warranty Take care when removing the lamp module NEVER touch the lamp or reflector Take care not to touch the glass surface of the lamp module If you do accidentally touch the glass it should be cleaned before use see section 5 Maintenance Do not use the lamp for more than 2000 hours as this may cause serious lamp fail...

Страница 4: ...rs the stack MUST be vertical to ensure that the stresses are distributed to all four chassis corners Before installation make sure that the surface ceiling or rigging that is to support the projector is capable of supporting the combined weight of all the projectors Backup safety chains or wires should always be used with ceiling mount installations Do not place heavy objects on top of the projec...

Страница 5: ...nt with Part 15 of the FCC Rules These limits are designed to provide reasonable protection against harmful interference when the equipment is operated in a residential environment This equipment generates uses and can radiate radio frequency energy and if not installed and used in accordance with the instruction manual may cause harmful interference to radio communications European Waste Electric...

Страница 6: ...i RF Interference viii European Waste Electrical and Electronic Equipment WEEE Directive viii Digital Projection Contact details ix 1 Introduction What s in the box 1 2 Key features of the projector 1 3 Getting to know the projector 1 4 Front view 1 4 Rear view 1 4 2 Installation Screen requirements 2 2 Aspect ratio 2 2 Positioning the screen and projector 2 6 Screen size vs throw distance 2 7 Shi...

Страница 7: ...attern 3 3 Adjusting the lens 3 3 Zoom 3 3 Focus 3 3 Shift 3 3 Adjusting the projected image 3 4 Aspect ratio 3 4 Image quality settings 3 4 Switching the projector off 3 4 4 Controlling the projector Overview 4 3 Controlling the projector 4 3 The control panel 4 4 LED status indicators 4 4 The remote control 4 5 Layout 4 5 Timeout 4 5 Using the control keys 4 6 Power 4 6 Source 4 6 Aspect ratio 4...

Страница 8: ...ma 4 15 Colour Temperature 4 15 Colour Gamut 4 16 Brilliant Color 4 16 Adaptive Contrast 4 16 RGB Adjust 4 17 Fine Sync 4 18 System menu 4 19 Language 4 19 Source Enable 4 20 Menu Position 4 21 Blank Screen 4 21 Auto Power On 4 21 Auto Power Off 4 21 Rear Projection 4 22 Ceiling Mode 4 22 Logo Display 4 22 Control menu 4 23 Trigger 1 2 4 23 Auto Source 4 24 Keys 1 to 5 4 24 Service menu 4 25 Facto...

Страница 9: ...imensions 6 7 Video formats supported 6 8 Input connections 6 10 HDMI 1 2 inputs 6 10 Composite video input 6 10 S Video input 6 10 RGB input 6 11 Component 1 input 6 11 Component 2 input 6 11 Control connections 6 12 Wired Remote control connection 6 12 Trigger 1 2 output 6 12 Serial control input 6 12 Remote communications protocol 6 13 Introduction 6 13 Key Commands 6 13 Operation Commands 6 15...

Страница 10: ...Page 1 1 1 Introduction Contents What s in the box 1 2 Key features of the projector 1 3 Getting to know the projector 1 4 Front view 1 4 Rear view 1 4 ...

Страница 11: ...ize vs throw distance in section 2 Installation Only one power cable dependent on the destination territory will be supplied with the projector Important Information 110 287 User manual on CD 110 288 Remote control 109 685 2x AA batteries HDMI cable Getting Started Guide 110 286 5mm Allen wrench Projector 109 729 1 56 1 86 1 zoom lens 109 658 1 85 2 40 1 zoom lens 109 680 Power cable 10A United Ki...

Страница 12: ...300 presents a powerful yet remarkably affordable solution for a variety of commercial and home entertainment applications including media rooms and home theaters training and education boardrooms and conference centers Visualization simulation environments retail entertainment digital media advertising and hospitality Key Features dzHigh resolution projector for medium sized venues dzApplications M...

Страница 13: ... lamp or the filter see section 5 Maintenance For information about controls and indicators see section 4 Controlling the projector Lamp cover Rear view Rear Infra red window remote control Power connection Lens Air inlet Air outlet Focus ring Zoom ring Horizontal shift adjustment Vertical shift adjustment under the badge Input connections Adjustable feet Projector control panel ...

Страница 14: ... Positioning the screen and projector 2 6 Optimum viewing position 2 6 Screen size vs throw distance 2 7 Calculating screen width and throw distance 2 7 Lens charts for the short throw zoom lens 2 8 example 2 8 Lens charts for the long throw zoom lens 2 9 example 2 9 Shifting the image 2 10 Mounting the projector 2 11 Ceiling mounting 2 11 Level adjustment 2 11 Rear projection 2 12 Stacking projec...

Страница 15: ...ith an aspect ratio of 2 35 1 can be displayed using the full 16 9 resolution of the DMD 4 3 the image is scaled to fit a 4 3 screen using the full height of the DMD 4 3 Narrow to be used for 4 3 images in combination with an anamorphic lens The image is scaled to fit the DMD vertically but squeezed horizontally such that the lens will stretch it to the correct ratio Native the image is displayed ...

Страница 16: ...rce If you have an anamorphic lens the Theaterscope setting would be a much better option Because it uses the whole of the DMD it will be a much brighter image than the letterboxed options shown above and will fill a wider screen if this is available Notes The 4 3 image shown here has far fewer pixels than the 1920 x 1080 of the DMD Your image may be different If you are using an anamorphic lens y...

Страница 17: ...show how to convert diagonal sizes in inches into width and height at various aspect ratios 2 35 1 Scope W D x 0 92in D x 023m H D x 0 39in D x 01m 1 85 1 W D x 0 88in D x 022m H D x 0 47in D x 012m 16 9 1 78 1 native aspect ratio W D x 0 87in D x 022m H D x 0 49in D x 0125m 1 66 1 Vista W D x 0 86in D x 022m H D x 0 52in D x 013m 16 10 1 6 1 W D x 0 85in D x 022m H D x 0 53in D x 014m 4 3 1 33 1 ...

Страница 18: ...our screen If you have insufficient height or width you will have to reduce the overall image size in order to display the full image on your screen Notes 2 35 1 Scope W H x 2 35 H W x 0 426 1 85 1 W H x 1 85 H W x 0 54 16 9 1 78 1 native aspect ratio W H x 1 78 H W x 0 56 1 66 1 Vista W H x 1 66 H W x 0 6 16 10 1 6 1 W H x 1 6 H W x 0 625 4 3 1 33 1 W H x 1 33 H W x 0 75 1 2 3 4 5 6 7 8 9 10 Scre...

Страница 19: ...rojector should be installed as close to the power outlet as possible The power connection should be easily accessible so that it can be disconnected in an emergency Ensure that there is at least 30cm 12in of space between the ventilation outlets and any wall and 10cm 4in on all other sides Do not install the projector close to anything that might be affected by its operational heat for instance p...

Страница 20: ... D A EB D F D B G Two optional converter lenses are available which modify the throw ratios as shown 3 69 0 8x converter 1 25x converter Short throw lens D A HI9 I AD 9 Long throw lens HBA ID9 D A 9 6 0 2 0 2 08 0 5 J 62 KLK M 2 08 0 7 5 J 62 4 6 0 2 62 3 0 8 M H9 2 08 4 6 0 2 2 27 0 3N 0 0 The effect of this can be seen on the lens charts on the following pages O O O O O Notes For more informatio...

Страница 21: ...1 2 3 4 5 6 7 8 9 10 11 12 metres 3 7 10 13 16 20 23 26 30 33 36 39 feet 23 7 20 6 16 5 13 4 10 3 7 2 3 1 using the 1 25x converter lens using the 0 8x converter lens without a converter lens Throw distance Screen width 1 2 3 4 5 6 7 8 9 10 11 12 metres 3 7 10 13 16 20 23 26 30 33 36 39 feet 23 7 20 6 16 5 13 4 10 3 7 2 3 1 using the 1 25x converter lens using the 0 8x converter lens without a con...

Страница 22: ... 2m you will need to use the 1 25x converter lens Screen width 1 2 3 4 5 6 7 8 9 10 11 12 metres 3 7 10 13 16 20 23 26 30 33 36 39 feet 23 7 20 6 16 5 13 4 10 3 7 2 3 1 using the 1 25x converter lens using the 0 8x converter lens without a converter lens Throw distance Screen width 1 2 3 4 5 6 7 8 9 10 11 12 metres 3 7 10 13 16 20 23 26 30 33 36 39 feet 23 7 20 6 16 5 13 4 10 3 7 2 3 1 using the 1...

Страница 23: ...re of the screen However you can set the projector above or below the centre or to one side and adjust the image using the Lens shift controls on the top of the projector to maintain a geometrically correct image The image can be shifted by up to 0 6 of the height of a full screen image known as 120 shift 0 15 of the width of a full screen image known as 30 B 88B 8 8 9 9 0 A 0 88 9 B 9 9 A 3 C 9 8...

Страница 24: ...ld be made by turning the four feet under the chassis Ideally the projector should be positioned perpendicular to the screen and the lens shift controls used to align the image with the screen to maintain a geometrically correct image Notes BEFORE INSTALLING THE PROJECTOR READ ALL THE WARNINGS BELOW AND ALL THOSE IN IMPORTANT INFORMATION AT THE FRONT OF THIS MANUAL The projector weighs approximate...

Страница 25: ...ng projectors The projector is capable of supporting the weight of up to three other projectors safely The stack should be positioned vertically and perpendicular to the screen and the lens shift controls used to align the image with the screen to maintain a geometrically correct image Carefully lower each projector down onto the top of the others making sure that they are vertically aligned with ...

Страница 26: ... inputs are available HDMI 1 2 HDCP compliant digital video inputs from HDMI or DVI sources RGB 15 pin D type VGA style input from personal computer Component 1 RCA phono connectors for RGBS using Video input for sync or YPbPr Component 2 BNC connectors for YPbPr Video RCA phono connector for composite video or used as sync input for Component 1 S Video standard 4 pin S Video connector Input conne...

Страница 27: ...Page 2 14 Input connection examples continued Notes For more information about pin connections and control codes see section 6 Appendix ...

Страница 28: ...ction All of the projector s features can be controlled via a serial connection using the text strings described in Remote communications protocol in section 6 Appendix The RS232 connection can also be used to download the firmware updates issued from time to time by D8300 Trigger 1 2 Trigger 1 Screen trigger output can be connected to an electrically operated screen automatically deploying the sc...

Страница 29: ...ly then push the lock down to secure the cable Notes Use only the power cable provided Ensure that the power outlet includes a Ground connection as this equipment MUST be earthed Handle the power cable carefully and avoid sharp bends Do not use a damaged power cable Power connection ...

Страница 30: ...jector on 3 2 Inserting batteries into the remote control 3 2 Selecting an input signal or test pattern 3 3 Input 3 3 Test pattern 3 3 Adjusting the lens 3 3 Zoom 3 3 Focus 3 3 Shift 3 3 Adjusting the projected image 3 4 Aspect ratio 3 4 Image quality settings 3 4 Switching the projector off 3 4 ...

Страница 31: ...on For more detailed information about using the control keys on the remote control or the projector control panel using the menus see section 4 of the User Manual Controlling the projector If the red ISSUE indicator is illuminated continuously or Error Codes in section 6 of the User Manual Appendix for more information Do not mix an old battery with a new one or different types of batteries If yo...

Страница 32: ...tion about connecting input signals see Signal Inputs in section 2 of the User Manual Installation For more detailed information about input connections see Input signals in section 6 of the User Manual Controlling the projector For more information about lens shift see Shifting the image in section 2 of the User Manual Installation 0 1 234567 8 9 9 no mechanical controls for lens shift Adjusting ...

Страница 33: ...if no adjustment has been made the indicator will go out and the adjustment key must be pressed again to end the adjustment before 5 seconds has elapsed press a different adjustment key or press the key again Always allow the lamp to cool for 5 minutes before disconnecting the power moving the projector changing the lamp Switching the projector off Press POWER OFF on the remote control or POWER on...

Страница 34: ...settings 4 7 Example Brightness screen control 4 7 Test pattern 4 7 Using the menus 4 8 Navigating menus and submenus 4 8 Main menu 4 9 Aspect Ratio 4 9 Presets 4 10 Recall Presets 4 10 Save Presets 4 10 Brightness 4 11 Contrast 4 11 Saturation 4 11 Hue 4 11 Sharpness 4 12 Noise Reduction 4 12 Overscan 4 12 Input Select 4 13 Resync 4 13 Advanced menu 4 14 Colour Space 4 14 Video Standard 4 15 Gamm...

Страница 35: ...9 Source Enable 4 20 Menu Position 4 21 Blank Screen 4 21 Auto Power On 4 21 Auto Power Off 4 21 Rear Projection 4 22 Ceiling Mode 4 22 Logo Display 4 22 Control menu 4 23 Trigger 1 2 4 23 Auto Source 4 24 Keys 1 to 5 4 24 Service menu 4 25 Factory Reset 4 25 Blue Only 4 26 Test Patterns 4 26 Altitude 4 26 continued ...

Страница 36: ...t how to connect the projector see Connecting the projector in section 2 Installation and Connections in section 6 Appendix Many features are controlled from the menus using the menu navigation keys on the remote control or the projector control panel For more information about using the menus see later in this section Using the menus Some of the menu features for example brightness contrast and s...

Страница 37: ...If you select a source that is NOT connected or active the projector will continue searching through the input sources until it finds a valid signal LED status indicators The indicators on the control panel are as follows POWER off NO POWER steady blue normal RUNNING mode flashing blue LAMP WARM UP or COOL DOWN mode ISSUE off NO ERROR flashing or steady red ERROR STANDBY amber STANDBY mode Notes M...

Страница 38: ...enu navigation keys on the remote control or the projector control panel For more information about using the menus see later in this section Using the menus Some of the menu features for example brightness contrast and sharpness can be accessed directly using the control keys at the bottom of the remote control For more information about using the control keys see later in this section Using the ...

Страница 39: ...remote control to switch the projector ON 0 1 2 3 4 5 6 7 89 1 1 1 6 6 1 3 43 2 11 1 7 4 31 1 1 7 2 3 Press POWER OFF on the remote control to switch the projector to STANDBY mode 11 23 1 6 6 7 3 1 A ANDBY mode The lamp will switch o44 0 1 2 3 4 5 6 7 89 1 1 3 6 1 3 the power indicator has switched o44 1 27 1 1 62 r 2 ATANDBY mode Source T 1 4 B 1 3 1 66 ACDEFG 23 1 1 31 to H 71 I4 7 3 1 1 3 IA B ...

Страница 40: ...Example Brightness screen control Test pattern Press the key repeatedly to cycle through the Test patterns in the following order White Black Red Green Blue Cyan Magenta Yellow Chequerboard Greyscale Alignment grid White Notes For more information about all these image quality settings and more see Main menu and Advanced menu later in this section Using the menus Some of the settings will not be a...

Страница 41: ...tly the same funtion as the ENTER key on the remote control To exit from the menus completely you may need to press up to three times Using the menus Navigating menus and submenus 01 2 3 4 use the menu page headings 56 7 1 85 2 9 2 53 Most menu 8 5y 8 5 submenu3 6 55 56 7 2 2 6 5 1 w 3 25 8 5 6 6 0 2 25 7 9 55 6 2 6 which is always the Main menu3 1 7 5 2 5 2 5 1 T 25 7 2 ABC 5 2 5 2 53 To select a...

Страница 42: ...ation about the Aspect ratio settings see Screen requirements in section 2 Installation Main menu To display the menus press MENU on the remote control or the projector control panel Use the and keys to select the Main menu page To select a menu item use the and keys until the item is highlighted Aspect Ratio Use the and keys to select from 16 9 0 1 2 3 4 5678 9 2 Theaterscope 3 75 A B d 99 A 9 2 ...

Страница 43: ...s Noise Reduction Color Space Video Standard Gamma Colour Temperature Color Gamut Brilliant Color Adaptive Contrast RGB Offsets RGB Gains To return to the Main menu press once Notes To select a different menu press MENU once or twice so that no items are highlighted then use the the and keys to select a different page To exit from the menus completely you may need to press up to three times Image ...

Страница 44: ...o shift the hue toward red increase it to shift the hue toward green Press or once Hue 0 1 2 3455 r Use the and keys to adjust the Hue 70 8 7 9886 To return to the Main menu once 1 2 3 1 2 3 1 2 3 1 2 3 Notes To exit from the menus completely you may need to press up to three times Image changes made using the menus will take effect immediately Image changes made using the menus will take effect i...

Страница 45: ...s 0 1 2 3455 r Use the and keys to adjust the Sharpness from 0 to 200 To return to the Main menu once Noise Reduction Press or once Noise reduction 0 1 2 3455 r Use the and keys to adjust the Noise reduction from 0 to 200 To return to the Main menu once Overscan 670 5 84 471 79 0 7 2 71 0 471 75 5 84 471 0 17 4 5 7 9 7 2 7 4 71 1 5 9 7 40 9 0 2 174 7 2 5 1 8 1 4 7 70 1 7 4 2 4 419 7 9 7 40 9 Use t...

Страница 46: ...r twice so that no items are highlighted then use the the and keys to select a different page To exit from the menus completely you may need to press up to three times Image changes made using the menus will take effect immediately Some menu items may be greyed out unavailable due to the effect of settings made in other menus or due to the type of input signal If you select a source that IS connec...

Страница 47: ... menus or due to the type of input signal To determine what is the correct colour space to use consult the user manual for the video source Advanced menu To display the menus press MENU on the remote control or the projector control panel Use the and keys to select the Advanced menu page To select a menu item use the and keys until the item is highlighted Colour Space In most cases the Auto settin...

Страница 48: ...oves the dark areas of the image especially suitable for images from video cameras Punch enhanced brightness and increased colour saturation for high ambient light environments Graphics enhanced highlights and contrast especially suitable for computer presentations Colour Temperature In general a higher colour temperature gives a cooler feeling to the image and a lower temperature gives a warmer f...

Страница 49: ... and keys to select from On 5 133 9 Off Adaptive Contrast 1 8 A 1 1 12 1 0 12 image depending on the mean luminance of the image Use the and keys to select from On Off B B B Notes To exit from the menus completely you may need to press up to three times Image changes made using the menus will take effect immediately Some menu items may be greyed out unavailable due to the effect of settings made i...

Страница 50: ...m 0 to 200 To return to the Advanced menu press once 1 2 1 2 Notes To select a different menu press MENU once or twice so that no items are highlighted then use the the and keys to select a different page To exit from the menus completely you may need to press up to three times Image changes made using the menus will take effect immediately Some menu items may be greyed out unavailable due to the ...

Страница 51: ...and causes the projector to temporarily lose sync Use the and 8 0 56 3 1 02 E 0 FEE To return to the Advanced menu once 1 2 3 4 Notes To select a different menu press MENU once or twice so that no items are highlighted then use the the and keys to select a dif1 3 To exit from the menus completely you may need to press up to three times Image changes made using the menus will take effect immediatel...

Страница 52: ... To select a menu item use the and keys until the item is highlighted Language This product is available only in English at present 1 2 3 Notes To select a different menu press MENU once or twice so that no items are highlighted then use the the and keys to select a different page To exit from the menus completely you may need to press up to three times ...

Страница 53: ...d source will be included in an automatic input source search Off the selected source will not be included in an automatic input source search To return to the System menu press MENU once 1 2 3 4 System menu continued Notes To select a different menu press MENU once or twice so that no items are highlighted then use the the and keys to select a different page To exit from the menus completely you ...

Страница 54: ...es into Standy mode and does not start until POWER ON on the remote control or POWER on the projector control panel is pressed Auto Power Off When the projector is searching for a valid input source this option determines what appears on screen Use the and keys to select from On The projector automatically goes into Standby mode if no input source is detected for 20 minutes Off The projector stays...

Страница 55: ...d keys to select from On Projected image is reversed top to bottom Off Logo Display Use the and keys to select from On The D8300 logo is displayed during power up Off Notes To exit from the menus completely you may need to press up to three times Image changes made using the menus will take effect immediately System menu continued ...

Страница 56: ...is highlighted Trigger 1 2 Trigger 1 Screen trigger output can be connected to an electrically operated screen automatically deploying the screen when the projector starts up and retracting the screen when the projector shuts down Trigger 2 Aspect Ratio trigger output can be used to control screen shuttering for different aspect ratios For each Trigger setting use the and keys to select from Scree...

Страница 57: ... Source Use the and keys to select from On projector searches for an alternative input source when the current input source is disconnected Off projector shows a blank screen when the current input source is disconnected Keys 1 to 5 The to keys on the remote control can each be programmed to switch to one of the seven input sources Use the and keys to select a Key then press ENTER or SELECT The Ke...

Страница 58: ...er make a record of all settings or select No then press ENTER or SELECT Service menu To display the menus press MENU on the remote control or the projector control panel Use the and keys to select the Service menu page 0y and cannot be changed To select a menu item use the and keys until the item is highlighted Factory Reset Press ENTER or SELECT to request a Factory Reset The following message w...

Страница 59: ...tude For use at high altitudes where the air is thinner the fan speed can be increased Use the and keys to select from Low normal speed fan High high speed fan 1 2 Notes To exit from the menus completely you may need to press up to three times Image changes made using the menus will take effect immediately Some menu items may be greyed out unavailable due to the effect of settings made in other me...

Страница 60: ...Page 5 1 5 Maintenance Contents Changing the lamp module 5 2 Cleaning the fans 5 3 ...

Страница 61: ...r this projector should be used Fitting any other lamp could damage both projector and lamp and will invalidate the warranty At the end of life the lamp will not strike and the Issue indicator on the control panel Typical lamp life is 2000 hours Do not use the lamp for more than 2000 hours as this may cause serious lamp failure damage the lamp module and cause extra cost on replacement Take care n...

Страница 62: ...elow 1 2 Notes Always switch the projector OFF before cleaning the fans Always allow the lamp to cool for 5 minutes before disconnecting the power moving the projector changing the lamp The fans should be cleaned regularly In a clean environment such as 01 In a dusty or smoky environment such as a theatre 2 345 6 7 cleaning may be necessary ...

Страница 63: ...10 Composite video input 6 10 S Video input 6 10 RGB input 6 11 Component 1 input 6 11 Component 2 input 6 11 Control connections 6 12 Wired Remote control connection 6 12 Trigger 1 2 output 6 12 Serial control input 6 12 Null modem cable 6 12 Serial port settings 6 12 Remote communications protocol 6 13 Introduction 6 13 Key Commands 6 13 Example 6 13 The commands 6 13 Operation Commands 6 15 Exa...

Страница 64: ...the fans It is possible to increase the speed of the fans for use in a high altitude environment See section 4 Controlling the projector System menu No image is displayed See section 5 Maintenance Changing the lamp Check that the input source is switched on and connected to the projector correctly Check that the correct image source is selected Check that the brightness and contrast settings are s...

Страница 65: ...Installation Connecting the projector Projector does not respond to control commands from a computer Check that the serial cable is connected correctly Check that the baud rate is set correctly See this section 6 Appendix Connections Check that the correct control codes are being used See this section 6 Appendix Serial communications protocol Projector does not respond to control commands from the...

Страница 66: ...s an error the red Issue indicator will flash as shown in the chart below For example if the lamp door is left open the red indicator will flash twice followed by a pause then the sequence will repeat until the error condition is corrected Notes ...

Страница 67: ...truments DMD resolution 1920 x 1080 pixels Colour wheel 6 segment RGBYCW 3x Contrast Ratio 3000 1 10 Colour temperature Native 7500 K 1500 K adjustable 5500 K 9300 K Pixel fill factor 87 Lamp power 400W Lamp life typical 1500 hours Brightness 6500 ANSI lumens 10 Uniformity 85 ...

Страница 68: ...r consumption 110V 347W in Running mode 1 9W in Standby 240V 331W in Running mode 2 5W in Standby International Regulations Meets FCC Class B requirements Meets EMC Directives EN 55022 EN 55024 Meets Low Voltage Directive EN60950 Indicators Power Standby Issue Fault Physical Temperature Operating 10 to 35 C Storage 20 to 60 C Thermal Dissipation 1500 BTU hr Humidity Operating 20 to 90 non condensi...

Страница 69: ...Page 6 7 Dimensions All dimensions in mm unless otherwise stated ...

Страница 70: ... VESA DMT 1280x720 47 95 x x x VESA GTF 1280 x 768 60 x x x VESA DMT 1280 x 768 60 x x x VESA DMT Reduced Blanking 1280 x 768 75 x x x VESA DMT 1280 x 768 85 x x x VESA DMT 1280 x 800 50 x x x VESA DMT 1280 x 800 60 x x x VESA DMT 1280 x 800 75 x x x VESA DMT 1280x1024 60 02 x x x VESA DMT 1280x1024 75 02 x x x VESA DMT 1280x1024 85 02 x x x VESA DMT 1440 x 900 60 x x x VESA DMT 1440 x 900 75 x x ...

Страница 71: ...x ITU R BT 1358 CEA 861 D HDTV 1035i 60 x x x x x SMPTE 260M 1080i 50 x x x x x SMPTE 274M CEA 861 D 1080i Aus 50 x x x x x SMPTE 295M 1080i 59 94 x x x x x SMPTE 274M CEA 861 D 1080i 60 x x x x x SMPTE 274M CEA 861 D 720p 50 x x x x x SMPTE 296M CEA 861 D 720p 59 94 x x x x x SMPTE 296M CEA 861 D 720p 60 x x x x x SMPTE 296M CEA 861 D 1080p 23 98 x x x x x SMPTE 274M CEA 861 D 1080p 24 x x x x x ...

Страница 72: ...0 8 TMDS Data 0 Shield 9 TMDS Data 0 10 TMDS Clock 11 TMDS Clock Shield 12 TMDS Clock 13 CEC 14 not connected 15 SCL DDC Clock 16 SCA DDC Data 17 DDC CEC Ground 18 5 V Power 19 Hot Plug Detect Composite video input 1 x 75 ohm BNC PAL or NTSC video S Video input 4 pin mini DIN 1 Y Ground 2 C Ground 3 Luminance Y 4 Chrominance C pin view of panel connector pin view of female connector ...

Страница 73: ...nc 14 V Sync 15 SCL Component 1 input 3 x RCA phono connectors RGsB YPbPr YCbCr Red Pr Cr Green Sync Y Y Blue Pb Cb Component 2 input 3 x 75 ohm BNC YPbPr YCbCr Y Y Pb Cb Pr Cr Notes In most cases the Auto setting will determine the correct color space to use If it does not you can select the appropriate setting manually To select between RGB and YPrPb signals see Advanced Menu in 4 Controlling th...

Страница 74: ...8 unused 9 unused Null modem cable used to connect the projector to a modem RX 2 3 TX TX 3 2 RX GND 5 5 GND Serial port settings Baud rate 38400 bps Data length 8 bits Stop bits one Parity none Flow control none Notes Trigger outputs are normally at 0V and rise to 12V when triggered The projector is a DCE so use a straight cable to connect to a computer or a null modem cable as shown here to conne...

Страница 75: ...sses and use the following format ky keyname CR Example ky pow on CR simulates the POWER ON key being pressed The commands Code transmitted keyname Description 0x01 pow on Turn power on 0x09 pow off Turn power off 0x15 menu Bring up or cancel menu display 0x17 enter Keypad enter 0x18 cur down Keypad down arrow 0x1A cur up Keypad up arrow 0x1D cur left Keypad left arrow 0x1F cur righ Keypad right a...

Страница 76: ...rc 4 Switch the active source to source 4 0x8F src 5 Switch the active source to source 5 0x93 osc sw Switch to the next Overscan mode 0x98 mem 1 Recall user memory associated with the User Memory A key 0x99 mem 2 Recall user memory associated with the User Memory B key 0x9A mem 3 Recall user memory associated with the User Memory C key 0x9D asp sw Switch to the next aspect ratio setting 0xA3 bcol...

Страница 77: ...n Example op aspect 1 CR sets the aspect ratio to Theaterscope op aspect CR asks what is the current aspect ratio op bright CR increments the brightness setting op resync CR commands the projector to attempt to re synchronise to the current input source The commands Operation command Values Notes aspect 0 16 9 1 Theaterscope 2 4 3 3 4 3 Narrow 4 Native memory 0 Preset A 1 Preset B 2 Preset C 3 Pre...

Страница 78: ... 0 Auto 1 YPbPr REC709 2 YCbCr REC601 3 RGB PC 4 RGB Video video stand 0 Auto 1 NTSC 2 PAL 3 SECAM gamma 0 CRT 1 Film 2 Video 3 Punch 4 Graphics color temp 0 5500K 1 6500K 2 7500K 3 9300K dlp frame 0 Auto 2 48 Hz 3 50 Hz 4 60 Hz color gamut 0 Auto 1 REC709 2 SMPTE C 3 EBU 4 Native bcolor 0 Off 1 On red off 0 200 green off 0 200 blue off 0 200 red gain 0 200 green gain 0 200 blue gain 0 200 vert po...

Страница 79: ...f 1 On logo disp 0 Off 1 On trig 1 0 Screen 1 16 9 2 Theaterscope 3 4 3 4 4 3 Narrow 5 RS232 6 On 7 Off 0 Trigger occurs when the projector is in RUNNING mode trig 2 0 Screen 1 16 9 2 Theaterscope 3 4 3 4 4 3 Narrow 5 RS232 6 On 7 Off 0 Trigger occurs when the projector is in RUNNING mode auto source 0 Off 1 On model name string ser number string soft version string act source 0 HDMI 1 1 HDMI 2 2 ...

Страница 80: ...environment string Temperatures lamp reset execute fact reset execute blue only 0 Off 1 On pattern 0 White 1 Black 2 Red 3 Green 4 Blue 5 Cyan 6 Magenta 7 Yellow 8 Chequerboard 9 Greyscale 10 Alignment Grid 11 Off altitude 0 Low 1 High status check 0 standby mode 1 warm up mode 2 running mode 3 cooling mode 4 error ...

Отзывы: