background image

31

E

MOVIE MODE

Recording Video Clips

The movie mode allows you to record video clips at a resolution of 320x240
pixels. Voice can also be recorded.

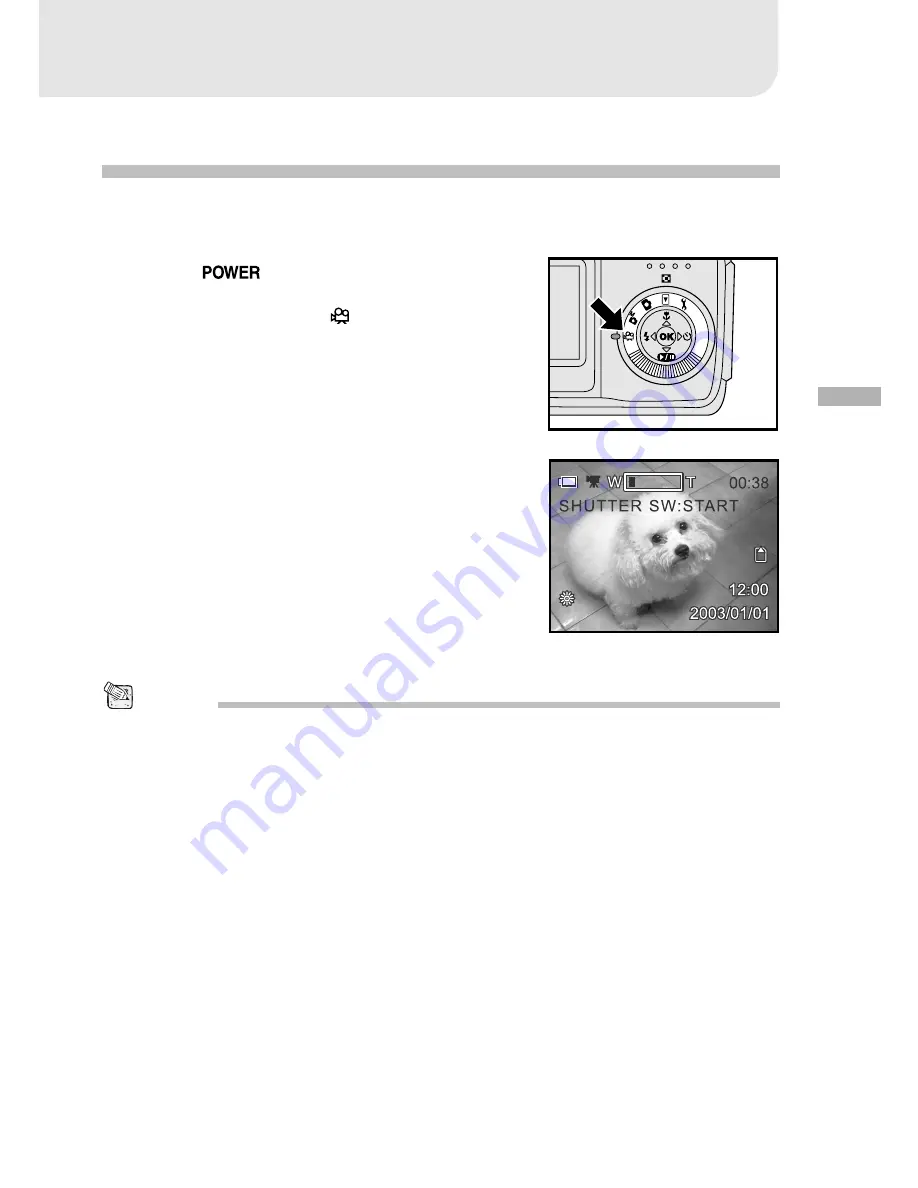
1. Slide the 

 switch and power on the

camera.

2. Set the mode dial to the 

 Movie mode.

The recordable movie time displays on
the LCD monitor.

3. You can start recording a video clip by

pressing the shutter button.

The elapsed time displays on the LCD
monitor while recording a video clip.

4. To stop recording, press the shutter button

again.

• In movie mode, image size/quality, macro, self-timer, flash and digital zoom are not available

or adjustable.

• While recording the video clip, you cannot zoom in or out on the subject.

• Be sure not to cover the camera’s microphone while recording a video clip.

NOTE

Содержание Vivicam 3746

Страница 1: ...Vivicam 3746 User Manual English 040116E...

Страница 2: ...ations However there is no guarantee that interference will not occur in a particular installation If this equipment does cause harmful interference to radio or television reception which can be deter...

Страница 3: ...eneral reference guide for the product 2 The product and accessories that come with your camera may be different from those described in this manual This is due to the fact that different retailers of...

Страница 4: ...fire or an electrical shock Do not touch the power plug during a thunderstorm if you are using the AC power adapter This may cause an electrical shock Do not use the camera if any foreign objects hav...

Страница 5: ...unplug the camera from the power source batteries or AC power adapter for safety If you are using the AC power adapter unplug the adapter from the AC power outlet after you have disconnected the came...

Страница 6: ...CD monitor 19 Zoom Functions 19 Digital Zoom 20 Self Timer 21 Macro Mode 22 Setting the Flash 22 Setting Image Resolution and Quality 24 Capturing Images Manually 26 PLAYBACK MODE 27 Playing Back Capt...

Страница 7: ...48 EV COMPENSATION 48 WHITE BALANCE 49 DIGITAL ZOOM 49 LCD BRIGHTNESS 50 SHARPNESS 50 Movie Menus 51 EV COMPENSATION 51 WHITE BALANCE 51 LCD BRIGHTNESS 51 Playback Menus 52 SLIDE SHOW 52 PROTECT 52 L...

Страница 8: ...hort videos by using the movie function Images you have taken can be downloaded to your computer using the USB cable USB driver is required only for Win 98 and Mac OS 8 6 You can enhance and retouch y...

Страница 9: ...CAMERA Front View 1 Speaker 2 Shutter button 3 Flash 4 Battery cover door 5 Power indicator 6 Power switch 7 Self timer LED 8 Viewfinder window 9 Microphone 10 Autofocus Optical Zoom Lens 11 DC in co...

Страница 10: ...button 7 Delete button 8 Display button 9 Zoom in button 10 Zoom out button 11 Controller 12 Mode dial 13 LCD monitor 14 Tripod socket Controller 1 Thumbnail button 2 Arrow button Up Macro button 3 A...

Страница 11: ...icator Solid blue The camera is powering up No LED indicator Blinking orange The camera is powering up No LED indicator Solid green The camera is powered and ready Yes 1 to capture image video clip LE...

Страница 12: ...s Automatic Red eye reduction Slow synchro Fill flash on Flash off 4 Macro 5 Self timer mode 10 seconds delay 2 seconds delay 6 White balance Automatic Sun Shade Tungsten Fluorescent 1 Fluorescent 2 7...

Страница 13: ...ry level Full battery power Fairly consumed Nearly exhausted Virtually no battery power 2 Playback mode 3 File image number 4 Image size 2048 x 1536 1600 x 1200 1280 x 960 1024 x 768 640 x 480 5 Image...

Страница 14: ...rly consumed Nearly exhausted Virtually no battery power 2 Press the shutter button to start recording a video clip 3 White balance Automatic Sun Shade Tungsten Fluorescent 1 Fluorescent 2 4 Movie mod...

Страница 15: ...when playing back video clips 1 Battery level Full battery power Fairly consumed Nearly exhausted Virtually no battery power 2 Press the button to play back recorded video clips 3 Movie mode 4 File m...

Страница 16: ...Connect the other end to an electrical outlet Make sure to use only the AC power adapter specified for the camera Damage caused by the use of an incorrect adapter is not covered under the warranty Us...

Страница 17: ...images and video clips 1 Make sure the camera is turned off 2 Slide the SD memory card cover 3 Inset an SD memory card The face of the memory card printed arrow should face towards the back side of t...

Страница 18: ...tended period of time To adjust the Date or Time at any other time 1 Power on the camera 2 Set the mode dial to the Setup mode 3 Select to the DATE SETUP by using the or buttons and press the button T...

Страница 19: ...nly compose images using the viewfinder Using the LCD monitor you can compose images more accurately but at the cost of battery consumption The LCD display is always recommended for macro shots Using...

Страница 20: ...power and increase the number of shots you can take it is recommended to turn the LCD monitor off and use the optical viewfinder instead The LCD monitor must be on when Digital Zoom is to be used NOTE...

Страница 21: ...itor by pressing the Display button 3 To enable the digital zoom a Press the menu button b Press the or buttons to select DIGITAL ZOOM and press the button c Press the or buttons again to select ON an...

Страница 22: ...er mode by toggling the button The selected self timer mode is displayed on the LCD monitor 4 Compose the scene 5 Press the shutter button The self timer function is activated The image is then taken...

Страница 23: ...off There is not a distinct point subject range at which normal mode is favored over macro mode take an image in both optical and macro modes and compare the results In Macro mode the internal flash...

Страница 24: ...learly reproduced in artificial light backlighting fluorescent lighting etc or with people against the night as a background scene The flash will always fire regardless of the surrounding brightness S...

Страница 25: ...herefore fewer images will take up more memory space High resolution and quality settings are recommended for printed output and situations requiring the finest detail Lower resolution quality images...

Страница 26: ...1 216 87 193 404 826 1670 3326 16 1 324 131 289 606 1240 2506 4990 Number of Recordable Images The frame counter indicates the approximate number of images that can be stored on the internal memory o...

Страница 27: ...refer to the appropriate section of this manual To Take Images Manually 1 Slide the switch and power on the camera 2 Set the mode dial to the Manual Record mode 3 Press the button 4 Select EV COMPENSA...

Страница 28: ...to the Playback mode The last recorded image appears on the LCD monitor 3 View and select your images by using the buttons To view the previous image press the button To view the next image press the...

Страница 29: ...tor 3 Press the button Nine thumbnail images appear on the LCD monitor assuming there are nine or more recorded images in the memory 4 Use the or buttons to move the cursor to select the image to be d...

Страница 30: ...ephoto button or wide angle button Pressing the telephoto button will enlarge the image To return to normal magnification press the wide angle button The image is displayed enlarged you will see a red...

Страница 31: ...E SHOW by using the or buttons and press the button 5 Set the playback interval by using the or buttons and then press the button The slideshow displays your images on the LCD monitor one by one with...

Страница 32: ...the LCD monitor 3 You can start recording a video clip by pressing the shutter button The elapsed time displays on the LCD monitor while recording a video clip 4 To stop recording press the shutter bu...

Страница 33: ...button to start To pause playback at any time press the button To stop playback press the or buttons Pressing the or buttons while playing the video clip will change the status as follows To play a t...

Страница 34: ...anual Record mode only the last recorded image can be erased In the Playback mode select any image that you want to view by using the or buttons 2 Press the delete button 3 Select 1 FRAME by using the...

Страница 35: ...he Playback mode 2 Press the delete button 3 Select DELETE ALL by using the or buttons and then press the button 4 DELETE ALL message appears on the image Use the or buttons to select YES and press th...

Страница 36: ...button If you want to cancel the action select NO 5 If you select YES the Frame No Reset message appears To reset the frame number use the or buttons to select YES and press the button If all images...

Страница 37: ...r buttons and press the button 5 You can protect one image or all images at one time by using the or buttons and press the button ONE IMAGE Protect one image at one time ALL IMAGES Protect all images...

Страница 38: ...clips from the camera to your computer follow the steps below Step 1 Installing the USB driver only for Windows 98 Step 2 Connecting the camera to your computer Step 3 Download transfer your images a...

Страница 39: ...screen instructions to complete the installation After the USB driver has been installed restart your computer Macintosh OS 8 6 computers Mac OS 8 6 users must install a USB driver For Mac OS 9 0 or h...

Страница 40: ...r memory card in your camera Typically the camera will be assigned drive letter e or higher 6 Double click on the removable disk and locate the DCIM folder 7 Double click on the DCIM folder to open it...

Страница 41: ...mages that you want then choose Copy from the Edit menu Open the destination location folder and choose Paste from the Edit menu You may also drag and drop image files from the camera to a desired loc...

Страница 42: ...hotoSuite 1 Insert the CD ROM packaged with the camera into the CD ROM drive The welcome screen appears 2 Click Install PhotoSuite Follow the on screen instructions to complete the installation For in...

Страница 43: ...a to create spectacular 360 panoramic images please refer to its online help For Windows 2000 XP users make sure to install and use the PhotoVista while logged in as a user with an Administrator accou...

Страница 44: ...nstalled in your computer 1 Insert the CD ROM packaged with the camera into the CD ROM drive The welcome screen appears 2 Click Install User s Manual Follow the on screen instructions to complete the...

Страница 45: ...ackaged with the camera into the CD ROM drive The welcome screen appears 2 Click Install Acrobat Reader Follow the on screen instructions to complete the installation For Mac users 1 Insert the CD ROM...

Страница 46: ...2 Press the menu button 3 Select the desired menu item by using the or buttons and press the button 4 Change the setting by using the or buttons and then press the button To exit from the menu mode a...

Страница 47: ...ich the image is to be captured Fine Normal Basic DIGITAL ZOOM You can take digital zoom shots by activating the digital zoom function OFF Disable digital zoom ON Enable digital zoom LCD BRIGHTNESS Th...

Страница 48: ...OM LCD BRIGHTNESS and SHARPNESS 1 Set the mode dial to the Manual Record mode 2 Press the menu button 3 Select the desired menu item by using the or buttons and press the button 4 Change the setting b...

Страница 49: ...a adjusts the exposure of each scene automatically However if the subject is very dark or very bright you may override the camera automatic exposure determination to make the subject brighter or darke...

Страница 50: ...led white balance adjustment This setting allows you to set the white balance when capturing images under specific lighting condition AUTO Automatic adjustment SUN For recording outdoors on a bright d...

Страница 51: ...er to LCD BRIGHTNESS in Record menu SHARPNESS Set the level of image sharpness HARD Sharpen the edge of the image detail NORMAL Leave the image detail as captured SOFT Soften the edge of the image det...

Страница 52: ...d menu item by using the or buttons and press the button 4 Change the setting by using the or buttons and then press the button To exit from the menu mode at anytime press the button again EV COMPENSA...

Страница 53: ...the settings by using the or buttons and then press the button To exit from the menu mode at anytime press the button again SLIDE SHOW Your camera can display your images sequentially as a slide show...

Страница 54: ...ou to copy your images from the camera s internal memory to a memory card Of course you can only do this if you have a memory card installed and some images in internal memory NO Does not copy the ima...

Страница 55: ...ERSION 1 Set the mode dial to the Setup mode 2 Select the desired menu item by using the or buttons and press the button 3 Change the setting by using the or buttons and then press the button BEEP Spe...

Страница 56: ...5 MIN RESET This function will restore all the parameters to the default settings NO Retain current settings YES Reset to default factory settings DATE TYPE Set the displayed date format on the LCD m...

Страница 57: ...d Singapore Spain Sweden Switzerland Thailand or Norway FRAME NO RESET Set whether or not to reset the file and folder number when you take images Default reset folder number is 100 and file number is...

Страница 58: ...57 E CONNECTING YOUR CAMERA TO OTHER DEVICES...

Страница 59: ...10 second delay Zoom Digital Capture mode 2X Playback mode 2X and 4X Exposure compensation Auto Manual 2 0 2 0 EV 0 5 EV steps White Balance Automatic Manual SUN SHADE TUNGSTEN FLUORESCENT 1 FLUORESCE...

Отзывы: