background image


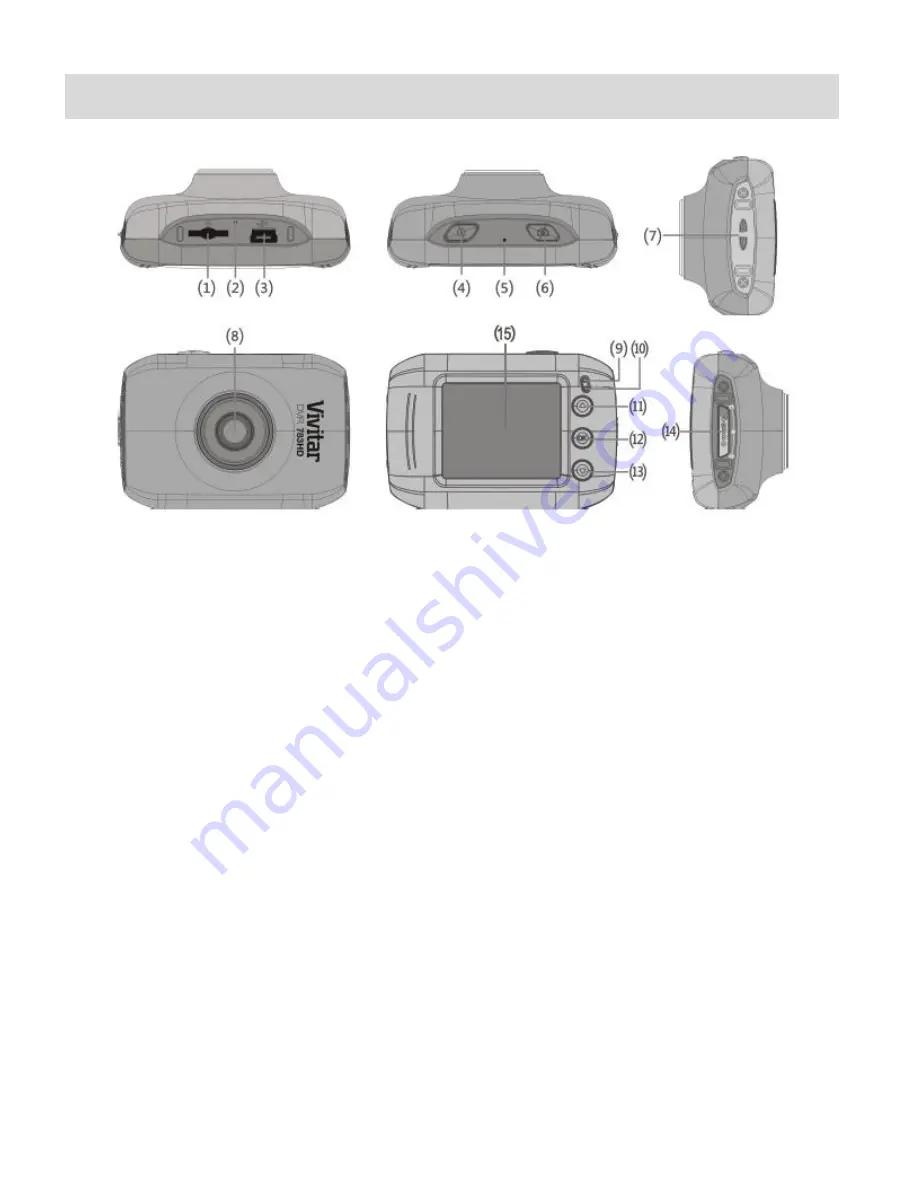
Parts of the Camcorder   


1.    Micro SD Memory Card Slot 

2.    Reset Button 

3.    USB Interface   

4.    Power Button 

5.    Microphone 

6.    Shutter Button 

7.    Wrist Strap Connector 

8.    Lens 

9.    LED Charge Light Indicator 

10.   LED Busy Light Indicator 

11.   UP / Zoom In Button 

12.   OK / SET Button 

13.   Down / Zoom Out Button 

14.   Mode Switch: Photo, Video, Playback 

15.   LCD Screen 


Содержание DVR 783HD

Страница 1: ...corder User Manual 2009 2014 Sakar International Inc All rights reserved Windows and the Windows logo are registered trademarks of Microsoft Corporation All other trademarks are the property of their...

Страница 2: ...14 Video Capture Mode 15 Photo Capture Mode 17 Playback Mode 19 Menu Options 21 Computer System Requirements 34 Installing the Software 35 Connecting the Camcorder to the Computer 36 Getting Photos an...

Страница 3: ...l action camcorder supports a Micro SD Memory Card up to 32GB Class 4 or higher In order to use your digital action camcorder normally please insert the Micro SD Memory card before use Micro SD Memory...

Страница 4: ...rder 6 Waterproof Casing 2 USB Cable 7 Bicycle Mount 3 AC Adapter 8 Helmet Mount 4 Vivitar Experience Installation CD 9 Helmet Mount Strap 5 Stand Accessory NOTE Built in Lithium Battery included not...

Страница 5: ...ton 3 USB Interface 4 Power Button 5 Microphone 6 Shutter Button 7 Wrist Strap Connector 8 Lens 9 LED Charge Light Indicator 10 LED Busy Light Indicator 11 UP Zoom In Button 12 OK SET Button 13 Down Z...

Страница 6: ...VIA THE COMPUTER 1 Power off the camera 2 Use the supplied USB cable to connect the smaller end of the USB cable into the USB slot on the camcorder Connect the other end to the USB interface of your...

Страница 7: ...ct the smaller end of the USB cable into the USB slot on the camcorder Connect the other end to the cable to the AC Adapter and then plug the AC Adapter into a power socket See images below 1 and 2 3...

Страница 8: ...ll The battery level is half The battery level is low indicating to prepare for recharging the built in lithium battery If the no battery level icon shows the battery is almost exhausted and the camco...

Страница 9: ...hear a slight clicking sound This indicates the memory card has been inserted correctly 4 If the memory card has successfully been inserted an icon appears on the LCD screen 5 To remove the card gent...

Страница 10: ...e POWER button located on top of the camcorder to turn on the camcorder NOTE If the camcorder becomes unresponsive insert a thin pin into the RESET hole and gently push the pin until you hear a slight...

Страница 11: ...tically saved to your camcorder s memory card PHOTO CAPTURE MODE Use this mode to capture pictures with your camcorder Slide the MODE Switch to the Photo Capture icon to open the Photo Capture Mode To...

Страница 12: ...l Memory Micro SD Memory card Class 4 or higher up to 32GB LCD Display 1 77 TFT Zoom 4X Digital Zoom Focus Range 120CM Infinity White Balance Auto Daily Cloudy Fluorescent Tungsten Light Exposure 3 2...

Страница 13: ...rting the camcorder Submerse the case completely in a bowl of water for about a minute Remove the case from the water dry off its exterior with a towel and then open the case If the entire interior is...

Страница 14: ...13 INSTALLING THE BICYCLE MOUNT HANDLEBAR CLAMP INSTALLING THE HELMET MOUNTING SYSTEM...

Страница 15: ...on the camcorder 2 Long press the POWER button again to turn the power off AUTO POWER OFF POWER SAVING FEATURE Your digital camcorder includes an Auto Power Off power feature that automatically turns...

Страница 16: ...set the camcorder display if desired NOTE While using the Zoom options the zoom magnification is indicated on the bottom right of the LCD screen 3 Changing Resolution If you would like to change the...

Страница 17: ...o set the zoom and camcorder settings before placing it into the case While capturing your video after approximately two minutes of video capture the LCD display turns off in order to save power The b...

Страница 18: ...Zoom options the zoom magnification is indicated on the bottom right of the LCD screen 3 Changing Resolution If you would like to change the resolution press the OK MENU SET button and then press the...

Страница 19: ...ngs before placing it into the case While capturing your video after approximately two minutes of video capture the LCD display turns off in order to save power The busy LED light remains on and the v...

Страница 20: ...er of the LCD screen Photos appear with the Camera icon displayed on the bottom left corner of the LCD screen The numbered sequence of captured images is shown on the top right of the LCD screen NOTE...

Страница 21: ...image video or photo appears 2 Select the image you would like to delete 3 Press the OK button to enter the Playback Mode menu options NOTE To exit the menu options press the Shutter button 4 Press t...

Страница 22: ...ess the Up or Down button to select a menu option The menu option appears highlighted 3 Press OK to select the highlighted menu option and enter the submenu options 4 Press the Up or Down button to se...

Страница 23: ...Mode menu option is selected use the Up button to highlight the top Mode menu icon and then quick press the Power button to select to the camcorder settings menu icon 3 Press the Up or Down button to...

Страница 24: ...etting will affect how your camera focuses when capturing an image Depending on your selection the camera will be more sensitive to focusing on particular areas in the display and adjust the image col...

Страница 25: ...re taken with your camcorder The White Balance menu options include Auto Default Daylight Cloudy Fluorescent Tungsten EFFECT The Effect menu allows you to choose a color effect to add to the images ta...

Страница 26: ...ty level of the images taken by your camcorder Keep in mind that photos with a higher image quality level will also take up more memory on your camcorder s memory card The Quality menu options include...

Страница 27: ...s that are taken with your camcorder The White Balance menu options include Auto Default Daylight Cloudy Fluorescent Tungsten EXPOSURE The Exposure setting helps you control the amount of light that e...

Страница 28: ...Burst Multi Snapshots feature allows you to take three rapid snapshots in a row with a single click of the Shutter button This feature can be effective when trying to capture a particular moment in a...

Страница 29: ...to the files First select the image you would like to lock or unlock and then select the appropriate menu option to either lock or unlock one image or all images The Lock menu options include Lock Un...

Страница 30: ...on deletes all images videos and photos Press the Up or Down button to select an option and then press the OK button to confirm 6 A window then appears to confirm your selected Delete option The follo...

Страница 31: ...Repeat Select Repeat to loop the Slide Show or play it only once The Repeat options include No Default Plays the Slide Show once Yes Plays the Slide Show continuously To stop the looping of the Side...

Страница 32: ...in fluorescent lighting sources in your locale If your camcorder is set to a frequency that does not match your country s electric current you may see waves on the images taken by your camcorder The...

Страница 33: ...e and time setting LANGUAGE You can select your camcorder s language setting by selecting the desired language from the Language menu The Language menu options include English French Spanish FORMAT Yo...

Страница 34: ...Exits the Format submenu screen without deleting all images RESET ALL Use the Reset All menu to reset your camcorder settings to the Factory Default Settings The Reset All menu options include Yes Au...

Страница 35: ...e hard disk space 16 bit Color monitor 1024 X 768 recommended screen resolution CD ROM Drive QuickTime 6 or higher Microsoft Internet Explorer 7 or higher Windows Media Player 10 or higher DirectX 9 o...

Страница 36: ...Experience Image Manager Installer window appears If the window does not appear open the application s CD DVD drive and click on Setup exe to launch the installer MACINTOSH Click the icon that appears...

Страница 37: ...r Experience Image Manager installer create the folder to where the program will be installed and then click Install 10 Please wait while the application continues the installation process on your com...

Страница 38: ...y USB device connected then it will be selected automatically 5 Select a location on the computer where to place the new video files 6 Add the new video files to albums if desired 7 Select to remove t...

Страница 39: ...utton on the application s Home screen Transferring Images Manually from the Camcorder to the Computer WINDOWS OS 1 Use the supplied USB cable to connect your camcorder to your computer s USB port 2 P...

Страница 40: ...e Paste from the Edit menu 6 We recommend that you copy the photos into the Pictures folder and the videos into the Movies folder 7 Do not disconnect the cable during transfer Doing so will cancel the...

Страница 41: ...E iPad SD Card Reader not included This may be purchased separately After you make the connection your iPad automatically opens the Photos application This allows you choose which photos and videos to...

Страница 42: ...se including but limited to repair by unauthorized parties tampering modification or accident What to Do When Service Is Required When returning your defective product postage pre paid for service you...

Страница 43: ...ter What do I do First ensure that you have in fact taken photos Press the Shutter button to take some sample photos or videos and then try downloading them again If the photos are saved to the SD mem...

Отзывы: