background image


11 

Video Capture Mode 

The Video Capture Mode allows you to capture videos with your digital camera. 


Taking a Video 

1.  Flip open the LCD cover and power on the digital video recorder. 

2.  When the camera is first powered on, the camera will be in Video Capture Mode. 

3.  While in Video Capture Mode, use the LCD display to direct the camera at the scene you 

would like to capture. 

4.  Hold the camera steady and press the 

Shutter

 button to start the video capture. 

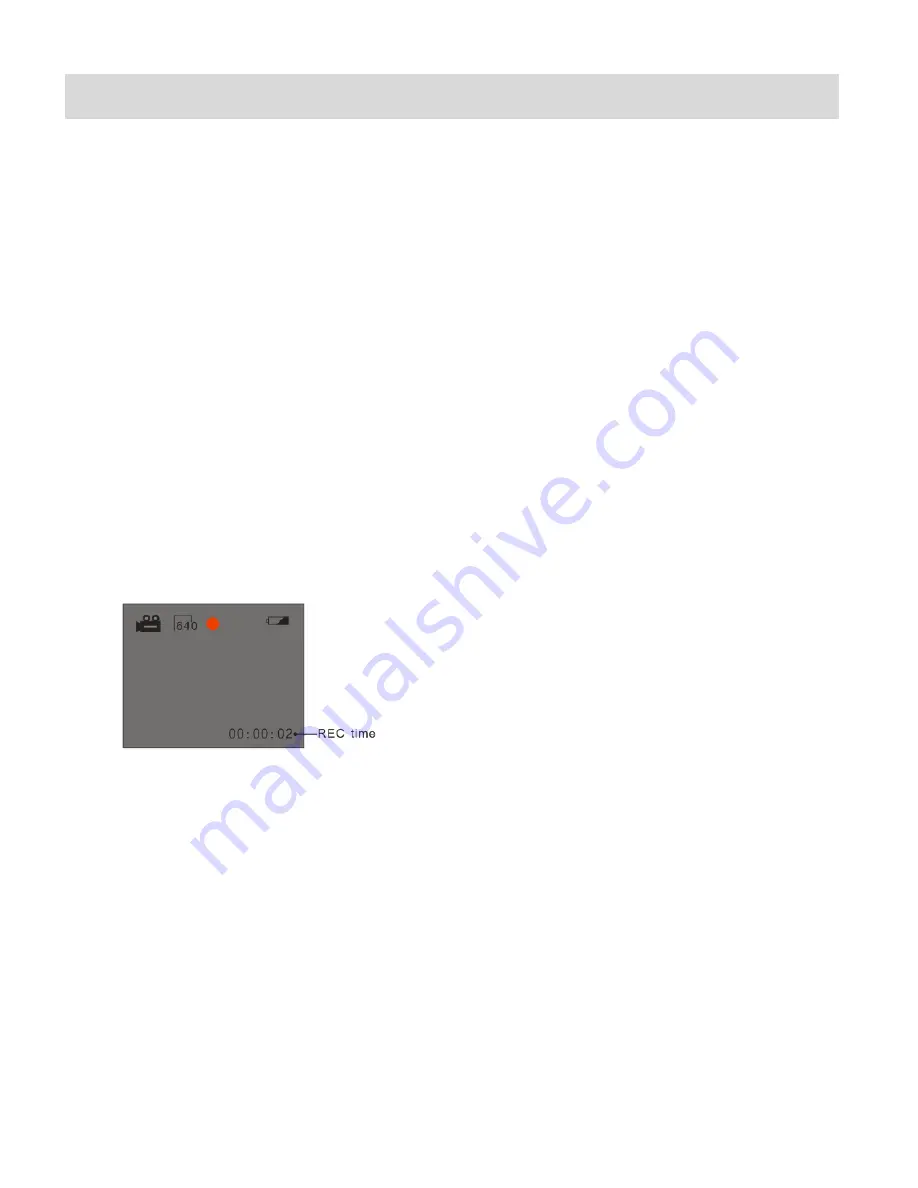
5.  A  red  blinking  icon  appears  at  the  top  of  the  LCD  indicating  that  the  recording  is  in 

progress.   

6.  The recording time is shown on the bottom right of the LCD screen. 

7.  To stop the video record, press the 

Shutter

 button again.   

8.  The video 

will automatically be saved to the camera‟s SD card.   


Video Resolutions 

There are two video resolutions for you to capture videos:


640x480 pixels (VGA).


320x240 pixels (QVGA) 

1.  Press 

UP

 or 

DOWN

 button to change between the video resolutions. 

2.  Keep in mind that images with a higher resolution will capture a video of better quality and 

will 

also take up more of your camera‟s memory. 


Содержание DVR 504

Страница 1: ...rder User Manual 2010 Sakar International Inc All rights reserved Windows and the Windows logo are registered trademarks of Microsoft Corporation All other trademarks are the property of their respect...

Страница 2: ...Icons 10 Video Capture Mode 11 Photo Capture Mode 12 Playback Mode 13 Connecting the Camera to a TV 16 Installing the Software 17 Connecting the Camera to the Computer 18 Getting Photos and Videos fro...

Страница 3: ...st out of your digital video recorder Note Your digital video recorder supports an SD Memory Card up to 32GB In order to use your digital video recorder normally it is strongly recommended to insert t...

Страница 4: ...Down Button 9 LCD Screen 2 Up Button 10 Digital Lens 3 Shutter Button 11 SD Memory Card Slot 4 Power Button 12 Tripod Socket 5 Delete Button 13 Microphone 6 MODE Button 14 Mirror 7 TV Out 15 Battery...

Страница 5: ...Setup Installing the Batteries Installing the Memory Card Insert 3 x AAA batteries Alkaline batteries recommended Insert SD Memory card up to 32GB before use Turning On the Camera Using the Camera Sel...

Страница 6: ...ure an SD card has been properly inserted into your digital video recorder inserted until a click sound is heard Note After the digital video recorder is powered on an SD icon will appear on the LCD d...

Страница 7: ...press the Shutter button again The video will be automatically saved to your camera s memory card Photo Capture Mode Use this mode to capture pictures with your camera After turning on your camera pre...

Страница 8: ...Internal Memory Limited 2 test photos or video 4 seconds VGA 8 seconds QVGA External Memory SD Card up to 32GB LCD Display 1 5 Inch TFT Lens Fix Focus Lens Focus Length f 4 8mm F2 4 Exposure Auto Whi...

Страница 9: ...disk space 1024 x 768 Recommended screen resolution 16 bit color or higher display adaptor CD ROM Drive QuickTime 6 or higher Microsoft Internet Explorer 7 or higher Windows Media Player 10 or higher...

Страница 10: ...again at any point to turn your camera OFF You will see a Goodbye splash screen and then the camera will power off completely Note Your digital video recorder also has an Auto Power Off feature that a...

Страница 11: ...camera mode make sure the camera is powered ON and press the MODE button LCD Icons When in Video Capture Mode this icon will display on the top left corner of the LCD display When in Photo Capture Mod...

Страница 12: ...t the video capture 5 A red blinking icon appears at the top of the LCD indicating that the recording is in progress 6 The recording time is shown on the bottom right of the LCD screen 7 To stop the v...

Страница 13: ...ture Mode 3 Press the MODE button once to enable the Photo Capture Mode 4 While in Photo Capture Mode use the LCD display to direct the camera at the scene you would like to capture 5 Hold the camera...

Страница 14: ...n X will be displayed on the LCD if there are no images saved on your SD Memory Card 3 The number of images videos and photos is displayed in sequence on the bottom right corner of the LCD screen 4 Se...

Страница 15: ...to scroll through the images on your digital video recorder s memory card until you find the image you would like to view Each captured image videos and photos will display on the LCD screen Videos w...

Страница 16: ...at the Memory Card 1 While in Playback Mode press the DELETE button THREE TIMES to format your memory card 2 Press the UP or DOWN button to select either Format Memory Card This permanently deletes al...

Страница 17: ...V instead of on the LCD screen Note The only limitation of using the TV screen is that the camera is now not portable 1 Connect the camera to a TV with the TV cable supplied Connect the black jack int...

Страница 18: ...ation s CD DVD drive and click on Setup exe to launch the installer 3 On Macintosh Click the icon that appears on the desktop to install the Vivitar Experience Image Manager 4 If you do not have inter...

Страница 19: ...then click Install 11 Please wait while the application continues the installation process on your computer 12 On PC Click the Close button when the installation is complete Click the Launch Vivitar E...

Страница 20: ...n it will be selected automatically 5 Select a location on the computer where to place the new photo and video files 6 Add the new photo and video files to albums if desired 7 Select to remove the med...

Страница 21: ...plication s Home page Transfer media from my camera to my computer manually Using Windows 1 Use the USB cable that came with your camera to connect your camera to your computer 2 MSDC appears on the L...

Страница 22: ...ur computer Optionally select the files and choose Copy from the Finder s Edit menu Then select a folder and choose Paste from the Edit menu 6 We recommend that you copy the images into the Pictures f...

Страница 23: ...se including but limited to repair by unauthorized parties tampering modification or accident What to Do When Service Is Required When returning your defective product postage pre paid for service you...

Страница 24: ...sample photos and then try downloading them again With test photos if the camera powers off before you upload them to the computer the photos are not stored in the camera s memory These photos should...

Отзывы: