background image

After Sales Support       TEL: 1300 886 649

5

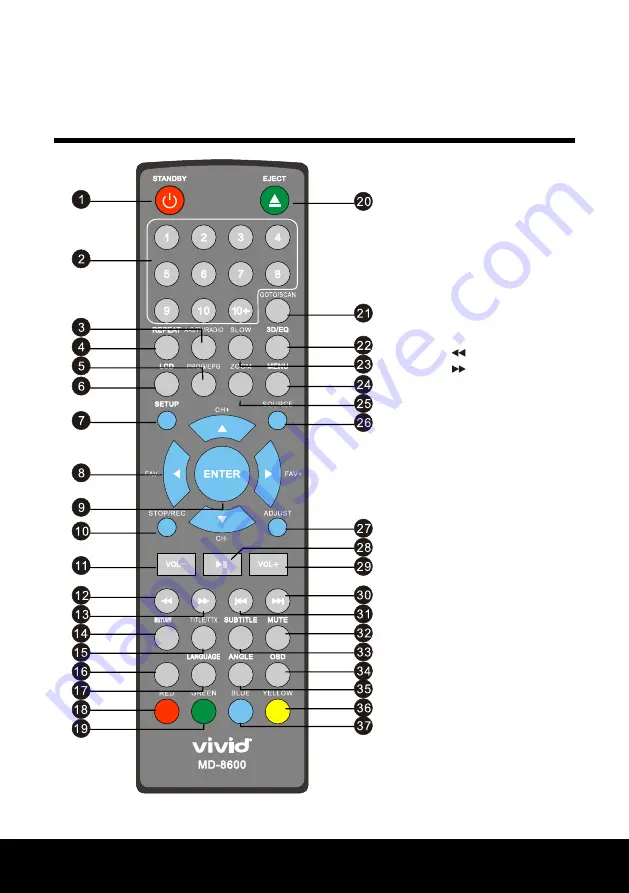
Remote control

1. Standby button

2. Number buttons

3. A-B/TV/Radio button

4. Repeat button

5. Prog/EPG button

6. LCD Setup button

7. Setup button

8. Navigation buttons

9. Enter button

10. Stop/Rec button

11. Vol - button

12.  Rewind button

13.   Fast forward button

14. Return button

15. Title/TTX button

16. Function button

17. Language button

18. Red Button

19. Green button

20. Eject button 

21. Go to/Scan button

22. 3D/EQ button

23. Slow button

24. Menu button

25. Zoom button

26. Source button

27. Adjust button

28. Play/Pause button

29. button

30. Next button

31. Prev button

32. Mute button

33. Subtitle button

34. OSD button

35. Angle button

36. Yellow button

37. Blue button

FUNCTION

Содержание MD-8600

Страница 1: ...N13275 Instruction Manual Model Number MD 8600 After Sales Support TEL 1300 886 649 7 LCD DVB T Micro Hi Fi with TV DVD player and dock for iPhone iPod...

Страница 2: ...fail within the first year after purchase even though it has been used as intended contact us immediately and we will remedy the problem as soon as possible In the unlikely event of such an occurrence...

Страница 3: ...lcome 3 Important safety instructions 4 Remote control 5 Front panel and rear panel 7 System connection 8 System set up 9 Language set up 10 Audio set up 11 Video set up 11 Speaker set up 12 Digital s...

Страница 4: ...oducts brought to you by VIVID are manufactured to the highest standards of performance and safety and as part of our philosophy of customer service and satisfaction this item is backed by our compreh...

Страница 5: ...st This unit should only be used with the power source indicated on the rating label Place the appliance on a straight stable place Do not place it on carpet Do not place the appliance on top of anoth...

Страница 6: ...12 Rewind button 13 Fastforwardbutton 14 Return button 15 Title TTX button 16 Function button 17 Language button 18 Red Button 19 Green button 20 Eject button 21 Go to Scan button 22 3D EQ button 23 S...

Страница 7: ...to avoid possible damage from battery corrosion If the remote control does not function correctly or the operating range becomes reduced replace all batteries with new ones Using the remote 1 Direct t...

Страница 8: ...ume 10 Eject button 11 DVD CD loader 12 Mic Jack 13 USB Jack 14 Card Slot 15 Y PB CB PR CR component out 16 Video output 17 Coaxial output 18 Power in 19 L R Audio output 20 L R Speaker output 21 Aux...

Страница 9: ...cord from the wall outlet Otherwise it may cause damage to the unit 3 Select the system PAL AUTO NTSC of the unit to match the colour system of your TV See page 9 for more on this 4 You can only have...

Страница 10: ...F seeFig 2 3 HD output This function allows you to choose from four high definition settings HD OFF 720P 1080i 1080P The connection point at the back of the appliance is HDMI see Fig 3 4 Video output...

Страница 11: ...it 7 Rating This feature lets you choose what ratings you would like to allow on the machine There are eight choices ranging from kid safe to adult so you can monitor restrict what is viewed see Fig 6...

Страница 12: ...Mic setup Choose ON or OFF 3 Key This function is used for a voice sign not the transmitter sign Use the keys to make your selection see Fig 13 4 Echo Choose the level 5 Mic Volume Choose the volume V...

Страница 13: ...RF see Fig 17 2 DYNAMIC RANGE Choose this setting to adjust the line out ratio and get different effects see Fig 18 3 DUAL MONO To set the output format of the left and right speaker see Fig 19 Stereo...

Страница 14: ...play 4 Play Pause During playback you can select the key to pause and again to continue play 5 Mute Press the MUTE button to turn off the sound The screen will continue to play normally Press MUTE or...

Страница 15: ...ress the L R button to select between the Mono Left Mono Right Stereo and Mix Mono settings 14 Go to Time search Press the GO TO SCAN button to display the following Playing DVD __ __ __ Such as 35 mi...

Страница 16: ...e CD disc can record approximately 600 minutes or 150 songs based on 128Kbps with sound quality close to CD Press the EJECT button on the front panel of the unit or on the remote control to open the d...

Страница 17: ...image on the right Put the JPEG disc into the disc tray and the files will load and display See image on the right Press the buttons to move to the desired sub folders and press ENTER to open Continu...

Страница 18: ...u want to start the search automatically The unit will return to the first TV station after the full search is complete and save the TV station Choose NO to quit the installation menu If you need to g...

Страница 19: ...ok at the radio programs press the buttons and then press ENTER to select your desired channel Pressing the OSD button will enter the program compositor and drop the little menu on the right 1 3 Chann...

Страница 20: ...use the buttons to choose from SPDIF OFF SPDIF RAW and SPDIP PCM 2 4 Language Choose between the OSD LANGUAGE SUBTITLE AUTO LANGUAGE and MENU Language Use the buttons to go through which language you...

Страница 21: ...quency G Band Width The SCAN TYPE has SINGLE CHANNEL which is for single frequency to search the station only permitting you to set AREA START CHANNEL and CHANNEL RANGE which is for single frequency t...

Страница 22: ...sing the remote control or the panel buttons NOTE To enter the iPod iPhone mode when in DVD mode you must press the iPod Aux in key you cannot change to iPod iPhone mode when in DTV mode iPod iPhone c...

Страница 23: ...tween the different setting options Use the buttons to change the BRIGHTNESS SHADE and other LCD setting options Volume tone operation The front panel knob and VOL and VOL keys on the remote control w...

Страница 24: ...oes not start playback Ensure it is a readable disc Check that the disc is inserted properly No sound Check that the audio cables are connected into the jacks securely Check that the audio setting of...

Отзывы: