background image

14

MP-S201 

| Version 1

3. operation

MP-I201 F

ront panel.

Class A/AB

MENU

SELECT

STANDBY

MUTE

M P - I   O

Содержание MP-I201

Страница 1: ...MP I201 Owner s Manual ...

Страница 2: ...echanical photocopying recording or otherwise without the prior written permission of Vitus Audio Any person who does any unauthorized act in relation to this publication may be liable to criminal prosecution and civil claims for damages Information contained in this manual is subject to change without notice and whilst it is checked for accuracy no liabilities can be accepted for errors ...

Страница 3: ...2 MP I201 rear panel Picture 13 3 operation Operation modes 15 Functions left front panel 16 Functions right front panel 17 MP I201 discription of the elements in the menu 18 MP I201 menu structure 19 4 operation service Safety notice 20 Mains supply voltage 20 Maintenance 20 Mains fuse 21 Replacing a blown fuse 22 5 warranty Warranty 23 6 specifications MP I201 Specifications 26 7 examples operat...

Страница 4: ... I201 Product ID Serial __________________________________ Product Build Date __________________________________ Signed __________________________________ All products details specifications and measurements are recorded for your MP I201 and kept by Vitus Audio ...

Страница 5: ...e considered to be impossible to ever get working however they have convinced many people and reviewers world wide of the opposite Before any of our new topologies are implemented in our products they are carefully reviewed by our dedicated listening panel This way we can guarantee the correct level of musically performance and robustness Generally we re after super neutral super detailed and supe...

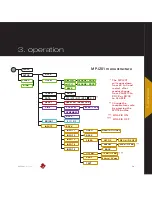
Страница 6: ...e tell us Important information is presented like this Ignoring this information may cause damage to you or the unit Damage caused to the unit by ignoring this information might invalidate the warranty Introduction to the Masterpiece Series The Vitus Audio Masterpiece Series is a true high end series of products which is build on our true dedication to neutral music reproduction Every detail is ca...

Страница 7: ...f extra care is not applied Vitus Audio A S cannot be held responsible for any damage that is a consequence of uncareful handling of the unit Differences in temperature After unpacking allow 24 hours for the product to reach room temperature before connecting up and switching on This is to allow condensation to dissipate which might otherwise cause damage to the electronics Remember also that cond...

Страница 8: ... cord brochure and manual Now remove the sides Two people carefully lift the amplifier of the box bottom and put it directly onto the floor Store the empty box and the protective foam for later use What s in the box MP I201 2x Andromeda Power Cable Standard Power Cable CD containing Manual and Brochure Foam Top Foam Bottom Crate Top Crate Crate Bottom 1 getting started CD containing Manual and Bro...

Страница 9: ... the best performance possible When you change volume a different number of shunt resistors are used To prevent pop in the output we have chosen to first add the new shunt resistors and then wait a short time before removing the unused shunt resistors at the new volume step This will give a minor fall in volume before settling at the new volume step It takes only very little time to get used to th...

Страница 10: ... the PSU power cable 6 Connect the mains to the MP PSU output Connecting the MP I201 This is a true balanced amplifier DO NOT connect the output Figure 3 to any ground source including chassis or signal ground this will damage the amplifier Not following this procedure may cause damage to any of your products speakers Damage caused to any of your products speakers by not following this procedure w...

Страница 11: ...se order Power amplifier a CD player Always follow this procedure 1 Turn the MP I201 off 2 Disconnect the mains power supply take the power cables out 3 Wait 15 minutes to allow the MP I201 to discharge 4 Move Transport the MP I201 5 Allow 24 hours for the MP I201 to reach room temperature 6 Connect the MP I201 Moving and transporting the MP I201 2 connecting 2 connecting ...

Страница 12: ...Version 1 2 connecting MP I201 rear panel Plugs MP I201 Inputs Input 1 2 3 XLR Input 4 5 RCA Digital Power Analog Power MP I201 Outputs Speakers Speaker out Standard Power Cable Andromeda Power Cable XLR in RCA in ...

Страница 13: ...t 1 Input 2 Input 1 Preamplifier Input Serienummer her This is a true balanced poweramplifier DO NOT under any circumstance connect speaker output to ground Caution Warning To prevent fire and shock hazard do not expose this device to rain and moisture Warning Risk of electrical shock DO NOT OPEN No user serviceable parts inside MAINS RCA in MP I201 Rearpanel Speakers Digital Power Analog Power XL...

Страница 14: ...14 MP S201 Version 1 3 operation MP I201 Front panel Class A AB MENU SELECT STANDBY MUTE M P I O ...

Страница 15: ... you use when listening to music 2 Menu mode In this mode you can alter the settings of the MP I201 3 Standby mode In this mode the controls of the MP I201 are deactivated The MP I201 does not shut down in Standby Mode in order to maintain an optimal working temperature Operation modes 3 operation ...

Страница 16: ...3 STANDBY Switches in and out of Standby Mode Menu mode You enter menu mode by pushing the MENU button once in Normal mode In the Menu mode there are 3 basic functions buttons 1 Scroll forward in the menu 2 MENU Enter Exit SELECT submenus and select settings 3 Scroll backward in the menu Functions left front panel Class A AB MENU SELECT STANDBY MUTE M P I O MP I201 Left Front panel ...

Страница 17: ...c functions buttons available on the right front 1 Turns volume UP 2 MUTE Mutes the output 3 Turns volume DOWN Menu mode In the text menu it is possible to change the name of the input This is done by using the following buttons from the right front 1 Change selected character 2 MUTE Go to the next character in the display 3 Change selected character 3 operation ...

Страница 18: ... removed Then the MP I201 will initiate in the volume step as it is defined in the V INIT sub menu BRIGHT Change the brightness of the display any step between 0 and 3 OUT M Select between STEREO or MONO output INPUTS Change settings for each input INPUT X Change the settings of input X USED Select whether input X has to be USED or not NOT USED When you select NOT USED input X will not be shown in...

Страница 19: ...pressing the MUTE button The MP I201 will count down from 60 to 0 and restart after modus change from CLASSIC to ROCK or ROCK to CLASSIC ºF ºC LT1 LT2 RT1 RT2 DATA LEAVE A AB CLASS INPUT 2 INPUT 3 INPUT 4 INPUT 5 BACK USED NOT USED USED BACK INPUT 1 99 dB 12 dB ADJUST FIX ON FIX OFF SET FIX BACK 12 dB 12 dB 8 Vmrs 2 Vmrs OFFSET SENS TEXT FIXED INPUTS BACK REMEMBER VOL STEP V INIT 99 dB 6 dB With F...

Страница 20: ...Vitus Audio Mains supply voltage Any unit may be set for operation in 100V 115V or 230V A C Units are shipped set for the mains supply voltage according to the destination The voltage setting can be updated later by your dealer if necessary Maintenance Vitus Audio products are designed to run for many years without the need for regular maintenance Our products contain no user serviceable parts exc...

Страница 21: ...kely has a malfunction In case of malfunction the unit must be returned to Vitus Audio for repair Fuse type Left and Right Channel 230V 20x5mm 6 3A T 115V 20x5mm 10A T 100V 20x5mm 12A T HRC fuse Digital Control 230V 20 x 5mm 500mA T LBC fuse Time lag fuse 100 120V 20 x 5mm 1 A T LBC fuse Time lag fuse Replacing the fuse with a fuse of a type and rating different from the original fuse might result...

Страница 22: ...use or the other way around See Fuse Type for the correct fuse 4 Remove the blown fuse and take the spare fuse 6 Click the fuse in place 7 Push the fuse carrier in place Replacing a blown fuse 3 There is a spare fuse available in the fuse carrier spare fuse blown fuse 2 Take a small flat bladed screwdriver and place it over the fuse carrier 1 The fuse carriers are placed on the back under the powe...

Страница 23: ... Audio will pay return freight of its choice IMPORTANT A returned product MUST be accompanied by a written description of the defect and a photocopy of the original purchase receipt This receipt must clearly list model and serial number date of purchase the name and address of the purchaser and authorized dealer and the price paid by the purchaser Vitus Audio reserves the right to modify the desig...

Страница 24: ...ranty remaining as measured from the date of shipment of the equipment to the Vitus Audio partner In the event warranty service is needed under these conditions the owner of the equipment must provide a copy of his purchase receipt fulfilling the requirements described under 2 Conditions above The product must be packed in its original box and returned to Vitus Audio or an authorized Vitus Audio r...

Страница 25: ...In the unlikely event of service required beyond the capabilities of the importer Vitus Audio will fulfill the conditions of the warranty Such products must be returned at the owner s expense to the Vitus Audio factory together with a photocopy of the bill of sale for that product a detailed description of the problem and any other information necessary return shipment In many cases the retailer y...

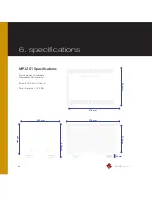
Страница 26: ...201 Version 1 6 specifications INPUT MENU SELECT STANDBY MUTE INPUT MENU SELECT STANDBY MUTE Front panel and body Anodized Aluminium Feet Still Point Ultra 5 Total weight 125 KG 400 mm 430 mm 708 mm 675 mm 505 mm 500 mm 370 mm 46 mm ...

Страница 27: ...vity 0 7 Vrms 0 7 Vrms Impedance 10KΩ 10KΩ POWER CONSUMPTION Standby 1W Full Power 550WRMS OUTPUT Speaker Right Speaker Left Available 1 1 Impedance 75 mΩ 75 mΩ Power W 8 4 ohm 700 1400 700 1400 Frequency response 800kHz 800kHz Signal to noise ratio 130dB 130dB THD noise 0 01 0 01 6 specifications ...

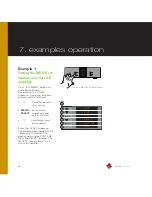
Страница 28: ...nt 1 Scroll forward in the menu 2 MENU Enter Exit SELECT submenus and select settings 3 Scroll backward in the menu Enter the CLASS submenu The display now shows CLASS Press the button The display now shows CLASS AB Press the SELECT button The MP I201 have operates as a class AB amplifier MENU LEAVE SETUP CLASS CLASS A CLASS AB CLASS SELECT SELECT Figure 6 MP I201 Left front panel INPUT MENU SELEC...

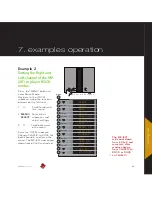
Страница 29: ...U button to enter Menu Mode Navigate to the OUT M submenu using the function buttons on the left front 1 Scroll forward in the menu 2 MENU Enter Exit SELECT submenus and select settings 3 Scroll backward in the menu Enter the OUT M submenu Change CLASSIC to ROCK for both channels and leave the menu The MP I201 now counts down from 60 to 0 and restarts LEAVE SETUP BACK OUT M RIGHT CH CLASSIC ROCK R...

Страница 30: ...croll backward in the menu Enter the RESET submenu The display now shows RESET NO Press the button The display now shows RESET YES Press the SELECT button The settings of the MP I201 have now been restored The MP I201 now automatically goes into standby mode Class A AB MENU SELECT STANDBY MUTE M P I O MP I201 Left Front panel 30 MP S201 Version 1 7 examples operation MENU LEAVE SETUP BACK OUT M TE...

Страница 31: ...backward in the menu In the V INIT submenu you can adjust the initial volume step This is the volume step the MP I201 starts up in when it leaves standby mode The initial volume step is as a standard set to 40 Set the volume step to 30 using the and the buttons Press SELECT and leave the menu MENU LEAVE SETUP BACK OUT M TEMP M DATA RESET V INIT VOL STEP O O O O VOL STEP SELECT SELECT SELECT Next t...

Страница 32: ... MP I201 will start up in this volume step when it leaves standby This volume step however is not remembered when the power cord is removed Then the MP I201 will initiate in the volume step as it is defined in the V INIT sub menu example 9 Go to REMEMBER press SELECT The display now shows VOL INIT The MP I201 will now start up in the current volume step on initialization Class A AB MENU SELECT STA...

Страница 33: ...ECT submenus and select settings 3 Scroll backward in the menu Enter the BRIGHTNESS submenu The display now shows 1 Press the button The brightness is now set to 2 Press SELECT to leave the BRIGHTNESS submenu The new brightness level is now saved Class A AB MENU SELECT STANDBY MUTE M P I O MP I201 Left Front panel MENU LEAVE SETUP BACK OUT M TEMP M DATA RESET V INIT BRIGHT 1 2 BRIGHT SELECT SELECT...

Страница 34: ...ration Example 7 Disabling inputs If you only use some of the inputs then it is possible to disable the inputs that you are not using The system will skip the disabled inputs and jump to the next input The following example illustrates how to disable Input 4 Press the MENU button to enter Menu Mode Navigate to the INPUT sub menu using the function buttons on the left front 1 Scroll forward in the ...

Страница 35: ...tep The input is then locked to this dB step and can not be adjusted with the volume control The following example illustrates how to fix the volume step of Input 1 to 0dB Press the MENU button to enter Menu Mode Navigate to the INPUT sub menu using the function buttons on the left front 1 Scroll forward in the menu 2 MENU Enter Exit SELECT submenus and selectsettings 3 Scroll backward in the menu...

Страница 36: ...e input to another The offset value can be set from 12 dB to 12 dB You cannot change the offset gain with FIX ON selected The following example illustrates how to change the offset values The signal on the source using line 2 is 3 dB higher than the signal on the source using line 1 We will reduce the differences in volume between input 1 and input 2 by lowering the offset gain of line 2 with 3 dB...

Страница 37: ...V rms The sensitivity is as a standard set to 4 Vrms In this example we will change the sensitivity of input 1 from 4 Vrms to 2 Vrms Press the MENU button to enter Menu Mode Navigate to the SENS submenu using the function buttons on the left front 1 Scroll forward in the menu 2 MENU Enter Exit SELECT submenus and selectsettings 3 Scroll backward in the menu In the SENS submenu you can adjust the s...

Страница 38: ...the MENU button to enter Menu Mode Navigate to the TEXT submenu using the function buttons on the left front 1 Scroll forward in the menu 2 MENU Enter Exit SELECT submenus and selectsettings 3 Scroll backward in the menu In the TEXT submenu you will find a list of predefined names that you can choose from Scroll through the list using the and the buttons Select the name SCD 010 using the SELECT bu...

Страница 39: ...ll now change the input name Line 1 to PICKUP Not in the predefined list We continue from the TEXT sub menu in the previous example LINE INE PINE P NE PI E PICE PIC PICK PICK PICKU PICKU PICKUP TEXT MUTE MUTE MUTE MUTE MUTE MUTE MUTE MENU The display is showing LINE 1 Press MUTE The first character in the display starts blinking Press or until the first character has the value you want Press MUTE ...

Страница 40: ...ed to an MP D201 and a MP P201 The MP D201 is connected to an MP T201 a PC and a Mediacenter The MP P201 is connected to a Turntable Units Vitus Audio products Signature Series MP L201 MP P201 MP D201 MP T201 MP I201 3rd party products Turntable PC Media Center Speakers MP P201 Turntable MP D201 Media Center PC MP T201 MP I201 ...

Страница 41: ...01 is connected to an MP T201 a PC and a Mediacenter The MP P201 is connected to a Turntable The MP I201 are set to function as a Mono Amplifier Units Vitus Audio products Signature Series MP L201 MP P201 MP D201 MP T201 MP I201 3rd party products Turntable PC Media Center Speakers MP L201 MP P201 Turntable MP D201 Media Center PC MP T201 MP I201 MP I201 7 examples ...

Страница 42: ...Picture 2 MP I201 Front 42 MP S201 Version 1 8 pictures MP I201 Front ...

Страница 43: ...43 MP S201 Version 1 8 pictures MP I201 Inside 8 pictures ...

Страница 44: ...mark v i t u s a u d i o AVA Group A S Vitus Audio Dueoddevej 6B Administration Hammershusvej 3H Shipping DK 7400 Herning Denmark Phone 45 9626 8046 Fax 45 9626 8045 e mail info vitusaudio com web site www vitusaudio com ...

Отзывы: