background image

36

EN

quick connections;

These quick connection valves allow 

outlet pressure regulation.

4. OPERATING 

INSTRUCTIONS

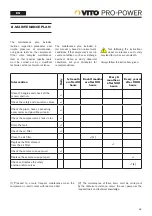
This type of compressor is frequently 

used in civil works, repairing shops 

and industries. It provides compressed 

air for several equipments, such as air/

painting guns and pneumatic tools. 

When using the compressor, its user 

must consider some safety measures:   

� Do not touch the cylinders gasket, 

cooling fins and compressed air 

pipes, once these elements reach high 

temperatures while operating. After 

stopping the compressor wait some 

minutes until the parts cool down; 

� Never place any flammable, nylon or 

cloth objects nearby and/or over the 

compressor; 

� The pipes or hoses connected to 

the compressor must have the same 

characteristics of flow and pressure. 

At least they must be equal to the 

compressor’s technical specifications; 

� Never switch on the compressor if the 

air filter isn’t assembled; 

� Never change the safety valve neither 

the tank. 

� If there are any ball-type shutoff valves 

in the compressor connections to the 

stationary system, they must be opened 

slowly. Never open the valve quickly 

once it will release energy that may 

damage equipments or tools; 

� The compressor mustn’t be switched 

on without the belt protection, 

otherwise it may cause physical or 

goods damages; 

� If the compressor is going to be used 

on painting works, its user must be over 

10m away from the equipment. It is 

recommended to use the connection 

hoses to work with enough distance 

from the compressor; 

� The compressor must only be set 

into operation in environments with a 

temperature b 5°C e +45°C;

Before starting the compressor, 

its user must ensure that all the 

components are correctly assembled. 

4.1 - COMPRESSOR START 

AND STOP (FIG. F)

After carrying out all the assembly and 

installation procedures, the compressor 

is ready to operate. The initiation should 

be carried out right after the installation 

respecting the following order: 

1. Check the oil level through the display 

(24) and plug in the power cord; 

2. Place the “ON/OFF” (28) switch, 

on the power contactor box (7), in (I) 

position;

3. Pull the power switch (17) to switch 

the engine on:

- The engine will run until the tank is 

completely full. When the tank reaches 

its maximum pressure, displayed in the 

pressure switch (16), the engine shuts 

down automatically. 

- When the engine shuts down, the 

accumulated compressed air inside the 

pipes between the compression pump 

and the non-return valve is released. 

This is the necessary condition to 

prevent a restart with the engine in 

effort. Therefore it prevents damages 

and increases compressor’s lifespan.

4. Press the power switch to stop the 

engine and prevent an automatic start;

5. Open the condensates drain (26) 

to drain the condensed water inside 

the tank;

6. After draining out completely, close 

the drain;

7. Connect the air guns and tools into 

the quick connection valves (3) or into 

the stationary system;

8. Pull the power switch to set the 

compressor to operate;

- When turning the compressor ON, 

if the tank pressure is inferior to the 

minimum pressure indicated in the 

pressure switch, the engine will start 

immediately.

9. Check if there are any air leaks in 

the pipes or connecting accessories. 

If there aren’t any tools or accessories 

connected to the compressor or to the 

distributing system and the compressor 

starts systematically, it means that 

there are leaks;

4.2 - PRESSURE SWITCH/

POWER SWITCH (FIG. G)

The compressor’s automatic operation 

is controlled by the pressure switch 

(16). The compressor starts when 

the minimum and maximum pressure 

values are reached, as long as the 

power switch’s button is pulled up. 

The minimum and maximum pressure 

are established from factory, do not 

change them. 

The power switch connected to the 

pressure switch (17) allows stopping 

the compressor every time its user 

intends to or in case of an emergency. 

4.3 - SAFETY VALVE (FIG. G)

The safety valve (29) is prepared to 

trigger according to the compressed 

air tank admissible pressure (25). If for 

some reason the admissible pressure 

is reached (11) and the engine doesn’t 

stop, the safety valve shall open (14). It 

is not allowed to adjust de safety valve 

or to remove the plastic seal. 

In order that the safety valve can 

function correctly in case of need, it 

must be activated frequently. 

1. To make sure that the safety valve 

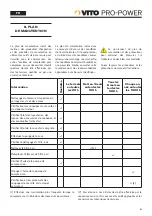
Содержание Pro-Power VICOC300B

Страница 1: ...AL DE INSTRU ES MANUAL DE INSTRUCCIONES INSTRUCTION MANUAL MODE D EMPLOI VICOC300B COMPRESSOR COM CORREIAS COMPRESOR CON CORREA PT ES BELT COMPRESSOR COMPRESSEUR COURROIE EN FR P g 07 P g 31 P g 19 P...

Страница 2: ...a Nivel de potencia sonora Sound power level Niv de puiss sonore Tens o de alimenta o Tensi n de alimentaci n Power supply voltage Tension d alimentation leo do motor Aceite del motor Engine oil Huile...

Страница 3: ...GEM ES DESCRIPCI N DE LA HERRAMIENTA Y CONTENIDO DEL EMBALAJE EN PRODUCT SPECIFICATION AND BOX CONTENT FR DESCRIPTION DE L APPAREIL ET DU CONTENU DE L EMBALLAGE Fig B Fig C 1 1 2 3 2 8 7 6 9 10 11 12...

Страница 4: ...4 Fig E Fig D Fig F 3 8 4 5 7 1 3 4 1 2 2 1 2 28...

Страница 5: ...5 Fig G Fig H Fig I Fig J Fig K 30 2 2 1 1 3 4 6 16 29 11 STOP 1 1 31...

Страница 6: ...6 Fig M Fig L 1 1 2 2 a 2 b 3 4 4...

Страница 7: ...orte 12 3 3 Liga o das tubagens mangueiras de ar comprimido 12 4 INSTRU ES DE FUNCIONAMENTO 12 4 1 Arranque e paragem do compressor 13 4 2 Pressostato interruptor de acionamento 13 4 3 V lvula de segu...

Страница 8: ...orreia do motor 10 Correia do motor 11 V lvula de seguran a na tubagem de ar comprimido 12 Bomba de compress o 13 Filtro do ar de admiss o 14 Tubagem de ar comprimido 15 V lvula anti retorno 16 Presso...

Страница 9: ...N o sobrecarregue o compressor os equipamentos funcionam melhor e com mais seguran a dentro dos limites de pot ncia indicados nas especifica es t cnicas Utilize o compressor adequado para cada tipo d...

Страница 10: ...press o m xima Acidentes com compressores s o comuns e na maioria dos casos poderiam ser evitados com manuten o regular do equipamento e cuidados de seguran a Acidentes com compressores de ar podem c...

Страница 11: ...rotativos colocadas Certifique que as grelhas de ventila o n o se encontram obstru das durante o funcionamento N o insira quaisquer objetos nas grelhas de ventila o Durante o funcionamento do compress...

Страница 12: ...s rio de liga o da tubagem fixa As sa das nos topos permitem a utiliza o de tubagens com di metros maiores N o poss vel regular a press o de sa da Para instala o fixa com tubagens flex veis utilize a...

Страница 13: ...a o Caso n o tenha nenhuma ferramenta ou equipamento acoplado ao compressor ou na rede de distribui o e o compressor arrancar sistematicamente existem fugas 4 2 PRESSOSTATO INTERRUPTOR DE ACIONAMENTO...

Страница 14: ...car as pe as em constante atrito evitando assim o sobreaquecimento e desgaste das pe as Para verificar o n vel do leo coloque o compressor numa superf cie plana e horizontal O n vel do leo deve encont...

Страница 15: ...r entradas em funcionamento indesejadas desligue o cabo de alimenta o esvazie o reservat rio de ar comprimido e retire todas as ferramentas de ar comprimido ligadas ao compressor Quando n o estiver a...

Страница 16: ...ns deve ser efetua da pelo concession rio de assist ncia a n o ser que possua as ferramentas apropriadas e conhecimentos mec nicos 8 PLANO DE MANUTEN O O plano de manuten o inclui rotinas procedimento...

Страница 17: ...adas por aus ncia ou n vel baixo de leo na bomba de compress o Pe as m veis danificadas ou bloqueadas Verificar o estado das pe as m veis e substituir se necess rio Repare ou substitua as pe as danifi...

Страница 18: ...ra a sua recupera o Excluem se da garantia a m utiliza o do produto eventuais repara es efectuada por pessoas n o autorizadas fora da assist ncia da marca VITO assim como qualquer estrago causado pela...

Страница 19: ...as tuberias mangueras de aire comprimido 24 4 INSTRUCCIONES DE FUNCIONAMIENTO 24 4 1 Arranque y parada del compresor 25 4 2 Interruptor de pr sion interruptor de accionamiento 25 4 3 V lvula de seguri...

Страница 20: ...COMPONENTES 1 Base apoyo del reservatorio del aire 2 Tornillo de drenaje de condensado del regulador de presi n 3 V lvula de salida con conexi n r pida 4 Man metro presi n de salida 5 Mango de transp...

Страница 21: ...tipo de trabajo El uso inadecuado puede resultar en situaciones peligrosas Utilice uno compresor adecuado para cada tipo de trabajo La utilizaci n del compresor para fines diferentes del previsto y el...

Страница 22: ...or a de los casos los mismos podr an ser evitados con un mantenimiento regular del equipo m s los debidos cuidados de seguridad Los accidentes con compresores de aire pueden provocar lesiones graves y...

Страница 23: ...jillas de ventilaci n Durante el funcionamiento del compresor algunas partes piezas y accesorios llegan a temperaturas muy elevadas Para evitar quemaduras no tocar en estos elementos durante la utiliz...

Страница 24: ...rgos Nos es posible ajustar la presi n de salida En instalaciones fijas con tuber a flexible utilice la v lvula de salida para conexi n la rede flexible 20 1 Introduzca el accesorio de conexi n de la...

Страница 25: ...a presi n del reservatorio es inferior la presi n m nima definida en el interruptor de presi n el motor se pone en marcha inmediatamente 9 Verificar se existen fugas de aire en la tuber a o accesorios...

Страница 26: ...presora es la de lubricar las piezas en constante fricci n y evitar as el sobrecalentamiento y desgaste de las piezas Para comprobar el nivel del aceite cloque el compresor en una superficie plana y h...

Страница 27: ...itar que el compresor se ponga en marcha fortuitamente desconecte el cable de alimentaci n vac e el reservatorio de aire comprimido y remueva todas las herramientas de aire comprimido conectadas al co...

Страница 28: ...os tems debe ser efectuada pelo concesionario de asistencia a no ser que el usuario tenga las herramientas apropiadas y conocimientos mec nicos 8 PLAN DE MANTENIMIENTO El plan de mantenimiento incluye...

Страница 29: ...cambiar las piezas presionar el bot n de disparo de la protecci n t rmica e volver a encender el compresor El motor apagase s bitamente Piezas m viles da adas por ausencia o nivel bajo de aceite en l...

Страница 30: ...000 3 2 2014 EN 61000 3 3 2013 EN 62321 2009 EN 50581 2012 de acuerdo con las determinaciones de las directivas 2014 30 EU Directiva de compatibilidad electromagn tica 2014 35 EU Diretiva de Baja Tens...

Страница 31: ...assembly 35 3 3 Compressed air pipes hoses connections 35 4 OPERATING INSTRUCTIONS 36 4 1 Compressor start and stop 36 4 2 Pressure switch power switch 36 4 3 Safety valve 36 4 4 Thermal protection 37...

Страница 32: ...of batteries and or power tools COMPONENTS LIST 1 Compressed air tank supporting base 2 Pressure regulator condensate purging screw 3 Outlet valve with quick connection 4 Manometer outlet pressure 5...

Страница 33: ...s gases or dusts Any power tool may form sparks that might ignite liquids gases or dust Do not expose any power tools to rain or use them in wet or damp environments The presence of water in an electr...

Страница 34: ...ool before using it Check that all the accessories are correctly assembled and attached to the machine and in good conditions Never use damaged accessories Verify if there are any misalignments in the...

Страница 35: ...upporting base directly by the tank s supports The compressor must be installed in a well ventilated area and with enough space for maintenance works Make sure the distance between the compressor and...

Страница 36: ...power contactor box 7 in I position 3 Pull the power switch 17 to switch the engine on The engine will run until the tank is completely full When the tank reaches its maximum pressure displayed in the...

Страница 37: ...lly when the compressor is used in damp environments 1 Loosen the tank s condensates drain 26 2 Wait until it drains completely 3 Tighten the condensates drain The condensed liquid inside the compress...

Страница 38: ...and its ventilation openings unobstructed Clean them regularly to avoid clogs Storage To avoid unwanted starts unplug the power cord empty the compressed air tank and remove every compressed air tool...

Страница 39: ...d in areas with too much dust 2 The maintenance of these items must be carried out by the technical assistance unless the user possesses the required tools and technical knowledge 8 MAINTENANCE PLAN T...

Страница 40: ...due to low oil level in the compression pump Damaged or blocked moving parts Check the moving parts status and replace them if necessary Repair or replace the damaged parts The compressor stops and t...

Страница 41: ...d for their recovery Excluded from the warranty the misuse of the product any repairs carried out by unauthorized persons outside the service center of the brand VITO as well as any damage caused by t...

Страница 42: ...47 3 3 Raccordement de tubes tuyaux air comprim 47 4 INSTRUCTIONS D E FONCTIONNEMENT 47 4 1 D marrage et arr t du compresseur 48 4 2 Pressostat interrupteur d alimentation 48 4 3 Soupape de s curit 4...

Страница 43: ...MPOSANTS 1 Base appui du r servoir air comprim 2 Vis de drainage de condensation du r gulateur de pression 3 Soupape d echappement avec raccord rapide 4 Manom tre Pression de sortie 5 Poign e de trans...

Страница 44: ...essures l utilisateur ou endommager l appareil Ne surchargez pas l appareil les quipements fonctionnent mieux et avec plus de s curit dans les limites de puisance indiqu es dans les sp cifications tec...

Страница 45: ...haque fois qu il existe une fuite d air c est un signe d anomalie ou de dysfonctionnement Arr tez le compresseur v rifiez et r parez imm diatement toutes les fuites d air Pendant le fonctionnement v r...

Страница 46: ...nts peuvent tre projet s pendant l utilisation de l appareil et causer des blessures hors de la zone de travail directe Les v tements utilis s pendant l utilisation de l appareil doivent tre appropri...

Страница 47: ...1 de la cuve d air comprim 25 2 Placez les rondelles et les crous de serrage dans les vis de fixation 3 Serrez les crous 3 2 MONTAGE DE LA POIGN E DE TRANSPORT FIG D 1 Ins rez les extr mit s de la po...

Страница 48: ...e les dommages dans le moteur et augmente la dur e de vie de l appareil 4 Appuyez sur l interrupteur d alimentation pour arr ter le moteur et ne pas permettre le d marrage automatique 5 Ouvrez la purg...

Страница 49: ...LA CUVE D AIR COMPRIM FIG J Pourassurerunelonguedur edeviede la cuve d air comprim il est conseill de purger l eau condens e apr s chaque utilisation du compresseur en particulier lorsqu il est utili...

Страница 50: ...compresseur Cet air impropre la consommation humaine 5 5 NETTOYAGE ET REMISAGE Nettoyage Apr s chaque utilisation nettoyez tous les composants du compresseur Essuyez avec un chiffon propre et humide o...

Страница 51: ...ces articles devra tre effectu e par le concessionnaire sauf si vous avez les outils appropri s et les connaissances m caniques n cessaires 8 PLAN DE MANUTENTION Le plan de manutention inclut des rou...

Страница 52: ...a pompe de compression Les pi ces mobiles sont endommag es ou bloqu es V rifier l tat des pi ces mobiles et les remplacer si n cessaire R parez ou remplacez les pi ces endommag es Le compresseur s arr...

Страница 53: ...3 2013 EN 62321 2009 EN 50581 2012 selon les d terminations des directives 2014 30 UE Directive sur la compatibilit lectromagn tique 2014 35 EU Directive de basse tencion 2006 42 EC Directive machine...

Страница 54: ...54 73 7 83 VICOC300B COMPRESSOR 300 COM CORREIAS TRIF SICO 10BAR S Jo o de Ver 23 de Novembro de 2020 Hugo Santos 20...

Страница 55: ...55...

Страница 56: ...RUA DA G NDARA 664 4520 606 S JO O DE VER STA MARIA DA FEIRA PORTUGAL MI_VICOC300B_REV00_NOV20...

Отзывы: