background image

8

2. Open the IE Browser and input the default address of IP-CAM and 

confirm. The IE browser will download Active X control automatical-

ly.

3. After downloading Active X control, the login dialog box will pop up.

4. Input the default username and password and then enter to view.

WAN Configuration

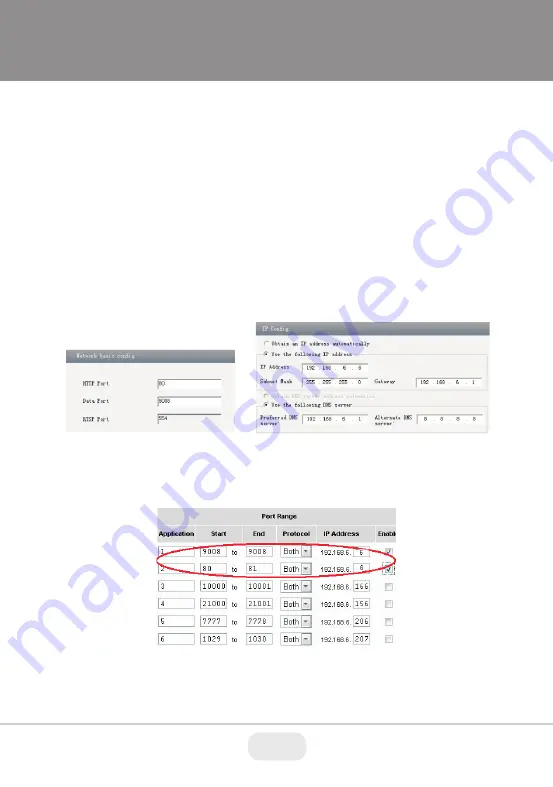
Access the camera by the router or virtual server for example.

1. Make sure the camera is connected to the LAN; Then log into the 

camera via LAN and go to System Congfig→Network Config→Port 

menu to set up the port number.

2. Enter System Config→Network Config→IP Address menu to modify 

the IP address.

4. Open the web browser and input its WAN IP and HTTP port to 

access the IP-CAM.

3. Go to the router’s management interface through IE browser to 

forward the IP address and port of IP-CAM in the “Virtual Server”.

Rubber Plug

Содержание VTD-TND3RVE

Страница 1: ...Compression Remote Viewing via CMS Internet Explorer and iOS Android Apps ONVIF Compliant IP66 Weather Resistance Optional Wall Mount VT TWM03 Junction Box Mount Available VT TJB02 Available in Ivory...

Страница 2: ...2 Overview Components and Accessories Camera Quick Guide Screws Hex Wrench Drill Template Rubber Gasket Waterproof Cap 1 2 RJ 45 Ethernet Power Cable 1 2...

Страница 3: ...ra with PoE also connect the power Cable to an approved 12VDC Power Supply Weather Resistant Network Coupler 1 Loosen the nut from the Weather Resistant Network Coupler 2 Run ethernet cable through co...

Страница 4: ...lower dome and then loosen the lock screw to remove the mounting base 2 Attach the drill template to the place where you want to install the camera then drill 4 screw holes and 1 cable hole if you wan...

Страница 5: ...ree axis camer bracket to obtain the optimi um viewing angle 6 Adjust the Focus and Zoom screw to achieve a clear image 7 Install the dome bubble on the camera with the screws then carefully remove th...

Страница 6: ...all on the PC Open the installed application 3 Modify the IP address The default IP address is 192 168 226 201 Click the information of the camera listed in the above table to show the network informa...

Страница 7: ...are as shown below IP address 192 168 226 201 HTTP 80 Subnet Mask 255 255 255 0 Data Port 9008 Gateway 192 168 226 1 You may use the above default settings when you log in the camera for the first tim...

Страница 8: ...amera by the router or virtual server for example 1 Make sure the camera is connected to the LAN Then log into the camera via LAN and go to System Congfig Network Config Port menu to set up the port n...

Отзывы: