5
ENGLISH
•
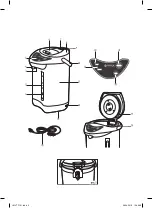
Insert the power cord (16) connector into the
socket (12) on the thermopot body, and plug
the power cord (16) into the mains socket.
•
The boiling mode indicator “boiling” (18) will
light up on the control panel (5).
•
After water starts boiling, the thermopot will
be switched to the keep warm mode, the indi-
cator (18) will go out and the indicator (17) will
light up.
•
In the keep warm mode you can switch the
reboiling on by pressing the button (20)
“reboil”, the indicator (18) “boiling” will light up
and the indicator (17) will go out.
•
Drain the water; to do this switch the water
pump on by pressing the button (19) “dis-
pense”.
Attention! Be careful when pouring out water to
avoid burns by hot water.
Version 1:
•
place a suitable bowl, for instance, a cup under
the spout for pouring water (4) and press the
water dispense button (3) with a rim of the cup.
Version 2:
•
place a suitable bowl under the spout for pour-
ing water (4) and press the water dispense but-
ton (19) «dispense».
•
After you finish using the thermopot, unplug it,
disconnect the power cord (16) connector from
the socket (12), open the thermopot lid (8) and
wait until it cools down completely. Remove the
lid (8), drain the water, dry the unit, install the
lid (8) back to its place and take the thermopot
away for storage.
CLEANING AND CARE
•
Before cleaning, disconnect the thermopot
from the mains, pour out water and let the ther-
mopot cool down completely.
•
Before removing the lid (8) press on the lock
(9), take the button (6), lift the lid (8) and
remove it (pic. 1).
•
Carefully tilt the thermopot to drain the remain-
ing water.
•
Set the lid (8) back to its place having prelim-
inary pressed the lock (9); before using the
thermopot make sure that the lid (8) is properly
fixed with the lock (9).
•
Clean the outer surface of the thermopot with a
slightly damp cloth and then wipe it dry.
•
Use neutral detergents to remove dirt; do not
use metal brushes and abrasive detergents.
•
Do not immerse the thermopot and the power
cord into water and other liquids.
•
Do not wash the thermopot in a dishwashing
machine.
Stains on the inner surface of the thermopot
The inner surface of the metal flask may change
its color under the influence of different water
impurities.
•
You can remove the stains with citric acid or
vinegar.
•
To remove the flavour of citric acid or vinegar,
boil water and pour it out.
•
Repeat this procedure until the smell and taste
vanish completely.
Descaling
•
Scale, appearing inside the metal flask, influ-
ences the water taste and disturbs the heat
exchange between water and the heating ele-
ment, that can lead to overheating and mal-
function.
•
To remove the scale fill the thermopot with a mix-
ture of one part ordinary vinegar and two parts
water up to the maximal level mark (15) «FULL».
•
Insert the power cord (16) connector into the
socket (12) on the thermopot body, and the
power cord (16) plug into the mains socket.
•
The boiling mode indicator “boiling” (18) will
light up on the control panel (5).
•
After water starts boiling, the thermopot will
be switched to the keep warm mode, the indi-
cator (18) will go out and the indicator (17) will
light up.
•
Unplug the thermopot and leave it filled with the
vinegar solution overnight.
•
In the morning pour out the vinegar solution,
fill the thermopot with water up to the maxi-
mal level mark (15) «FULL», boil it and pour out
the water.
•
You can use special detergents for electric
kettles to remove scale, strictly following the
instructions on the detergent usage.
•
If necessary, perfrom the cleaning procedure
several times.
STORAGE
•
Before taking the thermopot away for long stor-
age, unplug it, let the unit cool down and pour
out the remaining water.
•
Clean the thermopot.
•
Keep the thermopot out of reach of children
and disabled persons.
IM VT-7101.indd 5
26.04.2018 10:49:59
Содержание VT-7101
Страница 1: ...1 VT 7101 3 7 12 16 Thermopot 20 IM VT 7101 indd 1 26 04 2018 10 49 58...
Страница 2: ...IM VT 7101 indd 2 26 04 2018 10 49 59...
Страница 8: ...8 www vitek ru 3 20 30 8 6 15 FULL 16 12 16 IM VT 7101 indd 8 26 04 2018 10 49 59...
Страница 11: ...11 info vitek ru 3 15 38 117209 28 1 IM VT 7101 indd 11 26 04 2018 10 49 59...


