5
ENGLISH
–
Check the unit for damages, do not use the it in case
of damages.
–
Before switching the unit on make sure that your
home mains voltage corresponds to unit operat-
ing voltage.
Note:
Always switch the vacuum cleaner off and take
the power plug out of the socket while replacing the
brush attachments and before cleaning the dust bin (8).
Attaching the flexible hose, the telescopic pipe and
the attachments
–
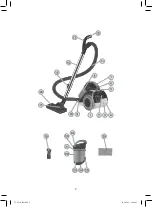
Insert the flexible hose ending (10) into the air inlet
(9) and turn it clockwise until bumping (pic. 1). To
remove the flexible hose (11) turn the ending (10)
counterclockwise.
–
Insert the flexible hose handle (12) into the tele-
scopic extension pipe (14) (pic. 2).
–
Extend the lower part of the telescopic extension
pipe to the required length, having preliminarily
pressed the lock (15) (pic. 3).
–
Choose the necessary attachment — the floor/car-
pet brush (16) or the combined brush (18) —
and
attach the attachment to the telescopic extension
pipe (14) (pic. 4).
Floor/carpet brush (16)
Set the switch (17) to the required position (depending
on the type of the surface being cleaned).
Combined brush (18)
The brush (18) is intended not only for cleaning ra-
diators, crevices, corners and space between cushions,
but for collecting dust from furniture surface as well,
the pile on the brush (18) prevents damage of polished
furniture surface.
OPERATION
Safety measures
•
Do not use the vacuum cleaner near hot surfaces,
ashtrays and in the places where inflammable liq-
uids are stored.
•
If the suction power of the vacuum cleaner de-
creases rapidly while cleaning, switch it off immedi-
ately and check the telescopic pipe and the flexible
hose for obstruction. Switch the vacuum cleaner
off, then unplug it, remove the obstruction and only
after that you can continue cleaning.
Attention! Always switch the vacuum cleaner on
only with the dust bin (8), inlet (21), outlet (4) and
protective (26) filters installed. Always make sure
that the filters are installed properly.
–
Before using the unit, unwind the power cord to the
required length and insert the power plug into the
mains socket. The yellow mark on the power cord
indicates the maximum cord length. Do not unwind
the power cord further than the red mark.
–
Press the button (5) to switch the vacuum cleaner
on.
–
During the unit operation you can control the suc-
tion power with the mechanical control (13) on the
flexible hose handle (12).
–
After the unit operation switch the vacuum cleaner
off by pressing the button (5) and unplug the unit.
–
To wind the cord press and hold the button (1), hold
the winding cord with hand to avoid its whipping
and damage.
–
Between unit operations use the brush storage (2).
–
Use the handle (7) for carrying the vacuum cleaner
or the dust bin (8) (pic. 5).
AUTO SWITCH-OFF FUNCTION
•
The vacuum cleaner is equipped with auto switch-
off function in case of motor overheating.
•
In case of overheating of the motor, the automatic
thermal switch will be on, and the vacuum cleaner
will be switched off.
•
In this case immediately remove the power plug
from the mains socket.
•
Check the telescopic pipe and flexible hose for ob-
struction and remove the obstruction.
•
Let the vacuum cleaner cool down for approximately
20-30 minutes before switching it on again.
•
Plug the unit into the mains, switch it on, if the
vacuum cleaner can not be switched on, this may
mean, that it is otherwise damaged. In this case
contact the authorized service center for repair.
CLEANING AND CARE
Remove garbage and dust from the dust bin (8), disas-
semble and clean it after every usage of the vacuum
cleaner.
Start cleaning with the vacuum cleaner only after hav-
ing preliminarily removed dust and garbage from the
dust bin (8).
Taking off the dust bin (8) and removing dust and
garbage from it
–
Switch the vacuum cleaner off and unplug it.
–
Remove the flexible hose (11) by turning the flexible
hose ending (10) counterclockwise.
–
Holding the handle (7), push the lock (6) and re-
move the dust bin (8) (pic. 6).
–
Place the dust bin (1) over a garbage bin. Open
the lid (24) by pressing the lid lock (25) (pic. 7).
Remove accumulated dust and garbage from the
dust bin (8).
Disassembling and cleaning of the dust bin (8)
–
Switch the vacuum cleaner off and unplug it, take
the dust bin (8) off, remove dust and garbage from
it.
–
Holding the dust bin (8) by the flask (23), turn the
lid (19) counterclockwise and take it off, the lid (19)
must be taken off together with the separator (22).
–
Open the lid (19) by pressing the lock (20) upwards.
–
Take the microfoam and inlet filter (21) out. Take the
microfoam filter out and clean it from dust.
–
Clean the inlet filter from dust.
VT-1820_IM.indd 5
10.10.2013 14:16:03
Содержание VT-1820 G
Страница 1: ...1 VT 1820_IM indd 1 10 10 2013 14 15 59 ...
Страница 2: ...2 VT 1820_IM indd 2 10 10 2013 14 16 01 ...
Страница 3: ...3 VT 1820_IM indd 3 10 10 2013 14 16 03 ...
Страница 16: ...16 8 10 9 1 11 10 12 14 2 15 3 16 18 14 4 16 17 18 18 18 8 21 4 26 VT 1820_IM indd 16 10 10 2013 14 16 05 ...


