background image

5

Press the end protectors (1017) and (1018) 

onto the profile ends (4.9). 

 5r. and 5l. door


attention:

 Do not stand the assembled 

door on the door gliders (1014) to avoid dama-

ging them.”
Push the door gliders (1014) onto both ends of 

door bar (1060) (5.1).
Assemble the door as shown in diagram 5.
Connect door rollers (1015) to the door bar 

(1062) using bolt (1004), washer (1009) and 

nut (1007) (5.4). 
Bolt door bar (1062) to upper bar (1059) (5.3) 

and slide the door seal (2021) into the outside 

side bar (2058) (5.6). Please ensure that for 

the inside side bar, the part (2098) is used on 

the right in (5R) and (2099) on the left in (5L). 

Connect the door fixer (1111) as shown. 

Loosen the door supports (2043).
The door rollers can now be slid into door  

runner bar (1047) (5.7). Please ensure that the 

door gliders are also running on the bottom 

track (5.5).  
Once the door is correctly in place, connect 

nuts and bolts into the end of both door runner 

bars (1047) as door stopper.
Adjust the door so that it moves freely.

 6. roof ventS 


Connect the side bars (1065) and the top bar 

(1064) depending on the glass thickness.  

Up to 4 mm, see (6.1). For 4 mm and over, 

see (6.2).
Place the bolts to connect the bottom bar 

(1066) in the prepared holes, and then slide 

the glass into the tracks in side bars (1065) 

(6.3).
Now connect bottom bar (1066), and ensure 

that the window is totally square before tighte-

ning all bolts.
Position the window in the ridge bar from one 

end (6.4) and (6.5) and slide it to the required 

position (6.6).
Connect the window sill (1063) with the extra 

bolts in the roof bars (6.7).
Bolt the window opener (1067) to the bottom 

bar (1066) using screws (1006) (6.8). 
Place the plastic cap (1019) over the end of 

the window opener (6.6) and connect both 

window fixers (1016) onto the window sill 

(1063) using screws (1006) (6.8).

 7. GlazinG – clear / froSted    

GlaSS


please note the already mentioned 

safety precautions.

Press the glazing seals (1020) onto the alumi-

nium profiles (7.3) and cut to length.

On the roof begin by positioning the glass at 

the ridge and fix in place using the glazing 

spring clips (1011) (7.2). The following pane 

should slide under the pane directly  

above it with the glass retaining clips (1012) 

between the panes (7.1). Continue as shown 

in the glazing plan. 

If difficulties arise in placing the last glass 

sheet, please ensure that those above have 

not slipped down. 
On the sides please begin from the bottom. 

 finiShinG


If desired, it is possible to seal the greenhouse 

at the edges using silicon. Silicon is not in-

cluded.
Place the warning label inside the house.
A full range of greenhouse accessories, to help 

you make the most of this product, is available 

from your stockist. Please inform yourself as to 

the possibilities.

 Safety notice


In the event of high wind conditions, close the 

doors and all vents.
In the event of heavy snowfall, clear the roof
of the building or take suitable measures to
support the roof. Heat the building in winter.

 commentS 


For the complete protection of your new 

greenhouse, we advise you to include it in 

your house insurance. Please take note of 

possible building rules relating to the position-

ing of greenhouses.
Please stick the greenhouse model label pro-

vided onto the door bar (1062) after success-

fully assembling this product. This information 

is important in the event that replacement 

parts are later required. 
Please keep these Assembly Instructions in  

a safe place, for future reference! 
Our policy is one of continuous improvement 

and we reserve the right to change the specifi

-

cations without prior notice.

001.00.0812

Содержание JUPITER 8300

Страница 1: ...D DK F S N SF Assembly instructions Montageanleitung Montagevejledning Notice de Montage Monteringsanvisning Montasjeveiledning Kokoonpano ohjeet 001 00 0812 Uranus jupiter 6700 8300 9900 11500 ...

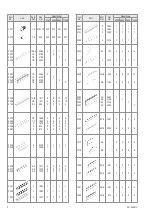
Страница 2: ... 6 2 2 2 2035 2046 2 3 2476 2484 1 1 1 1 1 1 1 1 2036 2037 2038 2 3 2 3 2 3 1511 1535 1535 4 2 2 4 2 2 4 2 2 4 2 2 2041 2042 1047 3 3 3 1963 1963 1257 1 1 2 1 1 2 1 1 2 1 1 2 Item No Part Sect Ref Size mm Quantity per 6700 8300 9900 11500 2041 2042 2101 2054 2 2 2 2 1963 1963 1963 1318 1 1 1 1 1 1 1 1 1 1 1 1 1 1 1 1 1043 2048 2 3 3 170 1318 4 1 4 1 4 1 4 1 2056 2057 1A B 4B 255 1184 6 3 8 4 10 5 ...

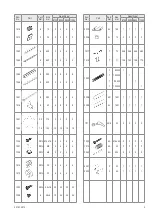
Страница 3: ... L M4 x 16 M4 M4 4 4 4 4 4 4 4 4 4 4 4 4 1014 1015 5R L 5R L 25 22 4 4 4 4 4 4 4 4 1003 1006 5R L 6 3 5x16 3 5x6 32 12 32 24 32 24 32 24 Item No Part Sect Ref Size mm Quantity per 6700 8300 9900 11500 2005 2006 5L 5L 100 10 1 2 1 2 1 2 1 2 1011 1012 7 7 70 11 348 126 396 142 444 158 492 174 1020 7 7 7 7 95000 105000 115000 125000 1 1 1 1 2098 2099 5R 5L 1921 1921 1 1 1 1 1 1 1 1 1111 5R L 22 2 2 2...

Страница 4: ...d between the stone concrete foundation and the aluminium frame and connected to the foundation with 50 mm long bolts not pro vided All diagrams are shown from the inside of the house with the exception of those enclosed in a double frame indicating the outside view 1 Side Elements Lay all of the parts on the floor and connect them loosely At this stage it is necessary with each vertical aluminium...

Страница 5: ...ow opener 6 6 and connect both window fixers 1016 onto the window sill 1063 using screws 1006 6 8 7 Glazing Clear Frosted Glass Please note the already mentioned safety precautions Press the glazing seals 1020 onto the alumi nium profiles 7 3 and cut to length On the roof begin by positioning the glass at the ridge and fix in place using the glazing spring clips 1011 7 2 The following pane should ...

Страница 6: ...müssen in Schritt 4 die äußeren Schrau ben wieder lösen um Giebelende bzw Giebel seite Tür mit den Seitenteilen zu verschrauben 2 Giebelende ohne Tür Auch diese Teile auf dem Boden auslegen und lose verschrauben Ebenfalls in jede senkrechte Verglasungsleiste 2041 u 2042 diesmal zwei Leerschrauben hineingeben um später in 2 2 und 2 6 zu verschrauben In die Leiste 2101 eine Leer schraube einfügen 3 ...

Страница 7: ...en verschrauben Achtung Das Fenster muss recht winklig sein Das Dachfenster in den First vom Firstende aus einführen und das Fenster in die vorge sehene Stellung bringen 6 4 6 5 6 6 Die Dachfensterschwelle entsprechend 6 7 mit den vorhandenen Leerschrauben fest schrauben Den Dachfensteraufsteller 1067 mit dem unteren Fensterprofil verschrauben Hierbei werden die Schrauben 1006 ver wendet 6 8 Die v...

Страница 8: ...e vitrage vertical 2055 ou les profilés de renfort 2095 seront fixés fig 1 2 1 5 Visser sans serrer les équerres 1092 comme indiqué sur la fig 1 1 Vous devez à l étape 4 desserrer à nouveau les boulons extérieurs pour pouvoir assembler le pignon avec ou sans porte et les côtés 2 PIGNON SANS PORTE Etaler toutes les pièces sur le sol et les visser sans serrer Mettre également dans chaque tasseau de ...

Страница 9: ...x 6 3 en ayant pris soin de mettre avant les boulons dans les trous des cadres Assembler alors le profilé inférieur 1066 de la fenêtre et les cadres latéraux en vérifiant que la lucarne soit d équerre Coulisser la lucarne dans l une des extrémités du faîtage et la mettre dans la position prévue 6 4 6 5 6 6 Fixer en serrant bien la traverse inférieure 1063 6 7 avec les boulons déjà coulissés Assemb...

Страница 10: ...ærk venligst at næsen skal gribe fat i de lodrette profiler 2041 2042 som i 3 8 Husk to bolte i de lodrette profiler 2041 2042 4A Samling Fastgør de 2 sider til gavlene 4 1 4 2 Monter samlingsbeslag 1092 som i 4 3 Monter tagryg og topbeslag 1092 som i 4 4 4B Montage af de forskel lige tagdele Bolt tagspær 2055 sammen med tagryg og tagrende 4 6 4 7 Husk at komme bolte i tagspær til vinduer afstivni...

Страница 11: ...s Bemærk venligst ovennævnte sikkerhedsfor anstaltninger Tryk gummiliste 1020 på aluminiumsprofiler 7 3 og skær til i rette længde Læg glas i taget ved hjælp af glasholdere 1012 og glasclips 1011 som i 7 1 7 3 Følg glasplan Sæt glas i resten af drivhus på samme måde Til slut Hvis De ønsker at gøre Deres drivhus helt tæt anvend silikone ikke inkluderet i alle samlinger Monter tagrendeskinnernes end...

Страница 12: ...och 2042 för montering av de vågräta stagen 2096 3 3 Som förstärkning till profil 2048 monteras beslag 1013 5001 5002 3 8 Se till att de griper tag i de lodräta karmprofilerna 2041 och 2042 Fäst löst från utsidan två bultar och muttrar på dörrspårstödet 2048 och för över dörrglidskenan 1047 på bulthuvudena 4A Montering Fäst långsidorna på kortsidorna 4 1 4 2 Fäst hörnplattorna 1092 enligt 4 3 Dess...

Страница 13: ...ionen i taknockens spår från ena ändgaveln på växthuset 6 4 och 6 5 och skjut den till önskat läge 6 6 Fäst fönsterkarmen 1063 med hjälp av de tidigare iförda bultarna 6 7 Kontrollera att rätt sida kommer uppåt Fäst fönsterhaken 1067 på den nedre fönsterprofilen 1066 6 8 och de två hållarna 1016 på fönsterkarmen 1063 med skruvar 1006 6 7 Sätt på skyddet 1019 på fönster haken 7 Glasning Vänligen no...

Страница 14: ...es fast i de lodrette profilene 2041 2042 som i 3 8 Husk to skru i de lodrette profilene 2041 2042 4A Samling Fest de 2 sidene til gavlene 4 1 4 2 Monter samlingsbeslag 1092 som i 4 3 Monter takrygg og topbeslag 1092 som i 4 4 4B Montering av de forskjellige takdelene Skru takperrene 2055 sammen med takrygg og takrenne 4 6 4 7 Husk og feste skruer i taksperrene til vindu avstivninger og møne profi...

Страница 15: ...NLIGST BEMERK OVENNEVNTE SIKKERHETSFORANSTALTNINGER Trykk gummilisten 1020 på aluminiums profilen 7 3 og skjær til i rette lengder Legg glass på taket ved hjelp av glassholdere 1012 og glassklipps 1011 som i 7 1 7 3 Følg glassplan Sett glass i resten av drivhuset på samme måte Ferdigstillelse Drivhuset kan tettes i hjørner ved hjelp av silikon følger ikke med Legg sikkerhetsforskriftene inne i dri...

Страница 16: ...16 URANUS 0 001 00 0812 6700 8300 9900 11500 A 2544 mm 3166 mm 3788 mm 4410 mm B 2544 mm 2544 mm 2544 mm 2544 mm 30 x 20 mm B A X X 30 mm 30 mm ...

Страница 17: ...022 2023 2 x 1 2 x 1 2027 2028 2 x 1 2 x 1 2055 2 x 3 2 x 4 2056 2 x 3 2 x 4 2095 2 x 2 2 x 2 3001 2 x 19 2 x 22 3002 2 x 19 2 x 22 1 1 1 4 1 2 1 5 1 3 1 6 6700 2x 1 2 1 1 1 3 1 4 2027 1092 2095 2055 2022 2056 8300 2x 1 5 1 6 2095 2028 2055 2023 1092 2056 ...

Страница 18: ...11500 1092 2 x 2 2 x 2 2024 2025 2 x 1 2 x 1 2029 2030 2 x 1 2 x 1 2055 2 x 5 2 x 6 2056 2 x 5 2 x 6 2095 2 x 2 2 x 2 3001 2 x 25 2 x 28 3002 2 x 25 2 x 28 11500 2x 9900 2x 2056 2029 2055 1092 2024 2056 2030 2055 1092 2025 2095 2095 ...

Страница 19: ...2 2 2 3 2 7 2 4 1043 2x 1091 1x 2022 1x 2035 1x 2036 2x 2037 1x 2038 1x 2041 1x 2042 1x 2054 1x 2095 2x 2100 1x 2101 1x 3001 32x 3002 32x 2 1 2 2 2 4 2 3 2037 2100 2038 1043 1043 2101 2095 2041 2095 2042 2036 2036 2022 2035 2054 1091 2 5 2 6 2 7 ...

Страница 20: ...2038 1x 2041 1x 2042 1x 2046 1x 2048 1x 2049 2x 2096 2x 2097 2x 2100 1x 3001 35x 3002 35x 5001 1x 5002 1x 3 5 3 1 3 6 3 2 3 7 3 3 3 4 3 4 3 6 3 3 3 2 3 1 3 3 3 7 3 5 3 8 1043 2049 2046 2097 2096 2096 2097 2037 2038 2036 2036 1047 1047 2100 1091 2048 2041 2042 1043 1047 2049 3002 1013 5001 3 8 ...

Страница 21: ... 9900 11500 1005 2 2 2 2 1010 2 2 2 2 1092 8 8 8 8 2043 2 2 2 2 2050 2051 2052 2053 1 1 1 1 3001 30 30 30 30 3002 32 32 32 32 4 1 4 2 4 3 4 4 4 2 4 1 4 3 4 4 1092 2043 2043 1092 1092 2050 2051 2052 2053 1091 1092 4 5 4 5 2043 1005 1010 ...

Страница 22: ... 0812 6700 8300 9900 11500 1017 4 4 4 4 1018 8 8 8 8 2033 4 4 4 4 2055 6 8 10 12 2057 3 4 5 6 3001 46 52 62 72 3002 46 52 62 72 4 6 4 10 4 6 4 7 4 9 4 10 4 8 2056 2033 2033 4 9 1018 1017 4 7 2055 4 8 2057 2055 3 3 4 4 5 5 ...

Страница 23: ...1007 2x 1009 2x 10¹⁴ 2x 10¹⁵ 2x 1111 1x 1059 1x 1060 1x 1061 2x 1062 1x 2021 1x 2058 1x 2098 1x 3001 3x 3002 3x 1003 1014 1014 1003 1003 3002 3001 1007 1009 1015 1004 5 1 5 5 5 3 5 4 5 2 5 2 5 2 5 6 5 7 5 8 2058 1061 1059 1062 1060 1111 2098 5 8 2021 5 3 5 4 2046 ...

Страница 24: ... 1059 1x 1060 1x 1061 2x 1062 1x 1111 1x 2005 1x 2006 2x 2021 1x 2058 1x 2099 1x 3001 3x 3002 3x 5 1 5 5 5 2 5 2 5 6 5 3 5 4 2099 1061 1059 1062 1060 1111 2058 2005 2006 5 7 5 8 5 6 5 7 1014 1003 1003 1003 3002 3001 5 5 1014 1007 1009 1015 1004 5 8 2021 5 1 5 2 5 4 5 3 2046 ...

Страница 25: ...0 8300 9900 11500 2x 4x 4x 4x 1006 12 24 24 24 1016 4 8 8 8 1019 2 4 4 4 1063 2 4 4 4 1064 2 4 4 4 1065 4 8 8 8 1066 2 4 4 4 1067 2 4 4 4 3001 8 16 16 16 3002 8 16 16 16 1063 1016 1006 1065 1001 1066 1065 1064 1019 2050 2051 2052 2053 1064 1067 6 1 6 2 ...

Страница 26: ... x 544 2 4 4 4 4 3679261 610 x 509 50 58 66 74 5 3679271 610 x 487 8 10 12 14 6 3679281 610 x 460 2 2 2 2 7 3679541 610 x 434 x 8 4 4 4 4 8 3679291 610 x 468 x 44 4 4 4 4 9 3679141 610 x 540 2 2 2 2 Total 82 94 106 118 1011 1020 1020 1012 6700 8300 9900 11500 1011 348 396 444 492 1012 126 142 158 175 1020 1 1 1 1 6700 8300 9900 11500 ...

Страница 27: ......

Страница 28: ... D 58089 Hagen Postfach 3320 D 58033 Hagen Tel 49 2331 37555 0 Fax 49 2331 37555 55 www eph schmidt de verkauf eph schmidt de OPJ A S Volderslevvej 36 A Postboks 480 DK 5260 Odense S Danmark Tel 45 66 15 10 30 Fax 45 66 15 00 84 www opj dk opj opjhandel dk ...

Отзывы: