


5
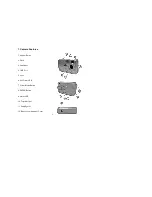
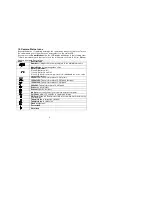
10. Camera Status Icons
Beyond the basics of capturing an image, the camera has many other features. Turn on
the camera and notice the many icons and symbols on the status LCD:
As you press the
Power/Mode
button the LCD display will change in the following order.
To learn more about each function refer to the referenced section in this User Manual.
Camera Icons and Descriptions
Icons
Descriptions
Number
of images that you may capture in the available memory
Movie
Mode
for capturing video clips
Battery Indicator:
2 levels: Battery is full
1 levels: Battery is half full
0 levels : Battery is near empty; flash is disabled and the icons on the
status LCD flashes
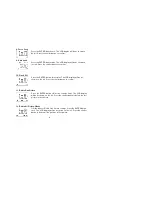
2408x1536:
Take pictures about 3.2 M pixels.
1600x1200:
Take pictures about 2.0M pixels (default)
1280x1024:
Take pictures about 1.2M pixels
640x480:
Take pictures about 0.3M pixels
Erase
one photo/video
Erase all
photos & videos
Indicate
the connecting of your camera and the computer
Self-timer
allows 10 seconds to capture an image
SD Card:
When a SD card is inserted in the camera it will show on the
LCD display.
Take pictures
in large size (default)
Take pictures
in small size
Flash off (
default)
Force flash
Auto flash
Содержание VQ-2000
Страница 1: ...1 Quick Start Guide DIGITAL CAMERA VQ2000...


