VistaQuest VQ-2000 Скачать руководство пользователя страница 6


4

8. Continuous Capture   

You can capture three images using the continuous capture feature.    When you use this 
mode the image resolution will be 640 x 480. To use the Continuous Capture mode 

follow these steps: 

Step 1: 

Power on the camera.    Press the Power/Mode button six times until the “        ”   

icon appears on the LCD display. 

Step 2:

 Press the 

Shutter

 button the camera will capture three images continuously. 


9. Deleting Images   

You can delete the last image captured, or you may delete all images in memory. 

Delete the Last Image   

Power on camera. Press the Enter button still for two seconds times until the 
“        ” icon appears on the LCD display. Then press the shutter button to   

delete the last picture in the camera. (Example: 020 will change to 019.) 


Delete All Images   

Power on the camera. ON the basis of Delete One Picture settings. Press the Enter 
button once, the icon          appears on the LCD display.    Press the shutter button to 

delete all the pictures in the camera. 
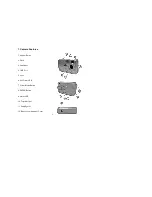


Содержание VQ-2000

Страница 1: ...1 Quick Start Guide DIGITAL CAMERA VQ2000...

Страница 2: ...1 020606 WARNING When the battery icon is blinking download the pictures to your computer immediately and change the batteries otherwise your images will be lost...

Страница 3: ...1 Camera Features 1 Shutter Button 2 Flash 3 Viewfinder 4 USB Port 5 Lens 6 Self Timer LED 7 Power Mode Button 8 ENTER Button 9 Status LCD 10 Tripod Socket 11 Strap Eyelet 12 Battery Compartment Cove...

Страница 4: ...s down on the memory card and it will partially eject Pull the card out with your fingers 4 Capturing Images Using your new camera is fun and easy There are two basic steps to capturing your first ima...

Страница 5: ...Capture You can capture motion video clips using the AVI capture feature The image is stored in AVI format The image counter increments by one after movie clips are stored Video clips are captured at...

Страница 6: ...three images continuously 9 Deleting Images You can delete the last image captured or you may delete all images in memory Delete the Last Image Power on camera Press the Enter button still for two se...

Страница 7: ...ideo clips Battery Indicator 2 levels Battery is full 1 levels Battery is half full 0 levels Battery is near empty flash is disabled and the icons on the status LCD flashes 2408x1536 Take pictures abo...

Страница 8: ...ill be as shown on the left When the shutter button is pressed the camera will shoot after beeping ten times The function is ideal for getting yourself into the picture 3 AVI Mode Press the Power Mode...

Страница 9: ...de Press the Power Mode button nine times The LCD display will be as shown on the left Connect your camera to the computer with the USB cable 7 Frequency Setting Press the Power Mode button ten times...

Страница 10: ...ree times The LCD display will be as shown on the left Press the shutter button to confirm 11 Delete One Picture Press the ENTER button still for two seconds times The LCD display will be as shown on...

Страница 11: ...est Corporation is proud that you have chosen its product and hopes you will enjoy sharing a clearer vision of your memories and special moments captured with your new camera with friends and family f...

Отзывы: