background image

DE2462U MKP-150/151/152 User Guide 

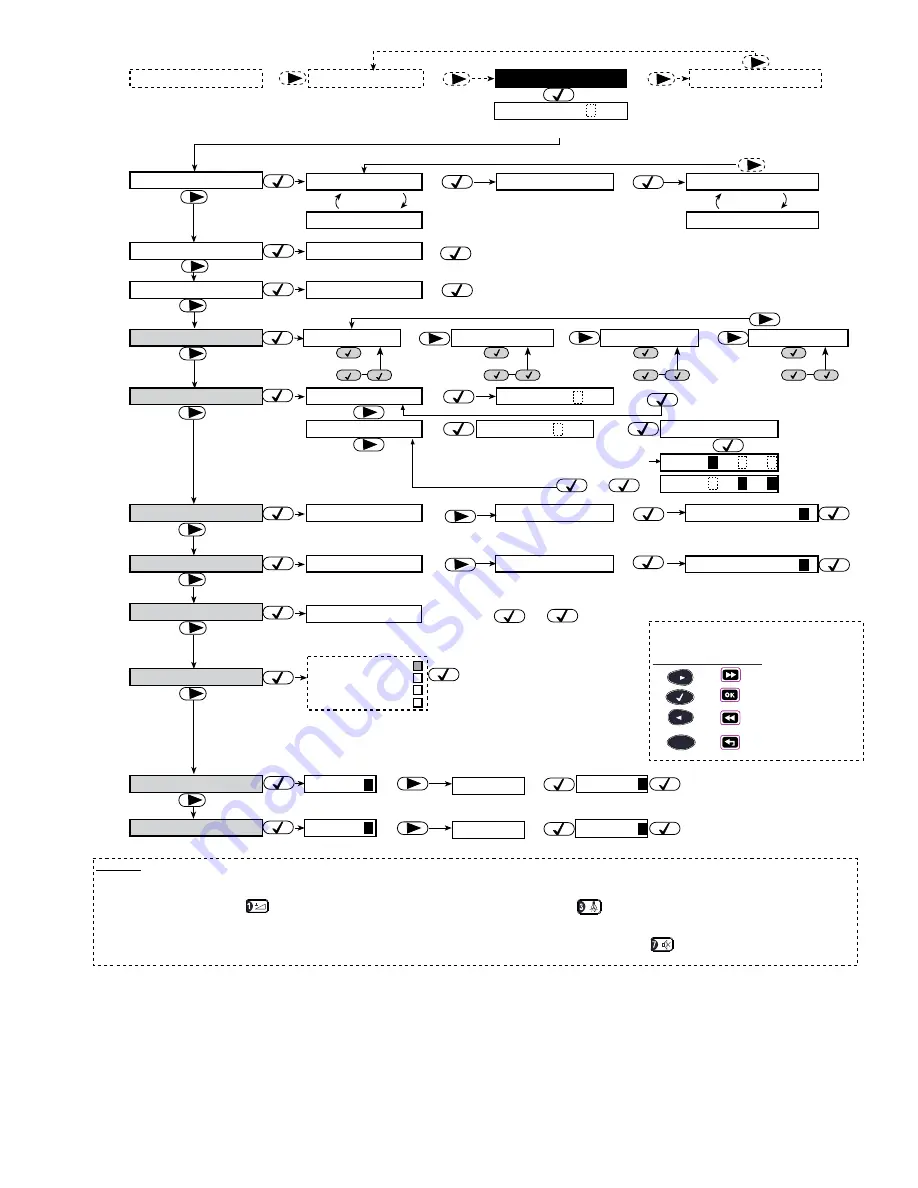
NOTES

(1) Function inside black rectangles are accessible only if master user code was entered.

(2) Press OK to display the number, state and name of frst by passed zone. Press NEXT/BACK repeatedly to view all the by passed zones.

(3) To enter “A” (AM) press        ( or one of the 3 keys above it), to enter “P” (PM) press         (or one of the 3 keys above it). (Not

      functional if the time format has been set to the 24 hour clock via the P.)

(4) SET/SHOW/RECAL L BYPASS menus are accessible only if “manual by pass” has been selected by the installer via the P.

(5) In the SET VOICE OPTION, if you select “enable promp ts”, the P mute speaker button        is active.

(6) RECAL L BYPASS is applicable when Partition is disabled.

SHOW BYPASS

RECALL BYPASS

BYPASS LIST

<OK> TO RECALL

(2)

SET BYPASS

WALK TEST

READY

<OK> TO BYPASS

Z01: BYPASSED

Z01: OPEN

KITCHEN

Alternating

KITCHEN

Alternating

(for checking state of next zone)

ENTER CODE  _ _ _ _

INSTALLER MODE

(4)

(4)

(4)

(example)

SET PHONE NUMBER

SET USER CODES

user code 1 1 1 1 1

[code]

user code 1

(1)

AUTO ARM OPTION

disable autoarm

enable autoarm

(if it is the current option)

[time]

AUTO ARM TIME

arm time _ _: _ _A

SQUAWK OPTION

(1)

(1)

(1)

SET VOICE OPTION

enable prompts

(if it is the current option)

(1)(5)

[4-digit master/user code]

if not satisfed

if not satisfed

disable prompts

disable prompts

enable autoarm

(First display is READY

or NOT READY)


NEXT

BACK

Moving one level

up in the menu

To move within the menus, the following

keys can be used:

SHOW / OK

squawk disable
sqwk low volume
sqwk mid volume
sqwk hi volume

(To review options, use

NEXT or BACK button)

Tel. No.


1st private tel#

Tel. No.


2nd private tel#

Tel. No.

3rd private tel#

Tel. No.


4th private tel#

LIGHT BY TIMER

LIGHT BY SENSOR

enable

disable

disable

if not satisfed

enable

disable

disable

if not satisfed

USER SETTINGS

(1)

(3)

(1)

ESC

(6)

user code 2

to select next

user codes (3....8)

user code 2 1 1 1 1

[code]

access to part

U02:P1    P2    P3

(for next user codes)

enter partition numbers (e.g.

for partitions 2 & 3 enter 23)

U02:P1    P2    P3

MKP-150/151 MKP-152


Figure 9: 

User Settings Flow Chart 

Содержание MKP-150

Страница 1: ...ific actions Automatic supervision messages Diagnostic test of the control panel Two long life 3 Volt Lithium batteries Wall mounting Friendly programming The Power green LED lights when operated using AC power The Trouble amber LED lights if a trouble state is currently detected within the control panel The Chime green LED lights when the chime function is active The Arm red LED lights when the s...

Страница 2: ...tion The unit enters sleep mode 15 seconds after last use applies only when using batteries or when there is a power failure Supervision A periodic supervision message programmable is transmitted automatically once every 15 minutes Europe once every 60 minutes USA or according to the local standards This function can be disabled Panic Alarm Message Activated by simultaneously pressing the and keys...

Страница 3: ...he screw pull down the bracket fully 1 Remove the bracket 2 Figure 2a Bracket Removal MKP 150 151 After removing the scre w pull down the bracket fully 1 Remove the bracket 2 Figure 2b Bracket Removal MKP 152 Mark and drill 4 holes in mounting surface Insert wall anchors and fasten the bracket to the mounting surface with 4 screws Screw Holes Screw Hole IMPORTANT The back tamper switch will not ac...

Страница 4: ...e terminal block Route the wiring through the wiring channels Note The transformer is optional Figure 5a Wiring MKP 150 151 9 VAC Note The transformer is optional Wiring Inlets Connect the 9 VAC power supply to the terminal block Route the wiring through the wiring channels Figure 5b Wiring MKP 152 Match the panel with the bracket projections Pull downward and secure the bracket with the locking s...

Страница 5: ...during exit and entry delays Options enable beeps off when home and disable beeps BACK LIGHT The keypad and LCD back light can be activated in one of two ways By key press back light is activated for ten seconds by a long press 2 sec of any key Always on back light remains on continuously Enabled only when the unit is connected to the AC supply The options are OFF after 10s and always ON JAM DETEC...

Страница 6: ...term 4 user term 5 READY 00 00 USER SETTING WALK TEST ENTER CODE installer code INSTALLER MODE SUPERVISION superv time 15m superv time 1h disable PIEZO BEEP enable beeps disable beeps off when home In Canada disable must be selected SERIAL NUMBER xxxxxxxxxxxxxxxx xxxxxxxxxxxxxxxx JAM DETECT UL 20 20 EN 30 60 class 6 30 60 disable BACK LIGHT OFF after 10s always ON PIEZO BEEP Partition disabled Par...

Страница 7: ...E _ _ _ _ INSTALLER MODE 4 4 4 example SET PHONE NUMBER SET USER CODES user code 1 1 1 1 1 code user code 1 1 AUTO ARM OPTION disable autoarm enable autoarm if it is the current option time AUTO ARM TIME arm time _ _ _ _A SQUAWK OPTION 1 1 1 SET VOICE OPTION enable prompts if it is the current option 1 5 4 digit master user code if not satisfed if not satisfed disable prompts disable prompts enabl...

Страница 8: ... any interference received including interference that may cause undesirable operation The digital circuit of this device had been tested and found to comply with the limits for a Class B digital device pursuant to Part 15 of the FCC rules These limits are designed to provide reasonable protection against harmful interference in residential installations This equipment generates uses and can radia...

Отзывы: