background image


16 

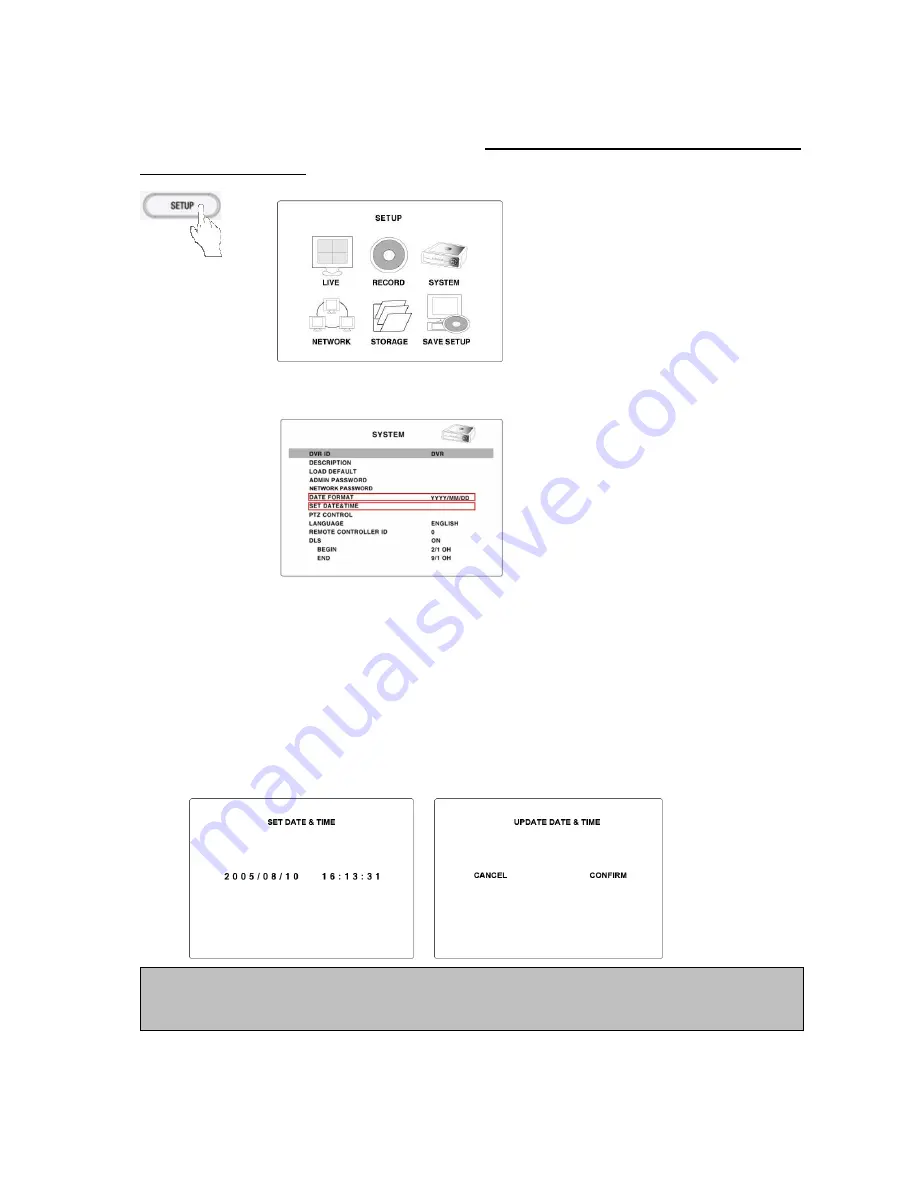
2-3. Time setting 

1.  Press the SETUP button. Press Up arrow button four times to enter “1111” (Default password) and press 

the  SEL  button.  Then the  SETUP screen  is displayed.  The password change is highly recommended to 

avoid unauthorized usage. 


2.  Press the direction button to select the SYSTEM menu and press the SEL button. 


3.  Go to DATE FORMAT field using Up/Down arrow button and select the date format using Right/Left arrow 

button. 


4.  Go to SET DATE & TIME field using Up/Down arrow button and press the SEL button. 

5.  Select the date and time that is be changed using Right/Left arrow button, change a value using Up/Down 

arrow button, and press the SEL button. Then UPDATE DATE & TIME screen is displayed. 


6. 

  Select  CONFIRM  and  press  the  SEL  button.  Then  the  system  will  reboot  automatically  showing 

“INITIALIZING…” message. 


The summer time is not applied on the factory default time. When your country and territories is 

under summer time, DLS(SUMMER TIME) is to be applied

.


 YYYY/MM/DD (Ex. 2008/5/6)                 

 YYYY-MM-DD (Ex. 2008-05-06) 

 MM/DD/YYYY 

 MM-DD-YYYY 

 DD/MM/YYYY 

 DD-MM-YYYY 

Содержание DIY-4350

Страница 1: ...nge without notice for quality improvement INSTRUCTION MANUAL DIY 4350 4 Channel MPEG 4 Digital Video Recorder About this user guide Before installing and using this unit please read this user guide c...

Страница 2: ...ger of explosion if battery is incorrectly replaced Replace only with the same or equivalent type recommended by the manufacturer This symbol is intended to alert the user to the presence of important...

Страница 3: ...power Do not allow the unit to get wet Do not use during thunder thunder storms Do not place in an unstable position Do not expose to shock or vibration Do not use this unit in areas where it is expos...

Страница 4: ...iances Do not connect this unit with the AC adapter in areas reachable to children or where pets move freely Never touch the AC adapter with wet hands If the unit emits smoke strange sounds or smells...

Страница 5: ...playback over network VGA video out and TV video out External IR receiver Main replacement parts of DIY 4350 Hard disk 1 years 25 C environment Cooling fan 3 years 25 C environment Battery 2 years 25...

Страница 6: ...Sensor and Schedule RECORD METHOD By Resolution fps Quality MULTI TASK TRIPLEX Record playback and transfer CONTROL UNIT IR Type Remote Control Front keys DYNAMIC IP Supported by DDNS LAN PORT 1 10 10...

Страница 7: ...4 2 2 Live screen 15 2 3 Time setting 16 2 4 DLS Day Light Saving time setting Summer time setting 17 3 OPERATION RECORD 18 3 1 MOTION DETECTION recording 19 3 2 CONTINOUS recording 20 3 3 SENSOR reco...

Страница 8: ...SETUP 35 6 1 LIVE 36 6 2 RECORD 38 6 3 SYSTEM 40 6 4 NETWORK 42 6 5 STORAGE 45 6 NETWORK ACCESS USING THE EXCLUSIVE NETWORK VIEWER 47 6 1 PC requirements 47 6 2 Installing the network viewer 47 6 3 Li...

Страница 9: ...e To move the playback position moves 1 frame forward FF To fast forward the footage at 1x 2x 4x and 8x speeds during playback USB port To connect USB Thumb drive to backup data HDD The indicator blin...

Страница 10: ...1 frame forward REW To rewind the footage at 1x 2x 4x and 8x speed during playback PLAY PAUSE To play or to pause the footage in playback mode FF To fast forward the footage at 1x 2x 4x and 8x speeds...

Страница 11: ...onitor ETHERNET Network terminal SENSOR IN External sensor terminal ALARM OUT External alarm out terminal CVBS VGA System video output format switch POWER DC12V input terminal Do not power this system...

Страница 12: ...rk cable LAN Connection Using a switching hub Connect to the system using a hub Switching hub and an Ethernet cable 10BASE T 100BASE TX CAT 5 LAN cable Internet ADSL Connection Connect to the system u...

Страница 13: ...rol it using separate outside relay During normal operation the control output contact is maintained at Open status and during control output the output contact is changed to Closed short status Dried...

Страница 14: ...of monitor TV monitor and VGA monitor 2 1 1 CVBS Select CVBS to connect general TV monitor VGA Select VGA to connect computer VGA monitor The general TV monitor terminal and the computer VGA monitor...

Страница 15: ...al recording in progress Sensor alarm recording in progress Motion alarm recording in progress Indicates that remote controller ID is set Indicates that motion is detected or sensor alarm input Indica...

Страница 16: ...utton 4 Go to SET DATE TIME field using Up Down arrow button and press the SEL button 5 Select the date and time that is be changed using Right Left arrow button change a value using Up Down arrow but...

Страница 17: ...ng Right Left arrow button Then the summer time fields are displayed 2 Select BEGIN field using Up Down arrow button and press the SEL button Then DLS BEGIN screen is displayed 3 Select the date and t...

Страница 18: ...ntinuously when the DVR is turned on C icon is displayed on the screen Refer to page 20 SENSOR recording Recording when the external sensor of DVR is sett off S icon is displayed on the screen Refer t...

Страница 19: ...r motion detection using button and SEL button Then the selected grids are displayed in Pink color Go to MOTION SENSITIVITY using button and select the sensitivity using button Go to PRE RECORD using...

Страница 20: ...iggered recording go to CHANNEL filed using button and select a channel from CH1 CH2 CH3 and CH4 using button Go to RECORDING filed using button and select BY SENSOR using button Go to SENSOR TYPE usi...

Страница 21: ...a channel for schedule recording go to CHANNEL filed using button and select a channel from CH1 CH2 CH3 and CH4 using button And Go to RECORDING filed using button and select SCHEDULE using button Be...

Страница 22: ...elect a recording mode using SEL button from C CONTINOUS recording M MOTION DETECTION recording S SENSOR recording DISABLE No recording EXAMPLE of SCHEDULE recording setting CONTINOUS recording mode a...

Страница 23: ...u using ESC button Go to CHANNEL field and select CH2 using buttons And go to SCHEDULE field and press SEL button Then SCHEDULE CH2 screen is displayed Move the cursor to COPY FROM using buttons and s...

Страница 24: ...through the calendar and the timeline Refer to page 26 GO TO Searching through selecting the date and time Refer to page 27 GO TO FIRST Searching the oldest recorded video Refer to page 27 GO TO LAST...

Страница 25: ...he recorded data list of every type of recording mode M Showing the recorded data list by motion detection BY MOTION S Showing the recorded data list by sensor detection BY SENSOR R Showing the record...

Страница 26: ...s SEL button Then SEARCH calendar screen is displayed Select the date using buttons and SEL button Move the vertical Yellow line to the time between 0 to 24 HOUR using buttons and SEL button Move the...

Страница 27: ...RCH menu is displayed Go to GO FIRST and press SEL button Then playback of the oldest recorded video data starts 4 5 GO LAST Press SEARCH button Then SEARCH menu is displayed Go to GO LAST and press S...

Страница 28: ...d Go to ARCHIVE and press SEL button Then ARCHIVE calendar screen is displayed Select the date using buttons and press SEL button Then ARCHIVE LIST screen is displayed Select one of the archived data...

Страница 29: ...mage or Video can be archived on HDD and be backed up to USB thumb drive in playback mode Refer to page 31 Backup Still image or Video from ARCHIVE search Still image or Video can be backed up from AR...

Страница 30: ...creen is displayed Select YES using buttons and press SEL button and select USB STICK using buttons and press SEL button Then SAVING screen with backup status bar is displayed after CHECKING USB messa...

Страница 31: ...n VIDEO TYPE screen is displayed after VIDEO OK message Select AVI or DVR using buttons and press SEL button Then BACKUP USB DEVICE screen is displayed Select YES using buttons and press SEL button an...

Страница 32: ...HIVE field using buttons and press SEL button Then ARCHIVE search calendar is displayed Select the date in Red using buttons and SEL button Then LIST screen is displayed Select the Still image JPEG or...

Страница 33: ...DEVICE screen is displayed Select YES using buttons and press SEL button and select USB STICK using buttons and press SEL button Then SAVING screen with backup status bar is displayed after CHECKING...

Страница 34: ...deo format DVR format video can be played back by the player the exclusive viewer that the DVR copies on USB thumb drive with video Three files are copied on USB thumb drive DVR file Exclusive format...

Страница 35: ...SETUP button then the password window is displayed The default password is 1111 which can be entered by pressing the up button 4 times and then pressing the SEL button After input password the SETUP...

Страница 36: ...fied channel HUE Change the hue value for the specified channel SATURATION Change the saturation value for the specified channel VGA SCREEN MODE Select VGA screen mode as either FULL or Normal NOTE If...

Страница 37: ...st of the channel using buttons Setting values of the display bar 0 100 The most contrast HUE Set the hue of the channel using buttons Setting values of the display bar 0 100 SATURATION Set the satura...

Страница 38: ...al Zone for motion sensing MOTION SENSITIVITY Set the motion sensitivity for the specified channel SENSOR TYPE Set the type of sensor for the specified channel from none N O normal open and N C normal...

Страница 39: ...grid is detected MOTION SENSITIVITY Set the level of motion detection sensitivity using buttons Setting values of the display bar 1 2 3 7 8 9 Low sensitivity level SENSOR TYPE Select the external sens...

Страница 40: ...te and time display SET DATE TIME Set the present date and time If DLS function is ON user can not enter into this menu and change data and time PTZ CONTROL PTZ CONTROL is not working in this model LA...

Страница 41: ...1 2 3 4 buttons and press SEL button Then the New password input screen is displayed Enter the new password using 1 2 3 4 buttons and press SEL button Then the confirm password input screen is display...

Страница 42: ...t PORT using buttons and press SEL button Then the SET PORT screen is displayed Input a port number using buttons and press SEL button WEB PORT Select PORT using buttons and press SEL button Then the...

Страница 43: ...ORD using buttons and press SEL button Input the registered PWSSWORD that is necessary for ADSL connection using buttons and press SEL button Press ESC button Then the APPLY NETWORK ADDRESS screen is...

Страница 44: ...ON The network access by the pre registered domain name address that is pre registered on www ddnscenter com is allowed DDNS SERVER NAME appears OFF The network access by the pre registered domain na...

Страница 45: ...uttons ON When the HDD is fully recorded former video data is deleted to record the new video data OFF When the HDD is fully recorded the recording stops FORMAT Select FORMAT using buttons and press S...

Страница 46: ...nnect USB thumb drive that has a menu setting value to the USB port Select LOAD SETUP FROM A USB using buttons and press SEL button Then the CONFIRMATION screen is displayed Select CONFIRM using butto...

Страница 47: ...rements CPU Intel Pentium 1 2Ghz or higher Memory 256MB 512MB or higher is recommended VGA memory 16MB 64MB or higher is recommended Resolution 1024x768 O S Windows 2000 XP Professional XP home Direct...

Страница 48: ...CUS features on the remote camera Not operating in this model CAPTURE Capture a still image from live screen PLAY PAUSE Play pause live video RECORD Start stop recording of live video to local disk SE...

Страница 49: ...o switch to quad screen display Full screen display Click the maximize button to display only screen and hidden the operation panel Image capture of live screen Still image of live screen can be captu...

Страница 50: ...as ON displays as a red color and specific event occurs Auto record When this Auto record is selected the RECORD button is always set as ON 2 Set the disk setting and exit from the setting menu Disk...

Страница 51: ...m live screen MARK IN Set the start time for video backup MARK OUT Set the ending time for video backup BACKUP Backup the selected recorded video as AVI format SEARCH CALENDAR The calendar shows dates...

Страница 52: ...ton Then the mode is changed from the live mode to the search mode Searching the video recorded in the remote DVR Connect the network to the DVR Searching the video recorded in the PC Do not connect t...

Страница 53: ...me for video backup and press the MARK IN button 3 Drag the slid on the time scale and drop to the end time for video backup and press the MARK OUT button Then the marked time is displayed in dark gre...

Страница 54: ...eed to enter the password Save Path Specify the location to record for backup and still image capture Automatic reconnection If a user selects this function the client S W will automatically try to co...

Страница 55: ...nt Set the record path and the size of local disk space for the log files LOG Select to save event log into log file ICON Select to display the event on live video EVENT LIST Select to show the event...

Страница 56: ...Record Set the recording conditions and select channels to record Select the local disk to use and the amount of disk space you want to allow the program to use for recording Setting Video Set the vi...

Страница 57: ...57 Setting Language Select the language of the network client viewer...

Страница 58: ...the IP address of the DVR from SETUP SYSTEM DESCRIPTION IP ADDRESS 2 Input the IP address or Domain name address that you pre registered on www ddnscenter com on the address field and press Go 3 Clic...

Страница 59: ...mber and Password and click Connect Server address Input IP address of the DVR from SETUP SYSTEM DESCRIPTION IP ADDRESS or Domain name address that you pre registered on www ddnscenter com Port Input...

Страница 60: ...2 Default network setting on DVR are Port 5445 IP ADDRESS 172 16 1 52 Subnet mask 255 255 0 0 Gateway 0 0 0 0 3 From PC connected in the same Router find IP address Gateway and Subnet mask by IPCONFIG...

Страница 61: ...Start Enter the first number of the port you need to port forward Example 5445 iii End Enter the last number of the port you need to port forward Example 5445 iv Protocol Select Both v IP address Ent...

Страница 62: ...0BASE TX CAT 5 LAN cable 1 Run the pre install the network client software on the supplied CD Refer to Chapter 6 Network access using the Exclusive network viewer 2 Check the IP address from SETUP SYS...

Страница 63: ...Confirm the Mac address and Serial No from the label of the rear panel of the DVR 4 Open the web browser and log on http www ddnscenter com MAC Address Input the Mac address EX 0002690XXXXX without a...

Страница 64: ...nd add the DVR as necessary Site Name Input the name of the DVR IP Address Input the Domain Name that is registered on http www ddnscenter com EX XXXXX ddnscenter com Port Number Input the port number...

Отзывы: