background image

C

ONFIGURING


THE

 S

CANNER

40

A

DJUSTING

 S

CAN

 S

ETTINGS


AND

 P

AGE

 S

ETTINGS

When scanning using a configuration that you created yourself, you can 
adjust that configuration’s scan settings and page settings. For example, 
if the scanned image is too dark, you can adjust the brightness of the 
scan setting.

To adjust the scan settings and page settings:
1. Display the Configuration dialog box.

Click the tab of the button whose options you want to change.

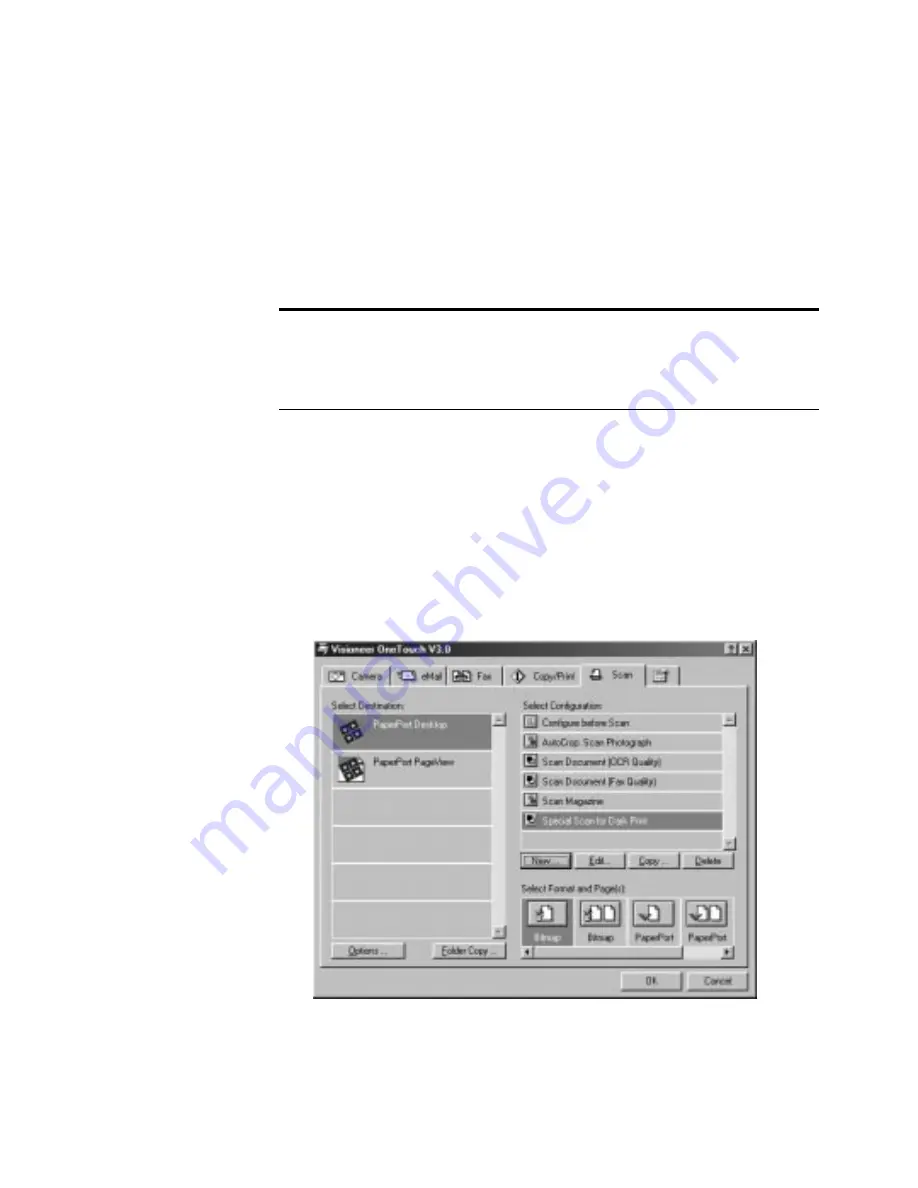
2. In the Select Configuration list, click the configuration that you 

want to adjust.

For example, the following figure shows a configuration named 
Special Scan for Dark Print (which you would have created earlier).

Note:  You cannot change the scan settings or page settings for any of 
the predefined scan configurations. You can only adjust settings for 
scan configurations that you create yourself. See the section above, 
“Creating New Configurations”.

Содержание 7700 -

Страница 1: ...Visioneer PhotoPort 7700 USB Scanner Installation Guide...

Страница 2: ...ng the 12 month period after the date of your original purchase of the product THIS IS VISIONEER S ONLY WARRANTY AND YOUR EXCLUSIVE REMEDY CONCERNING THE PRODUCT ALL OTHER REPRESENTATIONS WARRANTIES O...

Страница 3: ...13 Scanning Paper Items with the OneTouch Buttons 14 About the OneTouch Buttons 16 Scanning Paper Items from the Button Panel on the Screen 17 Transferring Images from Digital Memory Cards 18 The Com...

Страница 4: ...ith the PaperPort Software 52 Adjusting the Settings on the Scan Manager Pro 53 Saving a New Profile 54 Adjusting the Resolution and Sharpness 56 Adjusting the Brightness and Contrast 57 Adjusting Gam...

Страница 5: ...hotos and magazine articles your PhotoPort scanner also transfers images from CompactFlash and SmartMedia removable memory cards from digital cameras WHAT S IN THE BOX Please check the contents of the...

Страница 6: ...SB SCANNER 2 THE VISIONEER PHOTOPORT 7700 USB SCANNER Glass Reference marks Document cover Power jack OneTouch buttons panel USB port Status light Slot for CompactFlash memory card Slot for SmartMedia...

Страница 7: ...button next to the slot to remove the card Do not remove the card while transferring is in progress or you may damage the card Slot for SmartMedia memory card Insert a SmartMedia removable memory card...

Страница 8: ...e hard disk space A VGA or SVGA monitor Recommended settings for your monitor are as many colors as possible High Color 16 bit True Color 24 bit or 32 bit Set the resolution to at least 800 by 600 pix...

Страница 9: ...and other software files STEP 1 INSTALLING THE PAPERPORT SOFTWARE Install the PaperPort software before connecting the scanner to the computer To install the PaperPort software 1 Start your computer a...

Страница 10: ...xt section to connect the scanner to your computer When you re finished click Finish in the dialog box above Note If the PaperPort CD does not automatically start make sure the CD drive s door is comp...

Страница 11: ...e USB cable into an available USB port on the computer 2 Plug the other end of the USB cable into the scanner s USB port If the plug does not attach easily make sure that you are plugging it in correc...

Страница 12: ...scanner over to see the locking tab on the bottom Slide the locking tab to the unlocked position 4 Plug the power adapter cable into the power jack on the back of the scanner 5 Plug the power adapter...

Страница 13: ...an also install the other software from the CD or view and print the User Guides When you re finished remove the CD from the computer and store it in a safe place STEP 3 CHECKING OUT YOUR SCANNER The...

Страница 14: ...t menu appears 3 Choose About from the shortcut menu A dialog box confirms that the scanner is properly connected 4 Click OK to close the dialog box That s it Your scanner is ready to scan IF THE SCAN...

Страница 15: ...er Did you restart the computer after installing the software If you didn t restart the computer it may not have loaded all of the software files Try restarting your computer Please see the Readme fil...

Страница 16: ...or example if your computer s last hard drive is D the first scanner slot hard drive name will be E However network drive assignments typically start at F which often leads to a conflict between the s...

Страница 17: ...Click the scanner icon on the Windows taskbar A panel representing the scanner buttons appears Click a button on the panel Scan from the PaperPort Software or Other Twain Software Start the PaperPort...

Страница 18: ...neTouch button on the scanner 1 Place an item to scan on the glass face down and align the edge of the item with the arrow marker at the upper left corner of the glass 2 Close the document cover and p...

Страница 19: ...you pressed the Fax button the destination application is your fax software In the sample below the scanned image appears on the PaperPort Desktop During scanning the scan progress window shows a smal...

Страница 20: ...ck and white on your printer copier at the printer copier s default resolution Fax Displays the scanned item in your fax software as a black and white image at the default resolution of your fax softw...

Страница 21: ...2 Click the button you want to use to scan The scanner starts scanning the item When the scan is complete the scanned image appears in the destination application 3 To close the button panel click th...

Страница 22: ...having to connect the camera to the computer THE COMPACTFLASH CARD The following illustration shows a typical CompactFlash card THE SMARTMEDIA CARD The following illustration shows a typical SmartMedi...

Страница 23: ...slot To insert a CompactFlash card into the scanner Insert the edge with the connectors into the scanner slot Insert the card with the rear label and notched edge facing up To insert a SmartMedia car...

Страница 24: ...e images appear as thumbnails on the Desktop When the images are finished being transferred to the PaperPort Desktop you can then press the Camera button on the scanner to transfer the images to the P...

Страница 25: ...on and the card releases To remove a SmartMedia card gently press the card further into the slot until you feel the card release All of the images on the card are scanned to the PaperPort Desktop as t...

Страница 26: ...s keyboard Select the image and drag it to the Windows trashcan Select the image and choose Cut from the Windows Edit menu You can copy files to the memory card using the standard Windows copy and pas...

Страница 27: ...high quality photographic paper and mail them back to you You need an internet connection to use the PhotoWorks com service You also need to set up an account with PhotoWorks com to print your pictur...

Страница 28: ...in the Password box then retype it in exactly the same form in the Reenter Password box Typing it twice confirms your password You may want to write your new password on a piece of paper in case you...

Страница 29: ...is 06 6 When you re finished click Apply To send images to PhotoWorks com 1 Press the Camera button on the scanner The PhotoWorks com application appears If a memory card is already in a slot the imag...

Страница 30: ...s com application 5 If you do not want to send an image click it to select the image and then click Remove You can change an image s print size and other settings before sending it to PhotoWorks com S...

Страница 31: ...ces 7 To send the order type your password in the Password box and click Place Order A dialog box shows the order 8 Select the type of shipping 9 Click OK 10 On the PhotoWorks com application click Pl...

Страница 32: ...rea A dialog box appears for changing the image s settings 3 Click the Print Size drop down menu and select one of the sizes to set the print size 4 To order multiple prints of the image type a number...

Страница 33: ...p the image drag one of the cropping handles Notice that the print area retains its length to width proportions based on the selected print size 7 Click Apply to reset the image to its new print size...

Страница 34: ...Preferences tab on the PhotoWorks com application The Preferences dialog box appear Print Size Print Quantity Shipping Method select the settings for a typical order You can always change those settin...

Страница 35: ...ttings click Default 2 Click one of the other tabs on the PhotoWorks com application to continue working or click Exit if you re finished SETTING PHOTOPORT PREFERENCES Your scanner is pre configured t...

Страница 36: ...ption if you want your camera images converted to the PaperPort format When selected button pressed with a card inserted each button on your scanner is assigned a destination application where scanned...

Страница 37: ...display the images on a card before transferring them you can select and crop the images first To pre select images 1 Inert a digital memory card 2 Press one of the buttons configured to show you the...

Страница 38: ...images from card after sending to the destination Note if you select this option the images are erased permanently from the card and cannot be recaptured Be sure you want to erase the images before se...

Страница 39: ...display the Configuration dialog box from the shortcut menu 1 Right click the scanner icon The shortcut menu appears 2 Choose Configure on the shortcut menu The Configuration dialog box appears Click...

Страница 40: ...can Document OCR Quality and then after the scanning is finished to open the PaperPort Desktop to display the scanned image The Format and Page s setting is to scan as a bitmap for a single page item...

Страница 41: ...d whether to scan a single page or multiple pages The formats are Bitmap and PaperPort Use PaperPort for scanning any item The Bitmap format is usually for photos or artwork The page icons represent s...

Страница 42: ...ew destination application configuration and image format for a scanner button to optimize it for the type of scanning you want to do You use the Configuration dialog box to select new options To sele...

Страница 43: ...scans the image using the new configuration settings and displays the scanned image in the new destination application CREATING NEW CONFIGURATIONS You cannot change settings such as brightness or con...

Страница 44: ...1 Display the Configuration dialog box Click the tab of the button whose options you want to change 2 In the Select Configuration list click the configuration that you want to adjust For example the f...

Страница 45: ...graphs The scanning produces an image in varying shades of gray Select Color to scan color photographs and other color items Resolution Drag the slider to the right or left to adjust the dots per inch...

Страница 46: ...to in the middle of the glass the scanner will automatically determine the size of the photo When AutoCrop is selected the scanner makes two passes the first pass senses the item s size and the second...

Страница 47: ...t Gamma setting works fine in most cases and normally does not need to be adjusted 6 Click OK The Configuration dialog box reappears Make sure the configuration you just defined is selected 7 Click OK...

Страница 48: ...log box appears The dialog box shows which button you selected for new preferences If the Button tab on the Preferences dialog box is not selected click it Show All Destinations Clicking this option a...

Страница 49: ...cations to include in the button s list of destination applications Click in the boxes for the types of applications to include in the button s list Show Scan Progress Window Select this option to see...

Страница 50: ...ner in the Windows taskbar Folder for Temporary Images Click the Folder button and then select a folder for the scanner s temporary images During scanning a temporary file contains scan information ab...

Страница 51: ...File menu choose Select Source The Select Source dialog box appears and shows the Visioneer Scan Manager Pro as well as all other Twain devices installed on your computer 3 Choose Visioneer Scan Mana...

Страница 52: ...r or choose Acquire from the File menu The Visioneer Scan Manager Pro appears Note Your Visioneer PhotoPort scanner is initially set to scan from the PaperPort software with the setting Color Document...

Страница 53: ...configuration is selected Clicking the sign in front of Custom shows Custom s scan settings as a list Click a setting in the list if you want to change it The setting s options appear on the right si...

Страница 54: ...scans the item and displays a preview using the options you selected 3 Review the image to make sure it s what you want 4 To adjust one of the settings for the scan click it in the list of settings A...

Страница 55: ...e AutoScan settings In addition your PhotoPort 7700 scanner has built in image analysis capabilities that find the optimum combination of settings for the item you re scanning When you click AutoScan...

Страница 56: ...s Guide on the CD for more information about using the PaperPort software GETTING HELP WITH THE PAPERPORT SOFTWARE The PaperPort software includes a complete set of help topics that answer questions...

Страница 57: ...responding button on the right side of the Scan Manager Pro The following figure shows an example of the Scan Manager Pro if you click the Resolution setting in the list or click the Resolution and Sh...

Страница 58: ...elect a configuration on the Scan Manager Pro such as Color Custom 2 Adjust the settings that you want for later use Click to close the settings panel Note The information in the scan settings list an...

Страница 59: ...size is saved with this profile See Saving a Custom Size on page 65 for more about a custom image size Save the custom Response Curve and store it in this profile you can also create custom settings f...

Страница 60: ...higher the resolution the finer the details however higher dpi settings also produce larger files sizes Usually the higher resolution settings are used for precision work such as photographs or fine...

Страница 61: ...e the sharpness or to the right to increase the sharpness You can also type a number directly into the sharpness setting box or click the up and down arrows next to the box to increase or decrease the...

Страница 62: ...the up and down arrows next to the box to increase or decrease the setting 2 Drag the Contrast slider to the left to decrease the contrast or to the right to increase the contrast The Histogram repre...

Страница 63: ...ple if you selected the Black sampler button place the pointer on the blackest part of the image 3 Repeat with each of the other Sampler buttons 4 Click Adjust The image changes to show your new setti...

Страница 64: ...choose the type of color editing that you want to use Gamma the response curve changes as you change the gamma setting you can also change the saturation and hue settings Freestyle you can drag sectio...

Страница 65: ...act settings on other images This is especially helpful for complex Freestyle response curves A dialog box appears that lists the names of previously saved settings Type a name for your new settings a...

Страница 66: ...in the window Check to make sure the dotted line encloses the image that you want A new Scan Info box on the lower left portion of the Scan Manager Pro shows the information for the autotrimmed area...

Страница 67: ...new output size area You can also type in the size settings boxes Width and Height the measurements of the final image after it s scanned for example if you plan to print the image on a typical piece...

Страница 68: ...lick Rotate 90 Degrees 6 To maintain the selected area s length to width relationship known as the aspect ratio click Maintain Aspect Note that as you rotate the area or maintain its aspect ratio the...

Страница 69: ...phs you can create a custom size and reuse it whenever scanning those items To save a custom size setting 1 Click Add under the list of sizes The Add Size dialog box appears 2 Type a name and dimensio...

Страница 70: ...return the image to its full size click the Pointer button directly above the Zoom button put the pointer on the image and click the right mouse button Select Show Full Image from the pop up menu tha...

Страница 71: ...th range of colors Select this option to automatically allow the Scan Manager Pro s color settings to support more than a 24 bit depth if the other devices also support the greater range of colors Sho...

Страница 72: ...folder you want to use and click OK That folder name is then listed on the Preferences dialog box 3 Click OK to save your preferences GETTING HELP WITH THE SCAN MANAGER PRO The Scan Manager Pro has it...

Страница 73: ...nches 5 7 cm Width 11 25 inches 28 6 cm Length 16 0 inches 40 6 cm Weight 4 4 pounds 1 64 kg Removable memory CompactFlash Type 2 SmartMedia 3 3v Operating temperature 50 104 F 5 35 C without condensa...

Страница 74: ...VISIONEER PHOTOPORT 7700 USB SCANNER SPECIFICATIONS 70...

Отзывы: