


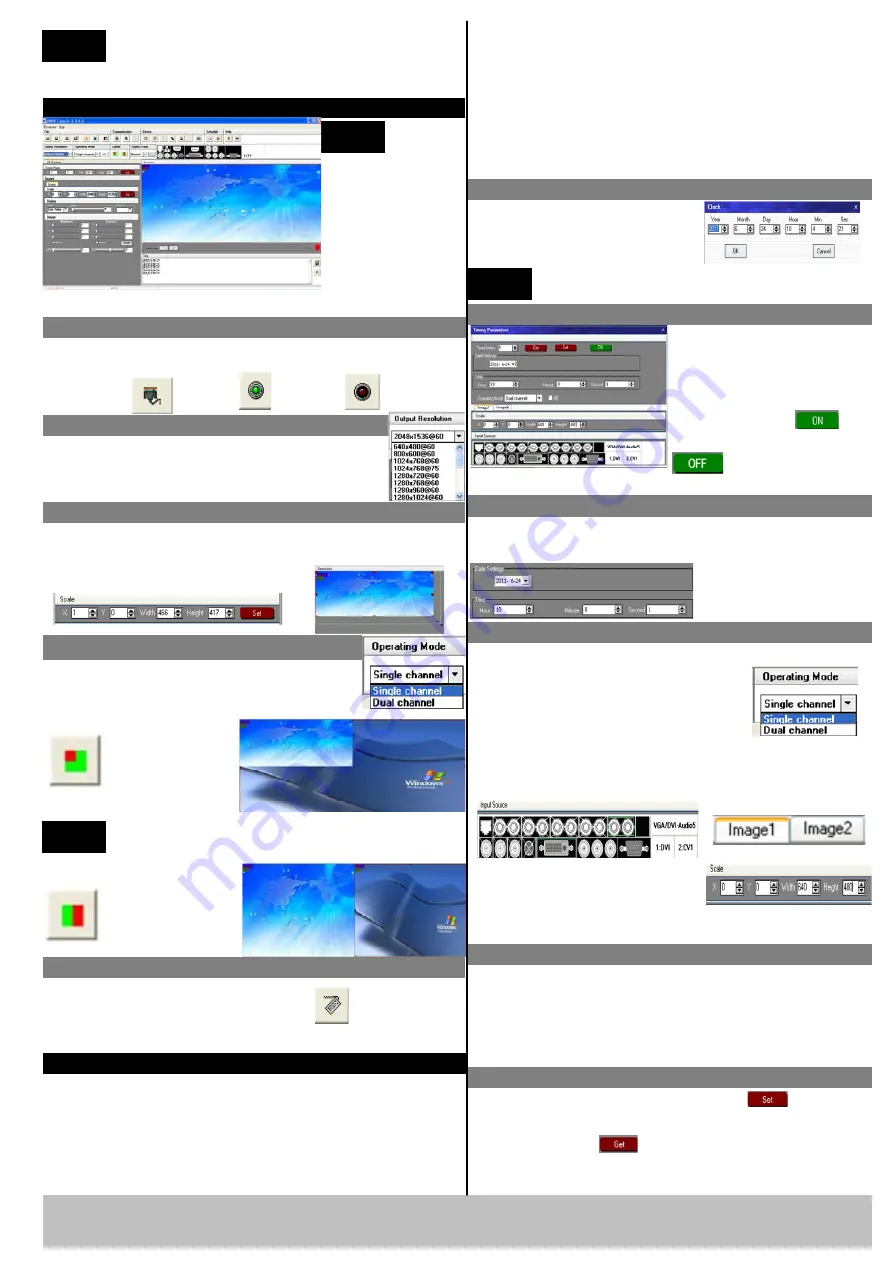
Remote control -- Software Operation
VSP 516 Quick Start
Rev 1.0
Page 3 of 3
NOTE
For setup
software,
please check with
user manual. And
install correct
language version to
work with right
language user
interface.
Step 2-Output resolution
Select output resolution from pull down
output list.
Step 3-Scale
User can scale the image with mouse drap and drop
operation; User can also scale by input the data into the
scale parameters and set.
Step 5-Save
Push
“
Save to flash
”
button and
select one of user mode to save, there
are three user modes in the list.
Save to flash
button, use to
save user mode
NOTE
SAVE1 setting is default user setting after VSP
516 power on.
All the user settings will gone after factory reset.
Step 4-Set up picture display mode
Under dual channels mode, user can set up
the pictures
’
size and position
,
as following:
Push this button
to show PIP
CV1 is default small window, DVI is default
bigger window.
NOTE
Push this button
to show PBP.
Use the RS 232 port on the computer, baudrate should be
115200.
Step 1-Set up communication
Set COM
Open COM
Close COM
Step 1-Set Clock
How to add task in advanced settings
There are three steps to finish schedule.
Step 1. Set clock to sync to local time;
Step 2. Enable the schedule.
Step 3. Set timer parameter the schedule will run;
Step 4. Set the functions which run with schedule;
Step 5. Save to timer index;
Step 6. Run schedule
set the current time through
the options in the "clock"
function.
NOTE
After factory reset, user need to set schedule
function again.
Step 2-Enable the schedule
User can save the schedule setting as timer index.
When the timer value is set to 1, the setting is stored
into index 1. If you want to set up more schedule
function, you can store in different index.
VSP 516 supports max 10 schedule functions.
The VSP 516 supports timer setting in date, hour,
minute and seconds.
When these steps were finished, click
to complete
the "Task Scheduler".
User should enable the
schedule after the
config, otherwise the
function is not used.
Push start button and
when the button show as
it means schedule
function is enable.
Select to work in dual channel or
single channel display mode.
Users can scale the parameters
by input values or click the
down arrow to set the parameters to control the
location and size.
Click the button
you can view the current
"mission plan" input, playback time, picture size,
location and other information.
Step 3-Set timer parameter
Step 4-Set function to run
User can set operating (display) mode, input
interface, scale for schedule function.
Select the input interface to work in display mode, if
display mode is dual channel, should click image 1
and image 2 page to select separately.
Step 5-Save to timer index
Step 6-Run schedule
Add task through
“
device schedule
”
under the
“
video processor
”
menu.
User can add task schedule, and then device will switch
to the input, run the config settings according to the
schedule.


