background image

1717 W Civic Drive, Milwaukee, WI 53209

414-354-6600

Design Modification Rights Reserved

© 2018 Visa Lighting

When using electrical equipment, basic safety precautions should always be followed, including the following:

•Read all instructions carefully before installing and save for future use.

•Make sure all connections are in accordance with the National Electrical Code and local regulations.

•To avoid possible electric shock, be sure the power supply is turned off before servicing or installing the fixture

•Service should be performed by qualified personnel.

•These instructions may not cover all details or variations. If additional information is needed, please contact Visa Lighting.

!

Model: CV2424
 

Linesse Linear Slot

Publication: 762302XX
Document Description:  Installation Instructions  
 

for 3” Linesse Linear Recessed  


Series Luminaires

8

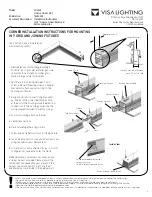
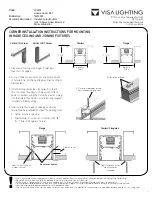
CORNER INSTALLATION INSTRUCTIONS FOR MOUNTING  
IN T-GRID AND JOINING FIXTURES

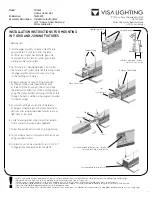
1.  Remove lens and install hanger brackets.
  For 9/16” lay-in grid, place smaller gap side
  of bracket towards lens. For other grids,
  place wider gap side towards lens.

2. Set fixture into opening between T-Grid. 

Screw in #8 self threading screws in hanger 
bracket and attach support wiring to the 
building and fixtures.

3. Bring conduit and conduit filling (supplied  

by others) to the power feed hole location 

  at the end of the housing. Make the electrical 

connections to the building power. Use the  
wiring diagram included to identify wiring.

4. For row mounting attach harnesses.

5. Center lens sections.

6. Slide fixture together using sliders.

7. Screw internal reflectors down to joining fixture.

8. Tuck harness at end of rows and attach end caps 

using supplied screws. Replace lens.

9. Grid end caps can be adjusted for lay in or slot T 

configurations (use extra holes to adjust).

Note:

 Horizontal grid corners has endcaps and  

a starter harness provided. Please discard the  
component not needed for your project. If the  
harness needs reversed for a left, use the 4”  
adapter harnesses provide in the hardware kit.

Use Chart on Page 3 to determine 
Grid mounting widths.

Approximately 4”

Hanger Brackets

Support Wire

Mounting Screws

Through Harness

Lens

Sliders

Smaller Gap Side of Bracket 

for 9/16” Lay-in Grid

Building Power Feed

Starter Harness

Through Harness

Inside View

Fasten extended reflector tabs  
to joining fixture.
Carefully break tab at end of run

Fasten end cap to end of run

Содержание Linesse CV2424

Страница 1: ...oid possible electric shock be sure the power supply is turned off before servicing or installing the fixture Service should be performed by qualified personnel These instructions may not cover all details or variations If additional information is needed please contact Visa Lighting 1 Linesse Linear Luminaire 3 Recessed LINESSE LINEAR LUMINAIRE 3 RECESSED CV2424 Page 2 Warnings Page 3 Mounting Ty...

Страница 2: ...before installing servicing or maintaining this equipment These instructions do not cover all installation service and maintenance situations If your situation is not covered or if you do not understand these instructions or additional information is required contact your distributor Before installing servicing or maintaining this equipment follow these general precautions To reduce the risk of el...

Страница 3: ...ture Service should be performed by qualified personnel These instructions may not cover all details or variations If additional information is needed please contact Visa Lighting Model CV2424 Linesse Linear Slot Publication 762302XX Document Description Installation Instructions for 3 Linesse Linear Recessed Series Luminaires 3 MOUNTING TYPES AND DIMENSIONS Flange Flangeless Trimless 9 16 Grid Te...

Страница 4: ...For other grids place wider gap side towards lens 3 Set fixture into opening between T Grid After the fixture is set screw in 8 self threading screws in hanger bracket and attach support wiring to the building and fixtures 4 Bring conduit and conduit fitting supplied by others to the power feed hole location at the end of the housing or in end cap Make the electrical connections to the building power ...

Страница 5: ...N HARD CEILING AND JOINING FIXTURES 1 Prepare wall ceiling with proper rough in width openings see chart on page 3 2 For post sheetrock applications use 5 8 holes on back of fixture Tie into the building with 1 4 all thread rod supplied by others 3 Install building power feed conduit and fitting supplied by others through top side of housing or thru end cap of 1st fixture in the continuous run Mak...

Страница 6: ...2302XX Document Description Installation Instructions for 3 Linesse Linear Recessed Series Luminaires 6 INSTALLATION INSTRUCTIONS FOR MOUNTING IN HARD CEILING AND JOINING FIXTURES cont 1 For row mounting fixtures attach male end of harness to female end of harness Small lens sections are centered between fixtures to avoid light leak at lens ends 2 Slide fixture together using sliders that extend f...

Страница 7: ...ed off before servicing or installing the fixture Service should be performed by qualified personnel These instructions may not cover all details or variations If additional information is needed please contact Visa Lighting Model CV2424 Linesse Linear Slot Publication 762302XX Document Description Installation Instructions for 3 Linesse Linear Recessed Series Luminaires 7 CORNER INSTALLATION INST...

Страница 8: ...e into opening between T Grid Screw in 8 self threading screws in hanger bracket and attach support wiring to the building and fixtures 3 Bring conduit and conduit filling supplied by others to the power feed hole location at the end of the housing Make the electrical connections to the building power Use the wiring diagram included to identify wiring 4 For row mounting attach harnesses 5 Center l...

Страница 9: ...R INSTALLATION INSTRUCTIONS FOR MOUNTING IN HARD CEILING AND JOINING FIXTURES 1 Prepare wall ceiling with rough in openings see chart on page 3 2 For post sheetrock applications use holes on back of fixture to tie into the building supplied by others Remove lens 3 Install building power feed supplied by others thru top side of housing or thru end cap Attach power to harness using the starter harne...

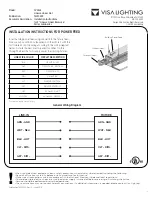
Страница 10: ...2018 Model CV2424 Linesse Linear Slot Publication 762302XX Document Description Installation Instructions for 3 Linesse Linear Recessed Series Luminaires 10 INSTALLATION INSTRUCTIONS FOR POWER FEED Insert building power feed using conduit into the fixture feed hole or a 2x4 Junction box supplied by others Start with the first fixture and splice wiring according to the wiring diagram below A starte...

Отзывы: