background image

RUDDO | User guide

3. CONFIGURING  

BRAKES AND RUDDER 
HARDNESS

We offer the possibility to adapt the rudder and brake hardness to your 
preferences. There are two modes available harder and softer.

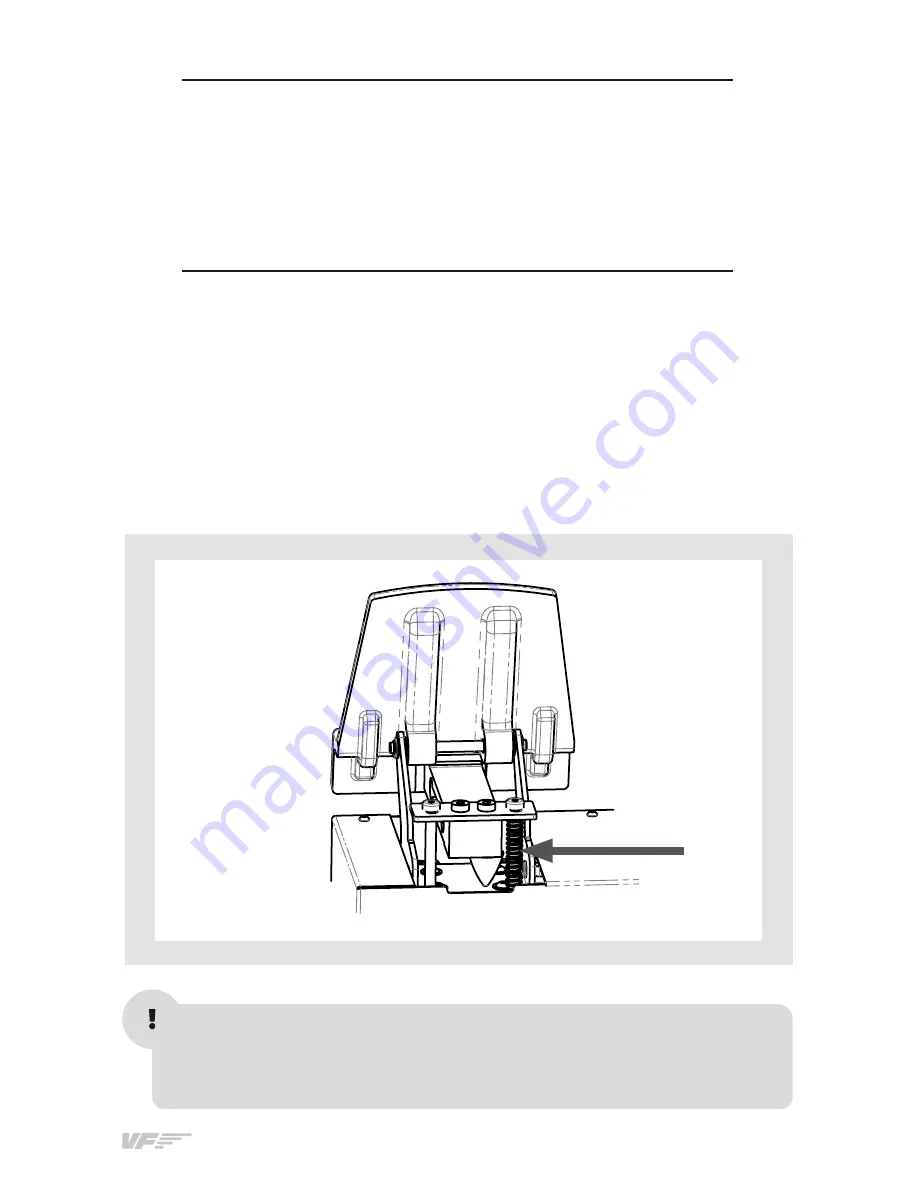
Brake hardness

In the rear part of pedals there is a spring that offers resistance when the 
brakes are pressed as you can see in the picture:

You can choose to use two springs for harder resistance or only one in order 
to obtain a softer resistance. (Two more springs are supplied)
You will need an Allen wrench n. 3 (not included) to change the springs.

Содержание RUDDO

Страница 1: ...RUDDO STEP ON FOR REAL USER GUIDE ENG Rev 2 0 March 2017 ...

Страница 2: ...RUDDO User guide ...

Страница 3: ...ES AND RUDDER HARDNESS 4 RUDDO CALIBRATION ON WINDOWS 5 RUDDO CONFIGURATION ON MICROSOFT FLIGHT SIMULATOR MFS AND PREPAR3D 5 1 Through the MFS Prepar3D menu 5 2 Through the VF Test Calibrate control panel 6 CONFIGURATION ON X PLANE 10 4 6 8 13 14 14 15 17 ...

Страница 4: ...RUDDO User guide 1 PACKAGE CONTENTS 1 RUDDO 1 unit 2 USB data Cable 1 unit 3 Subjection strap 1 unit 4 Adhesive backed Velcro strips 2 units 5 Memory stick 1 unit 6 Spring 2 units 7 User s manual 1 unit ...

Страница 5: ...5 4 1 5 3 4 7 6 2 ...

Страница 6: ...gure B We provide you a subjection strap 3 to minimize the chair move ments while the brakes are applied Lift the RUDDO from the floor and thread the strap through the RUDDO s base holes Pass the strap through the chair securing the subjection Pass the end of the strap through the tensioning tool and pull tight until the chair is at the desired distance Fixing to the floor optional Figure C The RU...

Страница 7: ...7 6 Figure A Figure B Figure C ...

Страница 8: ...able harder and softer Brake hardness In the rear part of pedals there is a spring that offers resistance when the brakes are pressed as you can see in the picture You can choose to use two springs for harder resistance or only one in order to obtain a softer resistance Two more springs are supplied You will need an Allen wrench n 3 not included to change the springs ...

Страница 9: ... 1 Unscrew the external screw from back part of the pedal 2 Add or remove the spring according to your preferences 3 Place the screw to its original position 4 Repeat the process with the other brake pedal ...

Страница 10: ...of the springs on every side of the rudder You will need to remove the black cover of the device using an Allen wrench number 2 not included 1 Remove the allen screws from the cover of RUDDO To remove some of the screws you will need to push the pedals with your hand 2 Remove the cover carefully ...

Страница 11: ...d 4 There are a total of 4 axis guides and 8 springs Add or remove the springs according your preferences You can decide 4 different combinations see the figure bellow Number 4 corresponds to the strongest combination and Number 1 corresponds to the softer combination ...

Страница 12: ...RUDDO User guide 5 Screw the axis guide s again using the screwdriver 6 Place the cover again fixing it with the screws removed at point 1 ...

Страница 13: ...ion Wizard follow the steps shown It s very important that you follow step by step exactly as you read on the screen X axis corresponds to the rudder X rotation corresponds to the left brake Y rotation corresponds to the right brake Once calibration is completed go to the Test tab to check the correct operation of the rudder left brake and right brake Click on Apply Click OK to exit For a proper o...

Страница 14: ...e pedals brake if you are not able to press the maximum force 5 1 THROUGH THE MFS PREPAR3D MENU From the main MFS Prepar3D splash screen choose the Settings option and click on the Controls button Check that Enable controller s option is activated Click on the Control axes tab and select VirtualFly RUDDO on the dropdown list Select Rudder axis in the list and press Change Assignment Slide the rudd...

Страница 15: ...kes assignment on all the buttons and axes To disable these assignments you have two options OPTION 1 Disable all the Joysticks game devices that you have con nected in the computer From the main MFS Prepar3D splash screen choose the Settings option Click on Controls In the window that appears go to the Calibration tab and disable the Enable controls option OPTION 2 Disable only Virtual Fly RUDDO ...

Страница 16: ...brate exe file in your Flight Simulator compu ter You can leave it in Desktop for example Just duble click on the VF TestCalibrate exe file to execute it Using VF Test Calibrate You will find VF Test Calibrate user s guide inside the Control Panel See the arrow in the following figure Keep in mind that VF Test Calibrate Control Panel has to remain ON when you use MFS Prepar3D ...

Страница 17: ... change from red to green when the pedal reaches the maximum In dropdown select Yaw Repeat the process with the left brake actuating to the maximum Then select Left toe brake from the dropdown menu Repeat the process with the right brake actuating to the maximum Then select Right toe brake from the dropdown menu Adjusting the sensibility Go to dead zone tab in Joystick and equipment dialog box To ...

Страница 18: ...RUDDO User guide ...

Страница 19: ...19 18 ...

Страница 20: ...UAL FLY HEADQUARTERS c Morales 39 bajos 08029 Barcelona Spain R D CENTER SHOWROOM c Maria Aurelia Capmany 29 P I La Fàbrica 08297 Castellgalí Spain T 34 93 833 33 01 info virtual fly com www virtual fly com ...

Отзывы: