background image

7

Introduction

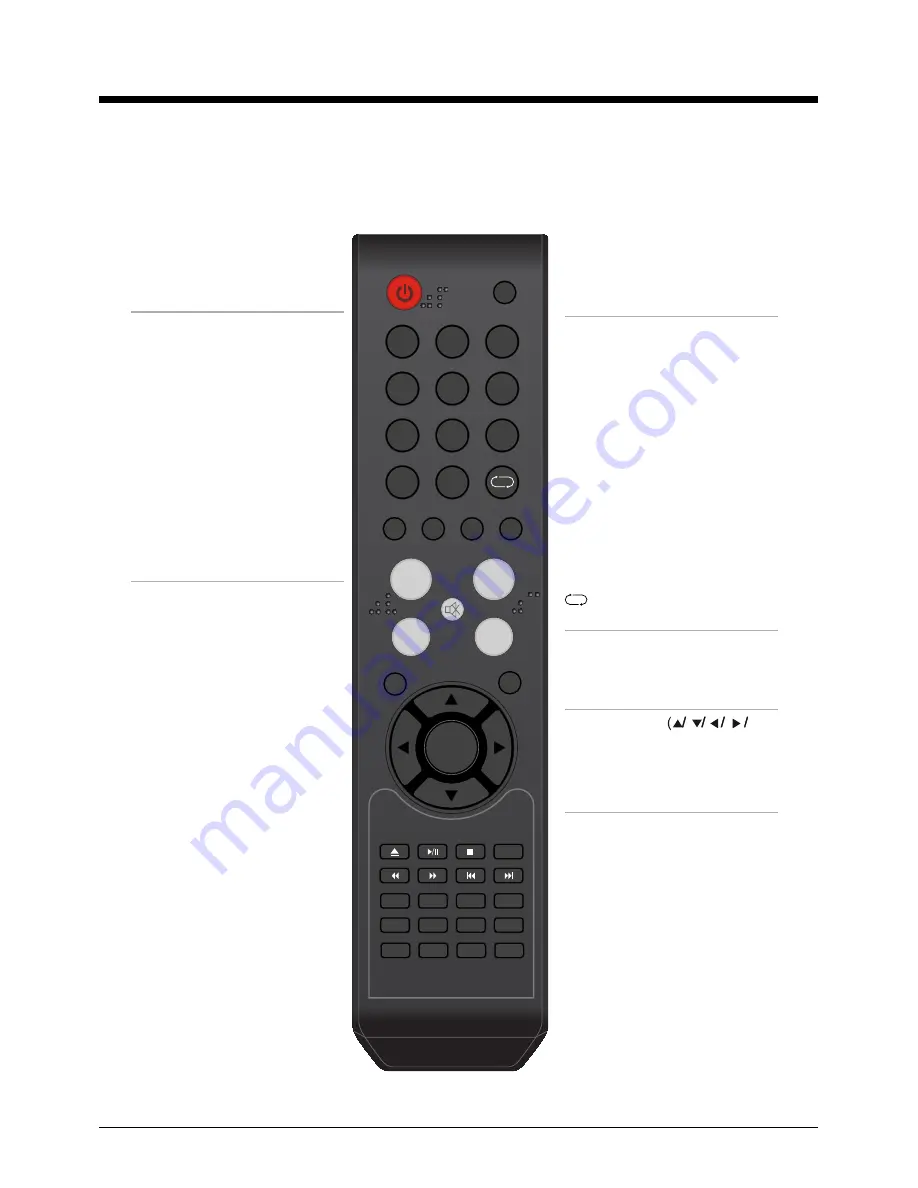
3. Remote Control

The remote control is using Infra-Red(IR). Point it towards the front of the LCD TV. The remote
control may not work correctly if it is operated out of range or out of angle.

POWER

Press to turn the TV on/standby

INPUT

Press to display the input source 
menu

To select the program directly.
e.g.:
Select channel 5,
press “5” button.
Select channel 62
press “6” button, and press “2” 
button in 2 seconds.
Select channel 152
press “1” button, and press “5” 
button, then press “2” button
in 2 seconds.
select channel “5-1”,
press “5” then “-/--” and “1”.

NUMBER BUTTONS

Return to the previous channel viewed.

MUTE

Press to mute the sound. 
Press again or press VOL+ to
unmute.

DISPLAY

Press to enter the EPG menu 

directly.

PICTURE

Press repeatedly to cycle

through the available video

picture modes.

SOUND

Press to cycle through the

different sound settings.

SLEEP

Press to setup the sleep time 

CH+/-

Channel/P/-

VOL+/-

V

olume +/-

MENU

Press to display the OSD menu.

EXIT

Press to exit form the OSD menu.

Allows you to navigate the
on-screen menus and adjust the
system settings to your
preference.

THUMBSTICK

OK

)

CC

Press to display the closed caption.

MTS

Press to select the audio channels.

FAV

Press to display teh favorite 
channels list.

EPG

Press to enter the EPG menu 
directly.

PICTURE   SOUND    SLEEP    DISPLAY

INPUT

VOL+

VOL-

EXIT

MUTE

MENU

OK

CH+

CH-

1

2

3

4

5

6

7

8

9

0

CC           MTS          EPG          FAV

SETUP

TITLE

ANGLE

GOTO

MENU

REPEAT

INTRO

A-B

PROGRAM

LANGUAGE

ZOOM

SUBTITLE

SLOW

Содержание LED24VF65D

Страница 1: ...24 1080p LED Backlight LCD Television with Bulit in DVD Player LED24VF65D 19...

Страница 2: ......

Страница 3: ...Rear View 3 Remote Control Connection Basic Operation OSD Menu 1 Picture menu 2 Audio menu 3 Time menu 4 Setup menu 5 Lock menu 6 Channel menu Simple Troubleshooting 2 3 4 4 5 8 5 6 7 8 9 11 12 13 14...

Страница 4: ...DFFRPSDQ LQJ WKH DSSOLDQFH Correct disposal of this Product DVWH OHFWULFDO OHFWURQLF TXLSPHQW RXU SURGXFW LV GHVLJQHG DQG PDQXIDFWXUHG ZLWK KLJK TXDOLW PDWHULDOV DQG FRPSRQHQWV ZKLFK FDQ EH UHF FOHG...

Страница 5: ...DU VZLPPLQJ SRROV 3XOO WKH SOXJ RXW LPPHGLDWHO DQG VHHN SURIHVVLRQDO KHOS LI WKH PDLQV SOXJ RU FDEOH LV GDPDJHG OLTXLG LV VSLOW RQWR WKH VHW RU LI LW LV DFFLGHQWDOO H SRVHG WR ZDWHU RU PRLVWXUH DQ WKL...

Страница 6: ...re quality than conventional LCD TVs with less power consumption Made of 95 recyclable materials 1920 x 1080 native resolution for Full HD 1080p performance Integrated ATSC TV tuner for HDTV broadcast...

Страница 7: ...adjust the volume POWER Turn on standby the TV set The effective receiving range for the signal is 5 8 metres from the front of the remote control window and 300 to the left or right side and 200 abov...

Страница 8: ...VIDEO Connect it to video output terminal of DVD 10 R L in Connect them to the audio output terminal of DVD shared with YPbPr 11 RF Connect antenna or cable 75 Ohm coaxial to receive TV signal Wall M...

Страница 9: ...e sound Press again or press VOL to unmute DISPLAY Press to enter the EPG menu directly PICTURE Press repeatedly to cycle through the available video picture modes SOUND Press to cycle through the dif...

Страница 10: ...ITLE SLOW INTRO If you play CD it will scan program with 3S A B Select and play the preferable paragraph of DVD program by pressing this key twice at the beginning and end of it REPEAT Repeat playing...

Страница 11: ...then press OK Connect to the power supply correctly as shown with the mains cable and mains adaptor When you connect the power the TV set comes into standby mode and the LED indicator Page 5 lights r...

Страница 12: ...e RCA Audio Cable Audio Cable DVD or VCR YPbPr Connection Note All cables shown are not included with the TV Connect the YPbPr output jacks on the DVD or VCR to the YPbPr input jacks on the TV set wit...

Страница 13: ...on the PC to the VGA jack on the TV set with a VGA cable Connect the audio output jack on the PC to the PC IN jack on the TV set with a stereo audio cable Turn on the PC and select VGA in the input so...

Страница 14: ...ss again or press VOL to unmute DISPLAY Display the information of current mode Thumbstick Allows you to navigate the on screen menus and adjust the system settings to your preference OK CONFIRM butto...

Страница 15: ...submenu use button to select the function item and you could adjust Contrast item in Picture menu for example with button select Picture Mode item in Picture menu for example with button enter the sub...

Страница 16: ...pressing the PICTURE button on the remote control Contrast Control the difference between the bright and dark regions of the screen picture Brightness Adjust brightness of the picture Color Adjust co...

Страница 17: ...ct the sound mode directly by pressing the SOUND button on the remote control Bass Low frequencies intensity Treble High frequencies intensity Balance Left and right stereo audio channels balance Surr...

Страница 18: ...u may set the automatic shutdown timer choosing from 5 to 240 minutes or deactivate this function Time zone Daylight Saving Time Select between On and Off Clock User can not change time manually durin...

Страница 19: ...erform an Auto adjustment Closed Caption CC Mode Allow you to select the CC Mode among On Off and CC on Mute Basic Selection Allow you to select the basic selection among CC1 CC2 CC3 CC4 Text1 Text2 T...

Страница 20: ...LEHG EHORZ don t work 7KLV RSWLRQ PHQX DOORZV RX WR ORFN DQ 79 FKDQQHO RU DGMXVW WKH 0RYLH UDWLQJ OWHU US TV 8VH 0 EXWWRQV WR VHOHFW WKH GHVLUHG UDWLQJ DQG SUHVV EXWWRQ WR EORFN RU XQEORFN UDWLQJ MPAA...

Страница 21: ...to search the channels automatically The receivable channels will be stored automatically When searching channels press MENU to stop If you select Air as input signal in Antenna item you can press but...

Страница 22: ...KHQ SUHVV OK EXWWRQ WR VKRZ RU KLGH WKH KLJKOLJKWHG FKDQQHO Channel No 6KRZ DQG VHOHFW WKH FKDQQHO Channel Label OORZ RX WR VHWXS D ODEHO IRU WKH FKDQQHO 3UHVV 0 EXWWRQ WR VHOHFW WKH SRVLWLRQ RI WKH W...

Страница 23: ...o choose 4 Press ENTER or Play to start when highlighted 5 Return to Menu when Playing When playing a DVD disc press the Menu button to return to the ROOT menu Title Play 1 Compatible with DVD discs 2...

Страница 24: ...gital Audio disc JPEG discs 2 To skip forward to the beginning of the next title chapter track on a disc press Next on the remote or the right side of the player 3 To skip backward to the beginning of...

Страница 25: ...al number of playing subtitle the amount of optional subtitles or Off Angle the serial number of playing angle the amount of optional angles or Off Press the button for the third time the display menu...

Страница 26: ...n to return to the normal condition 3 If the player has no sound check that the Mute is not on Zoom In the Video Image 1 Compatible with DVD JPEG discs 2 The Zoom Function allows you to enlarge the vi...

Страница 27: ...feature and then press OK to select the new setting 5 To exit the menu press SETUP or button to select EXIT SETUP and then press OK When launching the setup routine the pressing of the following butto...

Страница 28: ...ions are illustrated below OSD LANGUAGE The OSD will display in the language you choose AUDIO LANG If the disc you are playing has the language you choose it will output audio in that language SUBTITL...

Страница 29: ...o disc contains high density compressed data that needs proper handling 1 Hold the disc with fingers by outer edge and or the center spindle hole Do not touch the discs surface 2 Do not bend or press...

Страница 30: ...ture quality Check the aerial connections Check that the channel is tuned in properly Adjust the picture settings brightness colour sharpness contrast hue Make sure that the TV is not located close to...

Страница 31: ...Consumption Panel Size Video PC Audio 24 inch diagonal 1 DC 12V 5A 60W 1 250 cd m2 1 2 1000 1 1920x1080 1 1 1 Brightness Audio L R HDMI Contrast Resolution VGA YPbPr RF 1 1 Coax Headphone Product spe...

Страница 32: ......

Страница 33: ...product for 30 days and reserves the right in its sole discretion to dispose of the damaged product or ship it back to the consumer at consumer s expense after 30 days This limited warranty covers man...

Страница 34: ......

Страница 35: ......

Страница 36: ...VIORE Inc 7801 Hayvenhurst Avenue Van Nuys California 91406 Printed in China...

Отзывы: