VIORE 10.2

27

Trouble shooting

n

o

it

c

A

m

e

l

b

o

r

P

The screen does not appear.

Is the power plug pulled out? Insert the power plug.

Press the power button.

The screen appears too

This problem occurs for a brief time in the progression of image 
elimination processing in order to hide temporary screen noise that 
occurs when the power is turned on.  If the screen does not appear 
after one minute, contact your dealer or an authorized service center.

slowly after the power is turned on.

Screen is too bright or too dark.

Perform brightness adjustment or contrast adjustment.

Screen is too large or too small.

Adjust the screen size.

Stripes appear on the screen

This problem can occur if wireless telephones, hair dryers, or electric 
drills are used near the TV.

and it shakes.

Screen appears, Voice is not heard

1. Press the "MUTE"button.
2. Increase the sound level by pressing volume adjustment button.
3. Check if sound terminal of external input is connected properly.
4. Check if audio cables are connected properly.
5. Select and check the other input.

If the sound still does not work and you have checked every channel 
to ensure that the problem is not channel specific, contact your dealer 
or an authorized service center.

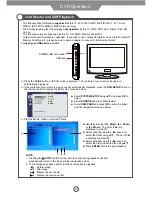
Remote control does not work

1. Check if main power is On.
2. Check that the batteries of the remote controller were loaded 
    properly.
3. Check to see if any obstacle exists between the LCD TV and the 
    remote control.
4. If the batteries have no power, replace them with two new 
    batteries.

- In case a problem occurs with your LCD TV, please take the following steps first.
- If the problem still occurs, turn the power off and contact your dealer or an authorized service center.

Maintenance and service

Содержание 10.2" PORTABLE LCD TELEVISION WITH BUILT-IN DVD PLAYER PLCD10V59

Страница 1: ......

Страница 2: ......

Страница 3: ...g the FUNCTION Settings Customizing the TUNING Settings EPG menu Closed Caption 13 14 15 16 17 17 Accessories Names of each part Remote Control 6 6 8 9 Input connections Headphone connection 11 11 Pow...

Страница 4: ...sult in fire or electric shock Be sure to ground the unit Failing to do so may lead to electric shock when a short circuit or overload occurs If necessary install a ground fault circuit breaker Never...

Страница 5: ...e or electric shock If rainwater finds its way inside the unit it may result in fire or electric shock Do not cover the unit with a tablecloth curtain or other material If the temperature inside the u...

Страница 6: ...the power cord connected to the outlet may cause damage to the cord resulting in fire or electric shock If you notice any unusual odors or smoke around the unit immediately disconnect the unit from th...

Страница 7: ...the apparatus has been damaged in any way such as power supply cord or plug is damaged liquid has been spilled or objects have fallen into the apparatus the apparatus has been exposed to rain or moist...

Страница 8: ...ratus has been damaged in any way Your TV could require servicing if any of the following occur Supply cord or plug is damaged Objects have fallen into the apparatus Apparatus has been exposed to rain...

Страница 9: ...ideo Audio output EAR PHONE Headphone out ON OFF Power switch up power on down power off Power led indicator Light red Battery is not full DC IN Connect to DC power supply Profile view 13 15 14 User G...

Страница 10: ...Disassembly of TV Base Wall Hanging Standing the TV with Bracket 7 Names of each part User Guidance Information slots...

Страница 11: ...8 Inserting Discs User Guidance Information The disc tray will open slightly Pull the tray gently to open completely There are two ways to open the disc tray...

Страница 12: ...the screen display mode NUMBER buttons and button Choose channel directly Press buttons to select and press a number button to select the channel Press buttons to select and press two number buttons t...

Страница 13: ...al 75 Coaxial Round Antenna Cable External Antenna Wall jack with F Connector Connection Antenna connection Note This model has a built in rechargeable Li ion battery You can enjoy watching TV for app...

Страница 14: ...r supply pushing the power switch OFF ON up and press STANDBY button to turn on the LCD TV 2 Pressing TV AV button on the LCD TV or TV AV button on the remote control to display the input source menu...

Страница 15: ...n press STANDBY on the LCD TV To turn off the LCD TV To turn on off the LCD TV by remote control Pressing button Selecting Input Source You can select between the TV signal and the input signal of oth...

Страница 16: ...option 13 Operating the menu 1 TV DTV menu Allows you to make adjustments to your picture settings Select TV DTV source for example 3 TV menu Allows you to setup a variety of setup options Select TV s...

Страница 17: ...ghtness Controls the overall brightness of the picture Contrast Controls the difference between the brightest and darkest regions of the picture Saturation Controls the saturation of the picture Sharp...

Страница 18: ...Settings The FUNCTION menu includes the following options Language Select the OSD menu language Blue Screen Turn on off the blue screen display when there s no signal Wide Screen Control the OSD menu...

Страница 19: ...me Zone Select the Time Zone for your TV set according to you area Daylight Save Turn on off the Daylight Save function CH button if you turn on the function AFC Automatic frequency control the LCD TV...

Страница 20: ...emote control in DTV mode the screen will display the Closed Caption as below Press button to cancel CC Display Turn on off the Closed Caption display CC Type Select the Closed Caption service CC Mode...

Страница 21: ...Failure to play certain discs is not an indication of a problem with your player Note 2 The TV support the mp3 files with the Bit Rate between 32K and 320Kbps Note 3 The TV support the JPG files up t...

Страница 22: ...19 DVD Operation DVD Functions operating instructions 1 Press TITLE button The screen will show TITLE Playback will commence from the first chapter of the selected title 2 3 4...

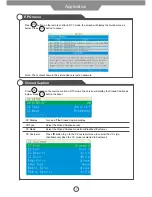
Страница 23: ...20 DVD Operation DVD Functions operating instructions STEP 5 6 7 8 9 10...

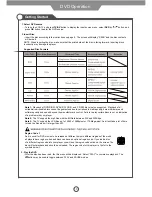
Страница 24: ...21 DVD Operation DVD Functions operating instructions 11 12 13 14...

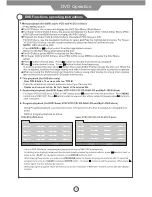
Страница 25: ...22 DVD Operation DVD Functions operating instructions 15 16 17 18 19 20 21...

Страница 26: ...ically displayed press the DVD SETUP button on the remote control to display the DVD setup menu as below SD MMC MS card reader USB jack 6HOHFW SYSTEM SETUP XVLQJ DQG SUHVV OK to select 6HOHFW SOURCE a...

Страница 27: ...launching the setup routine the pressing of the following buttons will turn off the setup menu while the choices that have been changed will be saved TV SYSTEM According to the Color system of your TV...

Страница 28: ...may also switch this OFF MENU LANG If the disc you are playing has the language you require you may select this 3 AUDIO SETUP 4 DIGITAL SETUP The video setup options are illustrated below DYNAMIC RAN...

Страница 29: ...26 Cleaning and Maintenance Maintenance for disc...

Страница 30: ...and it shakes Screen appears Voice is not heard 1 Press the MUTE button 2 Increase the sound level by pressing volume adjustment button 3 Check if sound terminal of external input is connected proper...

Страница 31: ...essly provided for in this statement noncommercial use of this product and shall not apply to the following including but not limited to to consumable parts such as batteries unless damage has occurre...

Страница 32: ...VIORE Inc 7801 Hayvenhurst Avenue Van Nuys California 91406 Printed in China...

Отзывы: