Vine TJ-225 Скачать руководство пользователя страница 8

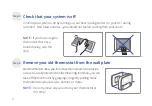
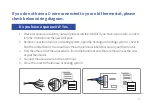
Check that your system is off

Step 3 

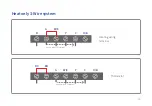
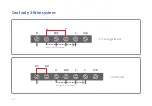
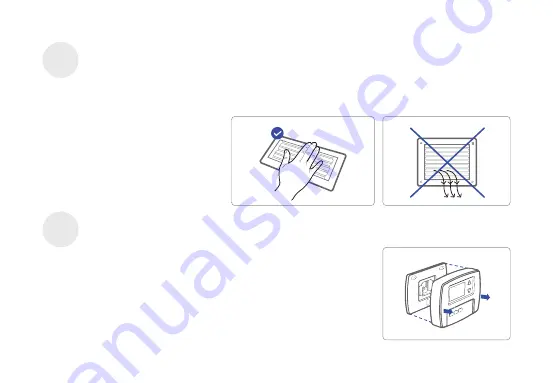
Remove your old thermostat from the wall plate

Step 4

Confirm your system is off by turning on your heat ( during winter ) or your AC ( during 

summer ). Wait a few minutes—you should not feel air coming from your vents.

NOTE :


If you have a digital 

thermostat that has a 

blank display, skip this 

step.

Most thermostats allow you to remove the main unit and provide 

access to a wall plate which holds the wiring terminals, you can 

take off the thermostat by grasping and gently pulling. Some 

thermostats may have screws, buttons, or clasps.
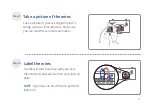
NOTE :


Do not remove any wires from your thermostat at 

                this time!

07

Содержание TJ-225

Страница 1: ...Smart Wi Fi Thermostat with Nightlight TJ 225 User Manual R...

Страница 2: ...J 225 Smart Wi Fi Thermostat with Nightlight Installation Guide Wi Fi Thermostat Two screws and anchors Flathead screwdriver Wire labels Jumper wire First things rst Here s what you ll nd in the box 0...

Страница 3: ...heat pump and dual fuel systems 2 Heat 2 Cool 1 Heat 1Cool Heat Only Cool Only Heat Pump W W O Emerg Heating or Aux Heating C Wire required to power the thermostat Note If you re uncertain about your...

Страница 4: ...icators Does not work with electric baseboard heat 110VAC 240VAC Does not work with millivolt systems Does not support S terminals for indoors and outdoors sensors NOTE If you are unsure please contac...

Страница 5: ...ine App for your smart device App Download 1 Search Vine Smart Control in the App Store or Google Play Store then download 2 Use your smart device to scan the QR code on the left for an automatic down...

Страница 6: ...ne thermostat will be linked to this email address once it is registered Installation Switch o power Step 1 This TJ 225 thermostat is designed to work on most 24V AC low voltage heating and cooling sy...

Страница 7: ...s you and avoids blowing a fuse in your equipment To make sure the power is o change the temperature with your current thermostat and wait at least ve minutes to be sure that your system doesn t turn...

Страница 8: ...ld not feel air coming from your vents NOTE If you have a digital thermostat that has a blank display skip this step Mostthermostatsallowyoutoremovethemainunitandprovide access to a wall plate which h...

Страница 9: ...ure of your existing wall plate s wiring and save it for reference Make sure you can read the wire terminal labels Use the wire label provided with your new thermostat to label each wire on your old w...

Страница 10: ...nto the hole in the wall Use the enclosed screws and anchors to mount the new wall plate In most cases you can utilize the same mounting position of your old thermostat Be sure to check the alignment...

Страница 11: ...Y Y2 W E O B W2 Conventional System Power for cooling 24V Power for heating 24V Common wire 24V Fan Power for cooling 24V Power for heating 24V Common wire 24V Fan 1st Stage Cool 2nd Stage Cool 1st St...

Страница 12: ...age Heat Y C Y2 O B W2 Single Stage Heat Two Stage Heat Furnace Boiler with C wire Thermostat RC RH G W E Y C Y2 O B W2 Combined Single Stage Heat and Single Cool Stage with C wire Remove Pre installe...

Страница 13: ...RH G W E Emerg AUX Heating 2nd Stage Heat 2nd Stage Cool Y C Y2 O B W2 Single Stage Two Stage Heat Pump with Emergency Heat and Auxiliary Heat with C wire Thermostat G W E Y C Y2 O B W2 Single Stage C...

Страница 14: ...Dual Fuel System Combined Single Stage Heat Pump and Single Stage Furnace with C wire Thermostat RC RH G W E Y C Y2 O B W2 13...

Страница 15: ...ver from furnace or heating system open the heating and cooling system s cover to nd the control board You should see the same terminal labels that are on your thermostat Find the other end of the unu...

Страница 16: ...tat move the G wire to the C terminal then use the included jumper wire to connect G with Y At the thermostat connect C with the G wire With this con guration the thermostat will have no fan control N...

Страница 17: ...Heat only 3 Wire system Heating wiring terminal R G W E Y C O B Thermostat RC RH G W E Y C O B Move G wire to C terminal Move G wire to C terminal 16...

Страница 18: ...Move G wire to C terminal Cool only 3 Wire system A C wiring terminal R G W E Y C O B Thermostat RC RH G W E Y C O B Move G wire to C terminal 17...

Страница 19: ...ntly to ensure wires are securely fastened When all wire connections have been completed place any excess wire back inside the wall First align the two clips on the back of the TJ 225 into the corresp...

Страница 20: ...the thermostat will power on and prompt you to start the setup If you are having trouble please refer to our help guide We are here to help WEBSITE www VINECONNECTED com online EMAIL info VINECONNECT...

Страница 21: ...cess once it s turned on for the rst time Heat Pump Gas Oil Electric Dual Fuel or No Heating select your Heat Type according to the heating appliance located in your home Heat Type Select your home s...

Страница 22: ...lve is engaged On Cool runs cooling when O B engages most cases or On Heat runs heating when O B engages Touch OK to next step If you have a heat pump installed Select the heating menu Con gure the he...

Страница 23: ...22 Schedule Select the schedule you would like to run in your thermostat 2...

Страница 24: ...23 Follow the screen instruction to set date and time of Thermostat Date Time 3...

Страница 25: ...ather forecast and more Please follow on screen instructions to complete the Wi Fi setup a After signing into your account click the plus sign in the top right hand corner to add a new device Wi Fi Se...

Страница 26: ...ID Set by Phone and follow the instruction on screen to nish the Wi Fi connection step c Return to your thermostat and click Start and select the Set by your phone to start Wi Fi setup Return to your...

Страница 27: ...ostat connect to Wi Fi you can nd the QR code by Menu About QR code NOTE You can use the QR code scanner by clicking the QR icon in the Device SSID eld to automatically enter the Device SSID and Devic...

Страница 28: ...rent Date Time Current Fan Mode Indoor Humidity Heating Setpoint OK Down Cooling Setpoint Nightlight Next Schedule Period Menu Back button Indoor Temperature How to use your TJ 225 Thermostat User Man...

Страница 29: ...when the current temperature drops below the setpoint Heat Activate the heating or cooling system as required to keep your home within the con gured range of setpoint Auto Only use the Emergency Heat...

Страница 30: ...29 Select Main Menu System use the and to change the system mode of your thermostat between Cool Heat Auto Emergency Heat or O On Thermostat...

Страница 31: ...of the scheduled programming Enable fan when the system is actively heating or cooling your home or to satisfy the Minimum Fan Runtime setting The Fan will turn on and o one a user programmed schedul...

Страница 32: ...nts the heat setpoint When the thermostat is in Auto mode you must rst select either your heating or cooling setpoint depending on which setpoint you would like to modify NOTE You can override the cur...

Страница 33: ...Schedule NOTE There are only two default programs available for selection please follow instructions on App to create new programs Tap the and to change the active schedule or select No schedule 32...

Страница 34: ...onnect the Wi Fi with your phone On Thermostat Select Main Menu Wi Fi Wi Fi Settings Your Thermostat supports 2 4G Wi Fi 802 11 b g n Wi Fi is normally con gured during initial setup You may however b...

Страница 35: ...View system runtime Heating Cooling Air Filter Min Run time 180s 300s 60s Cycle time 180s 300s 60s Runtime Sensor Calibration 10 F 10 F Min Description A temperature range between the current temperat...

Страница 36: ...l your TJ 225 Wi Fi Thermstat User Manual Main Screen Refresh Cool Key pad lock Indoor Temperature Next Schedule Period Indoor Humidity Current Fan Mode Current Mode Menu Current Date Time Heat Heatin...

Страница 37: ...the plus in the top right hand corner name your schedule and click OK To modify an existing Schedule select a Schedule from the list it will change to programming screen If you want to delete an Exis...

Страница 38: ...by touching Select Start time Heat setpoint and Cool setpoint Swipe to select the new time value Touch Save Note You can only select time values that are at least 15 min after the previous activity t...

Страница 39: ...ct the days that will use the copied schedule you can select more than one Select Copy 1 2 3 View the program in List View List View Copy the setpoints to other days of the week Copy View Select desir...

Страница 40: ...vice Settings Follow the on screen instructions to view and modify the thermostat settings for Nightlight Brightness and run schedule date time temperature units safety functions regarding your thermo...

Страница 41: ...TJ 225 thermostat Download the Amazon Alexa app and set up your Alexa enabled device In the Amazon Alexa app click on the Menu button in the top left corner Key step link Skill Tap on Skills in the A...

Страница 42: ...with the following commands Alexa turn Device Name on Alexa turn Device Name o Alexa Change Device Name Mode to Cool Heat Auto Alexa Increase Device Name by __ degrees Alexa Decrease Device Name by _...

Страница 43: ...ap the sidebar menu in the top left corner and select Home Control Then tap the plus sign in the lower right corner and search for Vine Control Find Vine Control on the list and open it select the cou...

Страница 44: ...Hey Google make it warmer or cooler Ok Google set the temperature to __ degrees Ok Google raise or lower the temperature __ degrees Ok Google what is the current temperature in the Bedroom Hey Google...

Страница 45: ...d product or components at VINE CONNECTED s sole discretion If the Product or a component incorporated within it is no longer available VINE CONNECTED may at its sole discretion replace the Product wi...

Страница 46: ...ts of return shipping to owner and will reimburse any shipping costs incurred by the owner except with respect to any Ineligible Product for which owner will bear all shipping costs 4 WHAT THIS LIMITE...

Страница 47: ...UCT INFORMATION THE SERVICES AND THE PRODUCT AT YOUR OWN DISCRETION AND RISK YOU WILL BE SOLELY RESPONSIBLE FOR AND VINE CONNECTED DISCLAIMS ANY AND ALL LOSS LIABILITY OR DAMAGES INCLUDING TO YOUR WIR...

Страница 48: ...www vineconnected com R...

Отзывы: