


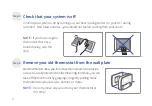


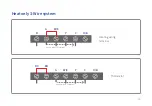


Refer to the above wiring diagram, insert all wires
vertically from the open socket into the proper
terminal. Ensure each wire is inserted into the
matching terminal (refer to the photo taken previously
if needed). Pull wires gently to ensure wires are
securely fastened.
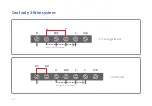
When all wire connections have been completed, place
any excess wire back inside the wall.
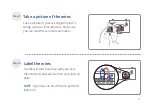
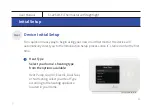
First align the two clips on the back of the TJ-225 into
the corresponding slots on the top of the wall plate.
push
Connect the wires to the new wall plate
Step 9
Attach Thermostat to the Wall
Step 10
1
2
clips
push
RC RH G W/E Y C Y2 O/B
/W2
Firmly press
forward to secure it
into position.
18
Содержание TJ-225
Страница 1: ...Smart Wi Fi Thermostat with Nightlight TJ 225 User Manual R...
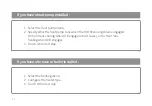
Страница 23: ...22 Schedule Select the schedule you would like to run in your thermostat 2...
Страница 24: ...23 Follow the screen instruction to set date and time of Thermostat Date Time 3...
Страница 48: ...www vineconnected com R...