45
Operation
Button(s)
Description
Switch on and off
POWER (7)
The amplifier is switched on and off using this button at the front panel,
there is no standby option. When switched off the device is internally
separated from the AC power. When switched on, one of the LED’s
near the input selector (1) is lit. As a precaution, before switching on,
the volume set-ting (3)(27) should be reduced. The switching operation
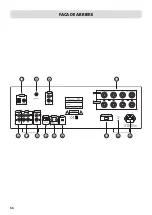
is signalled via the cables connected in the terminal “POWER CONT-
ROL” (19).
Select an input
INPUT (1)
Input selector
buttons (26)
On the front panel: if the “INPUT” dial is turned clockwise or in the
opposite direction, each of the input channels will be selected in turn
and this switches the playback between the devices connected to the
corresponding input sockets (12, 13, 16). The relevant LED lit over the
“INPUT” selection dial shows which source is currently selected.
Using the remote control: A short touch on the button for the desired
input channel (e.g. “S1” changes to the playback of the audio source
connected there.
The illuminated LED near the input selector (1) indicates which audio
source is currently selected for playback. Before switching over the
input channel, the volume (3)(27) should be turned down as a precau-
tion!
Change the volume
VOLUME (3)
VOLUME
/
(27)
On the front panel: Turn the knob “VOLUME” clockwise to turn up the
volume and counter-clockwise to turn it down.
Using the remote control: Hold down the button “VOLUME ” to turn
the volume up. Use “VOLUME ” to turn it down.
The volume setting affects the signals for the loudspeakers and additio-
nal main amplifier channels (14) but never influences the signal at the
output “REC OUT” (15). If a pair of headphones is plugged into the
front of the device, the volume control no longer affects the loudspea-
kers but instead affects these headphones.
Mute the speakers and
the preamplifier output
MUTE (25)
The MUTE function can only be operated with the remote control. It
switches off the loudspeakers, the headphones, the preamplifier output
“PRE OUT” (14) and the recording output “REC OUT” (15). Pressing it
again restores the volume to its original setting.
Change the treble pro-
portions of the sound
TREBLE (8)
With the “TREBLE” control dial on the front of the device you affect the
proportion of higher frequencies in the sound. Turning it in clockwise
direction increases the treble intensity and moving it in anticlockwise
direction reduces it. In the middle setting the treble proportions of the
input signals remain unchanged. The adjustment of the treble control
only has an effect if the button “TONE” (5) has been pressed. This tone
control affects the loud-speaker and headphone signals as well as the
output “PRE OUT” (14). The signal of the output “REC OUT” (15) is
independent of this.
OPERATING THE APPLIANCE


