Vimar 40605 Скачать руководство пользователя страница 15

15

TAB: 40605

EN

4 Settings

The 

Settings

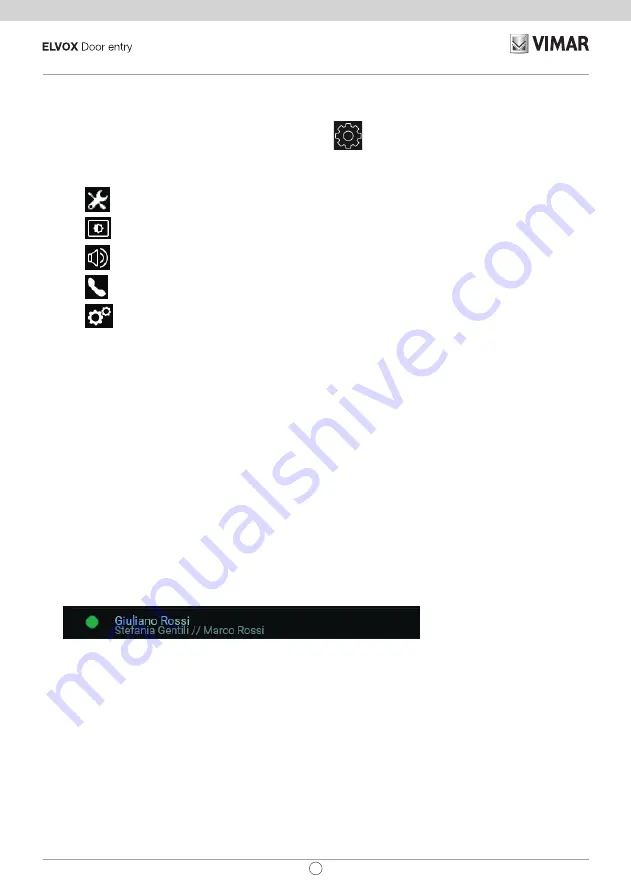
 page, which is accessed by selecting the icon 

 on the main screen, allows you to personalise 

and configure some parameters of the video entryphone. The page is divided into the following sections:


General


Display and Buttons


Sounds


Call Options


System

Selecting a section displays the items contained therein. To scroll through the items, use the multifunction buttons.

Some of these sections and items (specifically referred to below) are only accessible or programmable on the 

master video entryphone.

4.1 General Information

• 

Primary Name

 (from master device only): to set the primary name associated with the user. When con-

figuring the system, the installer assigns a preliminary name to the user (e.g. 

"Apartment 1"

). The user 

can change it later, by using the virtual keyboard on the screen to type and save the desired name (e.g. 

"John Smith"

). This is the name by which the user is identified in the system contact lists. The name is 

displayed in the header area of the main screen on all video entryphones belonging to the user.

• 

Secondary Name

 and 

Additional Names


(from master device only): to set the secondary name and any 

additional names or information. Information about the user is displayed by the porter switchboard as 

follows:

• 

Reset

 Names (from master device only): to reset the names to the default values (e.g. 

"Apartment 1"


for the Primary Name, and blank for the Secondary Name and Additional Name).

• 

Device ID: to set the ID by which an individual video entryphone is identified from among the user’s 

devices. Each video entryphone has its own ID, which is automatically assigned during system con-

figuration (e.g.: 

PI_60001

 for the master device). The user can subsequently change it to a name of 

their choice (

Entrance

Study

, etc.). In the Home section of the 

Contacts List

, each of the user's video 

entryphones is identified by its 

Device ID

. In the main screen, the ID appears at the bottom, next to the 

status icon.

• 

Language

: select the language to be used by the video entryphone interface. The following languages 

are available: 

Italian, English, French, German, Spanish, Greek and Portuguese

.

• 

Date

 and 

Time

 (from master unit only):  set the date and time displayed in the 

Header

 area of the 

main screen on all video entryphones belonging to the user. Enabling automatic mode (recommended) 

synchronises the video entryphones with the date and time of the video entryphone system. You can 

Содержание 40605

Страница 1: ...User Manual TAB 40605 TAB 7 IP hands free video entryphone...

Страница 2: ...Introduction 8 3 Call functions 10 3 1 Call from External Unit 10 3 2 External Unit self start 12 3 3 Call from or to another video entryphone 12 3 4 Call from or to a switchboard 13 4 Settings 15 4 1...

Страница 3: ...t at the end of its life cycle over to the appropriate municipal centres for the differentiated collection of electrical and electronic waste As an alternative to independent management you can delive...

Страница 4: ...1 2 Main functions Receiving video calls from external unit External unit self start External unit lock release Intercom audio calls Activating system actuations stair light auxiliary functions System...

Страница 5: ...5 TAB 40605 EN In the event of faults contact specialized personnel...

Страница 6: ...en In standby with the screen off pressing one of the 5 multifunction buttons b will display the favourites screen Pressing the Talk Listen c or Lock d buttons if configured will execute the configure...

Страница 7: ...figurable parameters user name device ID name interface language date and time automatic or manual display brightness and button backlighting ringtones volumes call options and video voicemail message...

Страница 8: ...at the top displaying user name programmable Primary Name date time and main status icons Master video entryphone indication Voicemail service enabled notification Ringer mute on notification The five...

Страница 9: ...onfigured one of the user s video entryphones is assigned as the master device Certain user settings can only be accessed from the master device Other settings can be made on any of the video entrypho...

Страница 10: ...l in progress the screen displays images captured by the External Unit camera and the video entryphone plays the previously selected ringtone If the ringer is muted Quick settings menu the video entry...

Страница 11: ...Voicemail Start Timeout If the voicemail service is disabled the call is terminated once the system timeout expires Conversation with external unit The following icons commands are available during th...

Страница 12: ...self start timer To restart the self start timer When the timer expires self start is ended and the video entryphone returns to standby Self start 3 3 Call from or to another video entryphone It is po...

Страница 13: ...ve been installed in the video entryphone system it is possible to send and receive calls to from the switchboard If the station is equipped with a video camera the calls will be audio video otherwise...

Страница 14: ...14 TAB 40605 EN Conversation with switchboard...

Страница 15: ...master device only to set the secondary name and any additional names or information Information about the user is displayed by the porter switchboard as follows Reset Names from master device only to...

Страница 16: ...Key button activates the External Unit lock and simultaneously cuts off the call even during conversa tion Video Voicemail Start Timeout from master device only to set the standby time in seconds bef...

Страница 17: ...CTV Porters Actuators Selecting a section displays the contacts contained therein To scroll through the contacts list use the multifunc tion buttons Once a contact has been selected the icons in the l...

Страница 18: ...eo entryphone on which you are currently browsing the Contacts List 5 2 Favourites Contacts selected by the user as favourites The first four contacts selected are displayed in the Favourites screen t...

Страница 19: ...ptured images When camera image view is activated the name of the camera is indicated at the top of the screen while the icons depicting the commands associated with the multifunction buttons are show...

Страница 20: ...tors relay outputs and lock release outputs of external units that can be be activated the user must be enabled by the installer during system configuration The activation request is confirmed by a fe...

Страница 21: ...entry In the case of missed calls the name is displayed in red next to the icon Outgoing calls are instead identified by the icon To scroll through the items use the multifunction buttons After selec...

Страница 22: ...If the user Status is Do Not Disturb the automatically rejected calls are not recorded in the call history If the Status is Online and the video voicemail service is enabled calls forwarded to the vo...

Страница 23: ...each message in the list If an image is attached to the message a paper clip icon is displayed next to the name The symbol identifies new messages that have not yet been opened In the case of Alert me...

Страница 24: ...s the number of messages is shown in the main screen above the Messages icon If the device is in standby with the screen off the backlight of the button flashes to indicate new unread messages Opening...

Страница 25: ...age in the list The symbol identifies new mes sages that have not yet been opened Messages can be audio video or audio only depending on the type of caller Use the multifunction buttons to scroll thro...

Страница 26: ...ges If the message box is full the active answering service icon in the main page header turns red Additionally a warning message appears on the Video Messages page At least one message must be delete...

Страница 27: ...A pop up prompt asks you to confirm before sending The porter switchboard service treats this notification as a high priority service request Alert Confirmation pop up If there is no porter switchboar...

Страница 28: ...28 TAB 40605 EN...

Страница 29: ...29 TAB 40605 EN...

Страница 30: ...Viale Vicenza 14 36063 Marostica VI Italy www vimar com 49400924A0_MU_EN 00 1710...

Отзывы: