background image

5

6. Display

The touchscreen display allows you to control the system using the following buttons and icons: 

I

H

G

F

E

D

C

A

B

L

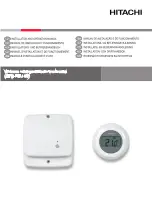
Fig. 5: Graphical interface and buttons

A

: Battery charge status

B

: Operating mode

C

: Away

D

: Confirm

E-F

: Menu navigation and setting parameters

G

: Back

H

: Nighttime reduction

I

: Settings menu

L

: Ring indicating consumption level and energy savings indicator

Содержание 2905

Страница 1: ...Instructions manual Thermostat 02905 Installer Manual ...

Страница 2: ......

Страница 3: ...er menu type and resetting default parameters 15 9 Settings of the normal menu 16 9 1 Operating mode setting 16 9 2 Unit of measurement setting 16 9 3 Heating air conditioning setting 17 9 4 Temperature set point setting 17 9 4 1 Comfort temperature 17 9 4 2 Away temperature 18 9 4 3 Antifreeze temperature 18 9 4 4 Nighttime reduction thermal delta 18 9 4 5 User settable thermal delta 18 9 4 6 Hys...

Страница 4: ...interface thanks to special views facilitates system management helping the user to oper ate while maintaining a state of energy saving 3 Installation The appliance must be installed on a wall at a height of 1 5 m off the floor in a suitable position for correctly detecting the ambient temperature It must not be installed in niches behind doors and curtains or in areas affected by sources of heat ...

Страница 5: ... a dry contact vice versa if they are open the input is off The contact must be SELV and free of potential The typical wiring diagram is the following NO NC C Fig 3 Connecting the multi function input Activation type dry contact Type of conductor 1 single wire or 1 multi wire cable conductor MAX 1 5 mm2 Length of the conductor max 100 m between the 2 terminals FUNCTIONS Remote nighttime reduction ...

Страница 6: ...1 5V AA batteries CAUTION In case of replacement dispose of batteries in the specific differentiated collection bins Fig 4 Changing batteries The battery charge status is shown as follows no icon battery charged flashing icon battery almost flat replace it fixed on icon battery flat the device will go OFF and it is no longer possible to switch to operation ...

Страница 7: ...g buttons and icons I H G F E D C A B L Fig 5 Graphical interface and buttons A Battery charge status B Operating mode C Away D Confirm E F Menu navigation and setting parameters G Back H Nighttime reduction I Settings menu L Ring indicating consumption level and energy savings indicator ...

Страница 8: ...it After each confirmation the display shows the icon for approximately 1 s In addition if the timer thermostat is connected to the probe 02960 via the circuit board 02915 it will also be possible to enable its acoustic signal back or cancel exits the current screen menu and returns to the previous one without saving any changes In menus with changes to multiple digits it lets you go back to chang...

Страница 9: ...e conventional average consumption vice versa if the level exceeds half the expected consumption will be higher than the conventional average The energy saving indicator indicates whether the currently set setpoint will allow obtaining savings with respect to the conventional average consumption 6 4 Locking the interface via PIN The thermostat lets you set a password see par 8 9 which inhibits any...

Страница 10: ...s been suitably configured you can remotely activate the following modes Remote reduction conceptually similar to nighttime reduction it acts on the comfort set point instead of the one set locally in manual mode Remote activation lets you activate the system remotely by setting the comfort set point Summer Winter switching the multi function input automatically switches the thermostat onto air co...

Страница 11: ... changed via or In the course of setting the set point flashes and the circular ring fills up accordingly this gives an indica tion of the expected consumption as a function of the set point you are setting Fig 10 Manual set point setting The selection is confirmed by touching The and icons in the lower right corner indicate whether the system is operating in heating or air conditioning mode respe...

Страница 12: ...ay temperature setpoint see para 9 4 2 The Away mode can only be activated in manual mode by touching The display will show the away temperature setpoint for approximately 2 seconds Fig 11 Input in away mode showing the away temperature Activation of this mode is identified by the icon above the temperature indicator Fig 12 Away Mode To exit and return to Manual mode touch the button again ...

Страница 13: ... Manual mode by degrees see par 9 4 4 Nighttime reduction is activated starting from Manual mode by touching or remotely via the multi function input if enabled The display will show the nighttime reduction setpoint for approximately 2 seconds Fig 13 Input in Nighttime Reduction mode showing the reduction set point Activation of this mode is identified by the icon above the temperature indicator F...

Страница 14: ...ue setpoint to avoid damage to the pipework or to keep it from falling below a certain safety level when you are away for lengthy periods in the winter The antifreeze mode is activated directly from the Settings menu see par 9 1 Once activated antifreeze mode is identified by the icon above the temperature indicator Fig 15 Antifreeze mode ...

Страница 15: ...on of the configured multifunction input is considered solely when the thermostat is in Manual mode In remote reduction mode the device sets the temperature to a value equal to Tcomfort see para 9 4 In this condition the display and its buttons have limited functions access to the settings menu is disabled and you can only change the temperature setpoint within a limited range if configured The Re...

Страница 16: ...y if it has been suitably configured by the installer see par 9 6 In remote activation mode the device sets the temperature to a value equal to Tcomfort see para 9 4 In this condition the display and its buttons have limited functions access to the settings menu is disabled and you can only change the temperature setpoint within a limited range if configured The Remote activation mode is identifie...

Страница 17: ...sired temperature set point can be set without the need to confirm the entered value Normal menu Within 3 secs touch and using and select EASY and then NO confirming with both choices The thermostat will restart showing the normal operating mode N B When replacing the batteries the set menu will automatically start when the thermostat is switched back on without having to repeat the above procedur...

Страница 18: ...5 calibration setting 6 and multi function input setting 7 OnOff PID temperature control algorithm setting 8 device info 9 lock unlock PIN setting Touching opens the submenu and then the flashing highlights the parameters of the submenu 9 1 Operating mode setting This menu is used to select the operating mode of the device Manual Off Antifreeze only if the thermostat is set on heating Using and se...

Страница 19: ...nOff adjustment mode CAUTION Depending on the mode the thermostat is in heating or air conditioning setting this setpoint acts only on the value associated with the current mode highlighted by the or icon for example T comfort of heating mode After then changing the setpoints of the current mode in succession change the mode and set all the setpoints corresponding to it 9 4 1 Comfort temperature T...

Страница 20: ... reduction is activated by the display or to Tcomfort when nighttime reduction is acti vated by the multi function input the thermal delta value is identical both in heating mode and in air conditioning mode with the only difference being that in the former case it causes a decrease in the set point while in the latter one it determines an increase The nighttime reduction mode can be activated eit...

Страница 21: ...n enabled automatically sets the Tcomfort temperature as the setpoint In this context the user can only change the temperature within a narrow range and cannot carry out any further operations on the device with the multi function input disabled the default mode is Antifreeze or OFF if on air conditioning and the user can manage the thermostat completely remote nighttime reduction the multi functi...

Страница 22: ... be set via the submenus that follow this selection breadth of adjustment range starting from the set temperature Tb is the temperature range in which the heating power goes from 0 to 100 For example with the temperature for heating set to 20 0 C and Tb 4 0 C the thermostat acti vates the heating system on 100 when T ambient is 16 0 C as this temperature increases the system power is consequently ...

Страница 23: ... in season to differentiate between heating and air conditioning by pressing and holding the button displays the software version of the device 9 9 Lock unlock PIN setting This menu lets you add change the password to inhibit use of the thermostat Using and set the three digits of the PIN one at a time and then confirm each set digit with If you wish to have free access to the thermostat so withou...

Страница 24: ...roportional band PID Band 0 5 5 C 0 1 C 1 C Adjustment period PID Period 10 30 minutes 1 min 20 min Unit of measurement tem perature Temperature unit C F C Temperature offset TE Offset temp 0 3 C 0 1 C 0 C Adjustment limit range Offset δU 0 2 C 0 C 0 5 C PIN number PIN 000 999 1 000 Temperature set point T0 Away Heat TG 10 35 C 0 1 C 16 C T2 Comfort Heat 10 35 C 0 1 C 20 C T0 Away Aircon 10 35 OFF...

Страница 25: ...void using aggressive products Clean the display with a special cloth for cleaning lenses 12 Installation rules Installation should be carried out in compliance with the current regulations regarding the installation of electrical systems in the country where the products are installed 13 Regulatory compliance LV directive EMC directive Standards EN 60730 2 9 ...

Страница 26: ...02905 installer 01 1406 VIMAR Marostica Italy Viale Vicenza 14 36063 Marostica VI Italy Tel 39 0424 488 600 Fax Italy 39 0424 488 188 Fax Export 39 0424 488 709 www vimar com ...

Отзывы: