background image

EX

X70

Mobile In

tern

et D

evic

e

13

English

MID

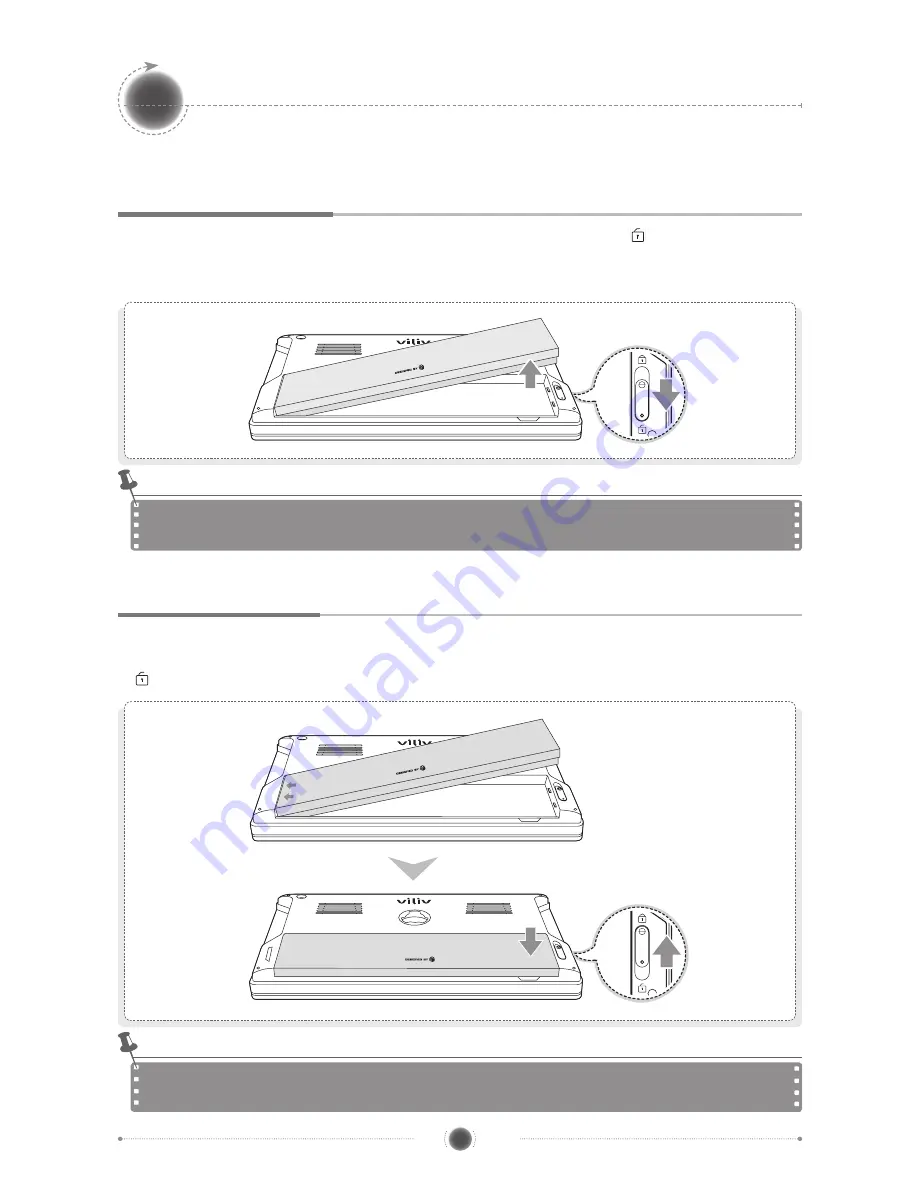
Separating · Attaching Battery

Separating Battery

Depress the Battery Separation/Lock button on the rear of the station in 

 direction as shown 

in the figure. Slightly push the battery up in the battery separation groove and then separate the 

battery.

Attaching Battery

Align the battery in the groove as shown in the figure below and then press it until it is closely 

attached to the main body. Push up the Battery Separation/Lock button on the rear of the station 

in 

 direction as shown in the figure below.

Separate the charger after turning the power of the station off. 

If not, you may receive an electric shock by a short circuit in the battery power part.

Notice

If the battery is misaligned with the groove and you attempt to mount the battery, the device may  

be damaged.

Notice

Содержание X70EX

Страница 1: ...This guide may be changed for product improvement without prior notice User s Manual Mobile Internet Device...

Страница 2: ...Thanks for purchasing viliv Please read the precautions throughly before using the product...

Страница 3: ...for the infringement of copyright or intellectual property rights from the use of this device lie with the user Improper Use The manufacturer of this device is not liable for any damage or improper us...

Страница 4: ...ing Attaching Battery 13 Separating Battery 13 Attaching Battery 13 Inserting Extracting USIM Card 14 Basic Operation 15 Turning the Power On Off 15 Setting Cancelling Hold Function 15 Jog and Functio...

Страница 5: ...place such as a bathroom Keep the device away from credit cards bankbooks or a communication ticket Do not use accessories that are not provided with this device Do not touch the LCD screen with a sha...

Страница 6: ...ved antenna Unauthorized antennas modifications or attachments could impair call quality damage your X70 EX or result in violation of FCC regulations X70 EX was tested for typical body wom operation u...

Страница 7: ...ver To prevent electromagnetic problems or other dangers turn off the Bluetooth setting wherever the use of Bluetooth is inhibited If you use a certain medical device such as a pacemaker or a hearing...

Страница 8: ...f Parts The appearance of the components below may differ from the actual components and some components are subject to change Basic Components Main Body AC DC Power Adapter USB Cable User s Manual St...

Страница 9: ...Switch Provides Power On Off and key input locking functions 7 Jog Dial It is used to move in Up Down Left Right direction on screen 8 Menu Button Moves to main menu 9 FN BIOS Mode F8 Advance Win XP...

Страница 10: ...l device with a USB cable 3 SD Card Slot It is used to insert an SD SDHC card 4 Multi I O Port It is used with external video out Component composite and S Video and to connect an extension I O pack 5...

Страница 11: ...tion Part of Battery Terminal Mounting slot for USIM card Refer to Page 14 for inserting extracting an USIM card 4 Separating Attaching Battery Push the battery downward to separate the battery as sho...

Страница 12: ...ay vary in accordance with products Power Connection Charging Adaptor The charger is connected to the power adapter terminal on the left side of the station Power Status Indicator Power Off Standby Mo...

Страница 13: ...The connections of external devices may vary in accordance with products USB Connection This is used for the connection of external devices such as digital camera external HDD etc USB Data Link Connec...

Страница 14: ...tery Align the battery in the groove as shown in the figure below and then press it until it is closely attached to the main body Push up the Battery Separation Lock button on the rear of the station...

Страница 15: ...of a USIM card face the USIM card slot and then push it in the arrow direction until a click sound is heard If however you push the USIM card using too much force the card may be damaged How to Extrac...

Страница 16: ...the left side and hold the button for over 4 seconds to turn the power off Since the file that your are working on is closed Z Z without saving it is better not to use this function If you turn the p...

Страница 17: ...DEL Install Win XP Mode Windows H Soft Keyboard A BIOS Mode ESC Win XP Mode OK Left Mouse Button B BIOS Mode F11 Popup Board Win XP Mode Right Mouse Button C BIOS Mode F11 Popup Board Win XP Mode Rig...

Страница 18: ...xecuted by double touching vilivManager on the screen 1 Wireless LAN Power Turn on off self powered wireless LAN function 2 Camera Power Turn on off self powered Camera function 3 Modem Power Turn on...

Страница 19: ...lease wait until the installation is complete Along with the start of Microsoft Windows XP Home the preparation screen for starting Windows appears as in the following figure The Windows start screen...

Страница 20: ...hortly It may take a couple of minutes Please wait for a moment 4 6 7 8 The screen to assign the computer name appears To do this an external keyboard is needed If you don t have an external keyboard...

Страница 21: ...he process of OS recovery is completed a message that confirms the successful recovery is displayed Partition 0 on disk 0 was successfully restored If you press OK button the system is booted again au...

Страница 22: ...PA LAN IEEE 802 11b g Bluetooth Bluetooth Ver2 0 EDR GPS Optional SiRF Star Connector Audio x1 USB x1 USB Link x1 Multi I O x1 SD SDHC Slot x1 Audio Stereo speakers Battery Lithium Polymer Removable V...

Страница 23: ...EX X70 MobileIn t e r n e t D e v i c e 22 English MID Memo...

Страница 24: ...EX X70 MobileIn t e r n e t D e v i c e 23 English MID Memo...

Страница 25: ...EX X70 MobileIn t e r n e t D e v i c e 24 English MID Memo...

Страница 26: ...Rev 1 0...

Отзывы: