4
step
Attach bracket with
mounting hardware provided.
18
1
step
Measur
ement (A)
Mea
sure
men
t (A
)
Measur
ement (A)
step
2
Measur
ement (A)
Me
as
ure
me
nt
(A
)
+1/2
”
+1
/2
”
(1.3 cm)
(1.
3 c
m)
Measur
ement (A)
+1/2
”
(1.3 cm)
X
X
Y
Y
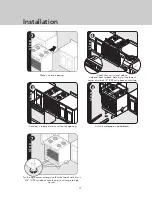
Measure from floor to bottom
of the anit-tip opening located on the back of
range. This will be measurement (A).
Locate anti-tip bracket on rear wall with the top left corner at
measurement (A) plus 1/2” (1.3 cm) from the floor and “X” dimension
(see chart) from where the right side of range (facing range) is to be
located and “Y” dimension (60” ranges only-see chart) from where the
left side of the range (facing range) is to be located.
WARNING
TIPPING HAZARD
To reduce the risk of property
damage or personal injury;
install anti-tipping device
provided in accordance with
the installation instructions
in this document. Device
must be engaged properly to
prevent product from tipping
over.
Anti-tip Device Installation (Wall Mount)
3
step
Mark and drill holes where bracket will be located.
Installation
Dimension
“X
”
Dimension
“Y
”
30”
21-1/2”
(54.6 cm)
N/A
36”
24-1/2”
(62.2 cm)
N/A
48”
21-1/2”
(54.6 cm)
N/A
60”
21-3/4”
(55.2 cm)
5-1/2”
(14.0 cm)


