manualshive.com logo in svg
background image

4

leg leveler installation

READ BEFORE INSTALLING LEG LEVELERS

W

WA

AR

RN

NIIN

NG

G!!

Do not lay unit on top, side, back, or front.  If unit is accidentally laid in any position other than right side up, then the
unit must remain in the right side up position for at least 24 hours before plugging the unit in.

1.  Tip unit backwards so there is (1) foot of clearance on front of the unit.  Have someone to assist you in tilting the

unit, to prevent it from falling on you while installing the leg levelers.

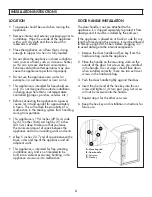
2.  Screw front two leg levelers into the screw impressions.  Leg levelers should be screwed in until snug.
3.  Repeat steps 1 & 2, with the exception of tipping the unit forwards now, to screw in the back two leg levelers.
4.  Your leg levelers are now installed.
5.  The unit should be level from front to back and side to side.  If floor conditions do not allow the unit to sit level,

adjust leg leveler(s) by turning the required leg leveler(s) counter-clockwise to increase their height and clockwise to
reduce their height.

Screw
Impressions

Содержание VUWC

Страница 1: ...ns si ib bi il li it ty y t to o b be e s su ur re e y yo ou ur r w wi in ne e c ce el ll la ar r i is s located so the front is not blocked to restrict incoming or discharge air flow properly leveled...

Страница 2: ...nt M MU US ST T B BE E unobstructed for air circulation and proper operation Installation should be such that the cabinet can be moved for servicing if necessary 2 Unit should be in a well ventilated...

Страница 3: ...ec ct tr ri ic c D Da at ta a 115 VAC 60 Hz Maximum amps 3 0 Approximate Shipping Weight 110 lbs 49 5 kg Front View Side View 30 3 4 78 1 cm Min 34 86 4 cm to Max 35 88 9 cm 14 3 4 37 5 cm 21 3 16 53...

Страница 4: ...ilting the unit to prevent it from falling on you while installing the leg levelers 2 Screw front two leg levelers into the screw impressions Leg levelers should be screwed in until snug 3 Repeat step...

Страница 5: ...ordance with the National Electrical Code and applicable local codes and ordinances The third ground plug SHOULD NOT under any circumstances be cut or removed All UL listed refrigerated products are e...

Страница 6: ...start and stop often It must do this to maintain the temperature setting Unplug the wine cellar before working on anything with the electrical system Exercise caution when sweeping vacuuming or moppin...

Страница 7: ...e or lower racks where the temperature is lower REMEMBER TO TURN OFF THE LIGHT WHEN IT IS NO LONGER NEEDED Store wines intended for everyday use on the front half of the racks where labels are complet...

Страница 8: ...ped regularly with hot soapy water Use a liquid cleaner designed for stainless steel when soapy water will not do the job D Do o n no ot t u us se e steel wool abrasive cloths cleansers or powders Do...

Страница 9: ...t is assumed that your wine cellar has been properly installed in accordance with all specifications and local codes and the appliance has been properly grounded If your wine cellar should fail to ope...

Страница 10: ...g used in outdoor situations This warranty does not apply to commercial usage Warrantor is not responsible for consequential or incidental damage whether arising out of breach of warranty breach of co...

Отзывы: