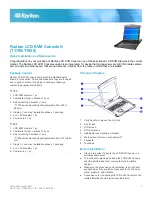
FRONT
REAR
2
2””
((5
5..1
1 ccm
m))
2
2”” ((5
5..1
1 ccm
m))
SIDE
1
10
0””
((2
25
5..4
4 ccm
m))
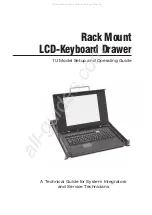
B
B
C
C
8
8 3
31
1//3
32
2””
((2
22
2..8
8 ccm
m))
2
26
6 3
3//4
4”” ((6
67
7..9
9 ccm
m))
2
23
3 1
1//4
4”” ((5
59
9..1
1 ccm
m))
2
25
5 3
3//4
4”” ((6
65
5..4
4 ccm
m))
1
1 3
3//8
8”” ((3
3..5
5 ccm
m))
((W
Wh
he
en
n ffaacciin
ng
g ccaab
biin
ne
ett,, o
op
pe
en
niin
ng
g iiss
llo
occaatte
ed
d o
on
n rriig
gh
htt ssiid
de
e..))
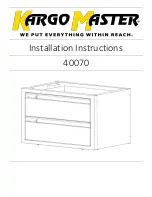
MODEL
VEWD172
VEWD102
VEWD162
VEWD172T
VEWD102T
VEWD162T
B
26 1/2”
29 1/2”
35 1/4”
(67.3 cm)
(74.9 cm)
(89.5 cm)
C
24 7/8”
27 7/8”
33 5/8”
(63.2 cm)
(70.8 cm)
(85.4 cm)
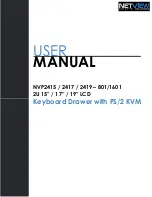
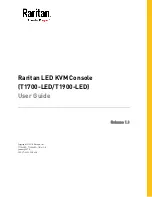
CABINET INSTALLATION
•To remove drawer assembly, pull warming drawer pan out until fully extended. Slide finger along the right and left
side until you reach the black hand latches (located at the front of the rails). Pull up on both the right and left latches
and pull drawer pan support completely out.
•For outdoor models - Apply silicon caulk that is provided all around the back of the warming drawer trim.
•Slide cavity assembly into cabinet opening.
•Drill (4) pilot holes in cabinet using 1/8” drill bit. Permanently secure the warming drawer using the (4) #8 mounting
screws provided.
•Replace drawer assembly.
Viking Range Corporation
111 Front Street • Greenwood, Mississippi 38930 USA • (662) 455-1200
Specifications subject to change without notice
(PS1005VR)
F1615K
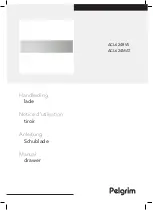
120V Electrical opening