manualshive.com logo in svg
background image

12

Griddle/Simmer Plate (on applicable models)

The optional 15,000 BTU griddle is constructed of machined steel with a blanchard finish and is uniquely designed to offer
excellent cooking performance as well as easy clean up. The griddle is equipped with an electronic thermostat to maintain an
even temperature across the griddle once the desired temperature has been set. The griddle has a power “ON” indicator light
which glows when the griddle thermostat has been turned on. This will cycle on and off as needed to indicate the thermostat is
maintaining the selected temperature. Before the griddle is used it is important to season the griddle. This seasoning process
will change the appearance of the griddle plate. However, it will also prevent food from sticking and protect the surface from
moisture. 

Seasoning the Griddle Before the First Use

•  Scrub the griddle plate with a mixture of one quart warm water and 1/4 cup white vinegar, using a blue Scotch-Brite

pad.

Dry thoroughly.

•  Wash griddle with warm, soapy water. Rinse off and dry thoroughly.
•  Season griddle by thinly coating the surface with approximately 1⁄2 to 1 teaspoon unsalted vegetable oil. Apply to entire

griddle using a paper towel or clean cloth. Let oil sit on griddle for approximately 1hour and then wipe with a clean cloth or
paper towel to absorb any residual oil. The griddle is now ready to be used. 

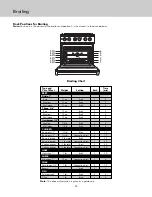
Griddle/Simmer Plate Operation

•  Turn the griddle control knob counterclockwise to the desired temperature setting. The

power “ON” indicator light will glow indicating the griddle thermostat is on.

•  The double griddle has two thermostat control knobs which control separate burners

located beneath the griddle.

•  When the griddle has reached the desired temperature, the power “ON” indicator light will

turn off indicating the griddle is preheated to the selected temperature.

•  Use liquid cooking oil or butter for eggs, pancakes, French toast, fish and sandwiches to

prevent sticking.

•  Routinely scrape loose food particles with a metal spatula during cooking to make the 

cleanup easier and to avoid the particles mixing with the food. 

•  To turn the griddle off, turn the thermostat knob clockwise to the “OFF” position.
•  ALWAYS turn to the“OFF” position when not in use and lower the heat between cooking loads.

Note: 

On griddle model ranges, the griddle/simmer plate will not function during the self-clean cycle.
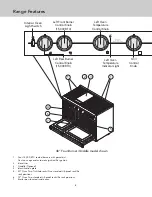
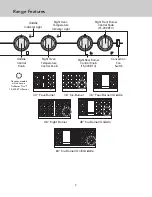
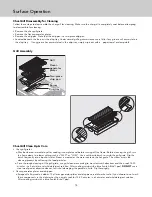
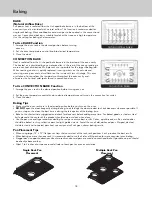
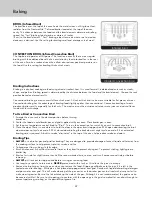
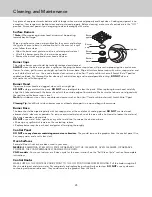
Griddle

Griddle

Grease trough

Griddle

Griddle Assembly

Surface Operation

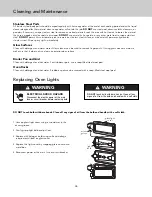
Griddle/Simmer Plate Clean Up & Care

• It is not necessary to wash the griddle after every use. When light cooking is performed and AFTER the griddle has cooled,

simply wipe down the surface with a clean cloth or paper towel. The oils in the food which cooked on the griddle surface
will naturally season the griddle providing a “natural” non-stick surface.

• After heavy cooking is completed and the griddle is still warm enough to create steam, pour a small amount of club soda

at room temperature directly on the griddle. Using a metal spatula, pull oils and food particles toward the trough in front.
Wipe entire surface with a paper towel. Follow with the seasoning process of applying oil.

• Keeping the griddle well seasoned will prevent the griddle from developing surface rust. If the griddle is not used for a

period of time, it must be re-seasoned. The griddle must be re-seasoned each time after it is washed. 

• Non-stick cooking spray is not recommended as it contains a high water content that has a tendency to burn quickly. 
• Corn oil is not recommended as it has a high sugar level. It will caramelize and burn on the surface making it very difficult

to remove. 

• After using the griddle, always remove the grease trough located in the front. Simply pull the trough towards you and lift

out. The trough or tray trap needs to be cleaned after each use. A fire hazard may occur if grease is accumulated in the
trough.   

• 

Note:

It is normal for the griddle to darken over time. This is the sign of a well seasoned griddle.

• 

Important:

Never flood a hot griddle with cold water. This thermal shock promotes griddle warping and can cause the

griddle to crack if continued over a period of time.

• For heavy duty cleaning, Viking offers a Griddle Cleaning Kit (model #GCK). This fast and effective commercial grade

cleaning system will clean your griddle in a matter of minutes. To order, contact your local Viking dealer or order on the
our website at vikingrange.com in the US or brigade.ca in Canada.

Содержание CVGCC530

Страница 1: ...Use Care Professional Freestanding Sealed Burner Gas Ranges VGCC530 VGCC536 VGCC548 VGCC560 CVGCC530 CVGCC536 CVGCC546 CVGCC560 ...

Страница 2: ...n Surface Operation ______________________________________________________________________________________10 Lighting Burners ______________________________________________________________________________________10 Surface Burners Automatic Reignition __________________________________________________________________10 Vari Simmer ___________________________________________________________________...

Страница 3: ...E REFERENCE Hazards or unsafe practices which WILL result in severe personal injury or death Hazards or unsafe practices which COULD result in death or severe personal injury DANGER Hazards or unsafe practices which COULD result in minor personal injury All safety messages will identify the hazard tell you how to reduce the chance of injury and tell you what can happen if the instructions are not ...

Страница 4: ...red or burned DO NOT store items of interest to children over the unit Children climbing to reach items could be seriously injured Children must be taught that the appliance and utensils in it can be hot Let hot utensils cool in a safe place out of reach of small children Children should be taught that an appliance is not a toy Children should not be allowed to play with controls or other parts of...

Страница 5: ... of the appliance not out into the room where they are easily hit or reached by small children NEVER let a pan boil dry as this could damage the utensil and the appliance Follow the manufacturer s directions when using oven cooking bags Only certain types of glass glass ceramic ceramic or glazed utensils are suitable for rangetop surface or oven usage without breaking due to the sudden change in t...

Страница 6: ...during a power failure Make sure the oven control is in the OFF position Momentary power failure can occur unnoticed The range is affected only when the power is interrupted When it comes back on the range will function properly without any adjustments A brown out may or may not affect range operation depending on how severe the power loss is WARNING POWER FAILURE WARNING Due to safety considerati...

Страница 7: ...rst use wipe interior with soapy water and dry thoroughly Then set the oven selector to bake the thermostat to 450 F and operate for an hour All models include Five performance modes including convection baking and convection broiling providing air circulation for shorter cooking times with even results Exclusive VSH Pro Sealed Burner System Vari Simmer to High combination of patented burner and t...

Страница 8: ...ontrol Knob 48 Four Burner Griddle model shown 2 3 1 1 5 4 7 Grill Control Knob 6 1 Four 15 000 BTU sealed burners with porcelain Cast iron caps and automatic ignition Re ignition 2 Island trim 3 Griddle Optional 4 Identification plate 5 30 Oven Two TruGlide racks One standard tilt proof rack Six rack positions 6 18 Oven Two standard tilt proof racks Six rack positions 7 Broiler pan located inside...

Страница 9: ...r Grill Griddle 48 Eight Burner Denotes models which have a TruPower Plus 18 500 BTU Burner Right Rear Burner Control Knob 15 000 BTU Right Front Burner Control Knob 15 000 BTU Right Oven Temperature Indicator Light Right Oven Temperature Control Knob Convection Fan Switch Griddle Control Knob Griddle Indicator Light ...

Страница 10: ...he burner control to any position to adjust the flame size Setting the proper flame height for the desired cooking process and selecting the correct cooking vessel will result in superior cooking performance while also saving time and energy Vari Simmer Simmering is a cooking technique in which foods are cooked in hot liquids kept at or just barely below the boiling point of water Simmering ensure...

Страница 11: ...lting small quantities Steaming rice Simmering sauces Low Melting large quantities Med Low Low temperature frying eggs etc Simmering large quantities Heating milk cream sauces gravies and puddings Med Sauteing and browning braising and pan frying Maintaining slow boil on large quantities Med High High temperature frying Pan broiling Maintaining fast boil on large quantities High Boiling water quic...

Страница 12: ...he griddle off turn the thermostat knob clockwise to the OFF position ALWAYS turn to the OFF position when not in use and lower the heat between cooking loads Note On griddle model ranges the griddle simmer plate will not function during the self clean cycle Griddle Griddle Grease trough Griddle Griddle Assembly Surface Operation Griddle Simmer Plate Clean Up Care It is not necessary to wash the g...

Страница 13: ...entilation on prior to turning the grill on Turn the grill knob counterclockwise to HI Always preheat the grill for 5 10 minutes before placing food on the grill grate Place food items on the grill cook as desired To turn the grill off turn the grill knob clockwise to the OFF position Char Grill Cooking Tips When grilling chicken roasts well done steaks or chops and thick pieces of meat sear on HI...

Страница 14: ...te and before turning off the flame Before cleaning the grill turn the flame down to a lower setting such as MED or LOW Use a soft bristle brush to scrub the grill grate Dip the brush frequently into a bowl of water Steam is created as the water contacts the hot grate The steam assists the cleaning process by softening the food particles o For a thorough cleaning of the grill grate use grill clean...

Страница 15: ...ould occur quickly STEAKS Rib Club Porterhouse T Bone Sirloin Remove excess fat from edge Slash remaining fat at 2 5 1 cm intervals to keep edges from curling Grill turning once Rare 140 F 60 C 1 2 5 cm 1 1 2 3 8 cm High High 8 12 11 16 Medium 160 F 71 C 1 2 5 cm 1 1 2 3 8 cm Med High 12 20 16 25 Well done 170 F 77 C 1 2 5 cm 1 1 2 3 8 cm Med High 20 30 25 35 Tenderloin 5 lbs 2 3 kg High 30 40 Rem...

Страница 16: ...y cooked 1 2 1 3 cm High 12 15 Remove excess fat from edge Slash remaining fat at two inch intervals Grill turning once Hot dogs Med 5 10 Slit skin before cooking Grill turning once POULTRY Chicken Broiler Fryer Halves or Quarters 2 0 9 kg 3 lbs 1 4 kg High 60 90 Place skin side up Grill turn and brush frequently with melted butter margarine oil or marinade Med 40 60 FISH AND SEAFOOD Steaks Halibu...

Страница 17: ...a cooking technique which utilizes fan forced air to circulate throughout the entire oven cavity creating the optimum cooking environment Cooking with convection is intended when performing multi rack baking and for heavier foods Below are some tips which will allow you to get the best results out of your oven when cooking with convection As a general rule to convert conventional recipes to convec...

Страница 18: ...rol knob to desired temperature and turn on the convection fan switch 3 Close the door Baking Tips Make sure the oven racks are in the desired position before you turn on the oven DO NOT open the door frequently during baking Look through the door window to check doneness whenever possible If you must open the door the best time is during the last quarter of the baking time Bake to the shortest ti...

Страница 19: ...F 191 C 12 15 Sugar Cookie sheet 3 or 4 375 F 191 C 10 12 PASTRY Cream puffs Cookie sheet 3 or 4 400 F 204 C 30 35 PIES Crust unfilled 9 round 3 or 4 400 F 204 C 10 12 Crust filled 9 round 3 or 4 350 F 191 C 55 60 Lemon meringue 9 round 3 or 4 350 F 177 C 12 15 Pumpkin 9 round 3 or 4 350 F 177 C 35 40 Custard 6 4 oz cups 3 or 4 350 F 177 C 35 40 ENTREES Egg rolls Cookie sheet 3 or 4 400 F 204 C 25...

Страница 20: ...ies 13 x 9 3 or 4 325 F 163 C 20 25 Choc chip Cookie sheet 3 or 4 350 F 177 C 7 10 Sugar Cookie sheet 3 or 4 350 F 177 C 7 10 PIES Crust unfilled 9 round 3 or 4 375 F 191 C 7 9 Crust filled 9 round 3 or 4 325 F 163 C 50 55 Lemon meringue 9 round 3 or 4 325 F 163 C 10 12 Pumpkin 9 round 3 or 4 325 F 163 C 45 55 Custard Not recommended ENTREES Egg rolls Cookie sheet 3 or 4 375 F 191 C 15 20 Fish sti...

Страница 21: ...evel 1 Batter uneven 1 Distribute batter even 2 Oven or rack not level 2 Level oven or rack 3 Pan was warped 3 Use proper pan Food too brown on 1 Oven door opened 1 Use door window to bottom too often check food 2 Dark pans being used 2 Use shiny pans 3 Incorrect rack position 3 Use recom rack position 4 Wrong bake setting 4 Adjust to conventional 5 Pan too large or convection setting as needed 5 ...

Страница 22: ...upplied with your oven Place broiler pan in oven 3 Set the oven temperature control knob to Broil Turn on the convection fan switch if you wish to convection broil 4 Close the door There is not a detent to hold the door in the open broil stop position With open door broiling the broil element does not cycle on and off With closed door broiling the broil element might cycle on and off if an extende...

Страница 23: ... oz Broil 3 4 Medium 10 oz Broil 3 6 Well done 10 oz Broil 3 8 Hamburger 1 2 Medium 1 4 lb Broil 3 6 Well done 1 4 lb Broil 3 8 CHICKEN Bnls breast 1 1 2 lb Broil 3 15 Bnls breast 1 1 2 lb Convection Broil 3 15 Bone in breast 2 3 lbs total Broil 1 22 Bone in breast 2 3 lbs total Convection Broil 1 20 Chicken pieces 2 3 lbs total Broil 3 22 Chicken pieces 2 3 lbs total Convection Broil 3 20 HAM Ham...

Страница 24: ...n contact a local store handling speciality cooking utensils 3 Set the temperature control to 200 F 93 3 C and turn on the convection fan switch CAUTION You must carefully check the food during the dehydration process to ensure that it does not catch fire 24 Convection Defrost Convection Defrost Air is circulated by a motorized fan in the rear of the oven The fan accelerates natural defrosting of ...

Страница 25: ...th the burner head with the outside edge of burner base Make sure the tabs are not aligned with the igniter and the burner cap is level Note For stubborn stains use a non abrasive cleanser such as Bon Ami and a soft brush or soft Scotch Brite pad Cleaning Tip For difficult to clean burner caps and heads place parts in a zip seal bag with ammonia Burner Base The base should be wiped regularly with ...

Страница 26: ...ia make sure that it does not run down on exterior door surface Broiler Pan and Grid Clean with detergent and hot water For stubborn spots use a soap filled steel wool pad Oven Racks Clean with detergent and hot water Stubborn spots can be scoured with a soap filled steel wool pad 26 Cleaning and Maintenance Replacing Oven Lights DO NOT touch bulb with bare hands Clean off any signs of oil from th...

Страница 27: ...Failure to do so can result in personal injury to hands and or fingers Lift door up and out Door Replacement and Adjustment 1 2 Reinstall door to range Open door completely Reinstall hinge trim 3 4 Remove pins from hole in hinges 5 If the door needs to be adjusted loosen hinge trim screws located in step 2 Adjust the screws located between the door and kickplate using a 5 32 hex head allen wrench ...

Страница 28: ...ge is not connected to power Igniters sparking but no flame ignition Gas supply valve is in OFF position Gas supply is interrupted Igniters sparking continuously after flame ignition Power supply is not grounded Power supply polarity is reversed Igniters are wet or dirty Burner ignites but flame is large distorted or yellow Burner ports are clogged Unit is being operated on wrong type of gas Air s...

Страница 29: ...our range can be found by opening door and looking under the control panel A duplicate label is located on the back side of the range Model no ________________________________________________________________ Serial no ______________________________________ Date of purchase________________________________________ Date installed __________________________________ Dealer s name ______________________...

Страница 30: ...t or representative Service will be provided during normal business hours and labor performed at overtime or premium rates shall not be covered by this warranty Owner shall be responsible for proper installation providing reasonable and necessary maintenance providing proof of purchase upon request and making the appliance reasonably accessible for service The return of the Owner Registration Card...

Страница 31: ...31 ...

Страница 32: ... EN 031516 Viking Range LLC 111 Front Street Greenwood Mississippi 38930 USA 662 455 1200 For product information call 1 888 845 4641 or visit our web site at vikingrange com in the US or brigade ca in Canada ...

Отзывы: