background image

3

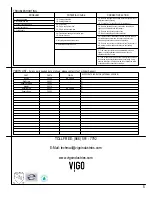
La velocidad de flujo con aireador instalada - 1.2 gpm
Caudal con aireador dispuesto en el cuadro - 1.5 gpm
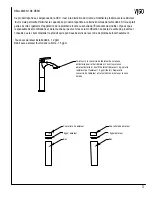
NORMAS DE CAUDAL

Giro abra la tapa del aireador hacia la izquierda para quitar

Basta con quitar el aireador 1.2 gpm y reemplazarlo con el

aireador 1,5 gpm (siempre). Vuelva a colocar la cubierta del

1.2gpm aireador

1.5gpm aireador

Cubierta aireador

Cubierta aireador

Содержание LINUS VG03013

Страница 1: ...truction Single hole construction Ceramic disk cartridge Single lever faucet Standard plumbing connections Finish resist corrosion and tarnishing PACKING LIST Faucet Assembly Pin Brass ring Two Metal braided hoses Rubber washer Nut 12 3 8 5 1 8 NOTE All faucets are compliant to CEC 2016 regulations If you have inquiries about your water flow please email techmail vigoindustries com ...

Страница 2: ...1 1 2 THE MEASUREMENTS IN INCHES ARE ROUNDED TO THE NEAREST 1 8 VG03013 3 1 8 1 3 4 10 5 8 1 4 1 3 4 5 1 8 8 3 8 2 3 1 2 1 1 2 6 5 8 2 ...

Страница 3: ...e with altering the product post sale and highly advises that the client only install the product that meets the needs of their local plumbing code Flow rate with installed aerator 1 2 gpm Flow rate with aerator provided in box 1 5 gpm FLOW RATE REGULATIONS Twist open the aerator cover counterclockwise to remove the aerator You will find an aerator installed here Simply remove the 1 2 gpm aerator ...

Страница 4: ...M THE BOTTOM OF THE FAUCET BRASS RING RUBBER WASHER NUT 3 2 Your new faucet is designed for years of trouble free performance Keep it looking new by cleaning it periodically with a soft cloth Avoid abrasive cleaners steel wool and harsh chemicals as these will scratch dull and or damage the finish and or product void your warranty Be sure to shut off water supply prior to installation Protect your...

Страница 5: ...xible hose and rethread checking to make sure the connection is secure Make sure to use pipe tape 2 B Remove supply lines and flush lines 2 A Remove aerator and soak clean with a non abrasive agent i e half hot water and half vinegar 1 B Contact Vigo Technical Support for replacement 1 A Remove cartridge from housing wash thoroughly with hot water and reseat in housing 3 B Remove supply line and c...

Страница 6: ...h access is not available all expenses to provide said access will be the responsibility of the owner This warranty does not apply to Products that have not been installed or operated in accordance with instructions supplied by VIGO and all applicable rules regulations and legislation pertaining to such installations This warranty does not apply unless the VIGO Product is installed by fully insure...

Страница 7: ...ODEL VG03013 FEATURES Solid brass construction Single hole construction Ceramic disk cartridge Single lever faucet Standard plumbing connections Finish resist corrosion and tarnishing PACKING LIST Faucet Assembly Pin Brass ring Two Metal braided hoses Rubber washer Nut 12 3 8 5 1 8 de la CEC de 2016 Si vous avez des questions au sujet de votre ...

Страница 8: ...1 1 2 3 1 8 1 3 4 10 5 8 1 4 1 3 4 5 1 8 8 3 8 2 3 1 2 1 1 2 6 5 8 VG03013 2 ...

Страница 9: ...3 responsable des modifications et de la touche qui peut venir avec la modification du poste de vente de produits et horaire Bec Bec ...

Страница 10: ... PIN FROM THE BOTTOM OF THE FAUCET BRASS RING RUBBER WASHER NUT 3 2 Your new faucet is designed for years of trouble free performance Keep it looking new by cleaning it periodically with a soft cloth Avoid abrasive cleaners steel wool and harsh chemicals as these will scratch dull and or damage the finish and or product void your warranty Be sure to shut off water supply prior to installation Prot...

Страница 11: ...xible hose and rethread checking to make sure the connection is secure Make sure to use pipe tape 2 B Remove supply lines and flush lines 2 A Remove aerator and soak clean with a non abrasive agent i e half hot water and half vinegar 1 B Contact Vigo Technical Support for replacement 1 A Remove cartridge from housing wash thoroughly with hot water and reseat in housing 3 B Remove supply line and c...

Страница 12: ...h access is not available all expenses to provide said access will be the responsibility of the owner This warranty does not apply to Products that have not been installed or operated in accordance with instructions supplied by VIGO and all applicable rules regulations and legislation pertaining to such installations This warranty does not apply unless the VIGO Product is installed by fully insure...

Страница 13: ...n Single hole construction Ceramic disk cartridge Single lever faucet Standard plumbing connections Finish resist corrosion and tarnishing PACKING LIST Faucet Assembly Pin Brass ring Two Metal braided hoses Rubber washer Nut 12 3 8 5 1 8 NOTA Todos los grifos cumplen con CEC 2016 regulaciones Si usted tiene preguntas acerca de su flujo de agua por favor escriba techmail vigoindustries com ...

Страница 14: ...1 1 2 3 1 8 1 3 4 10 5 8 1 4 1 3 4 5 1 8 8 3 8 2 3 1 2 1 1 2 6 5 8 VG03013 2 ...

Страница 15: ... en el cuadro 1 5 gpm NORMAS DE CAUDAL Giro abra la tapa del aireador hacia la izquierda para quitar Basta con quitar el aireador 1 2 gpm y reemplazarlo con el aireador 1 5 gpm siempre Vuelva a colocar la cubierta del 1 2gpm aireador 1 5gpm aireador Cubierta aireador Cubierta aireador ...

Страница 16: ...FROM THE BOTTOM OF THE FAUCET BRASS RING RUBBER WASHER NUT 3 2 Your new faucet is designed for years of trouble free performance Keep it looking new by cleaning it periodically with a soft cloth Avoid abrasive cleaners steel wool and harsh chemicals as these will scratch dull and or damage the finish and or product void your warranty Be sure to shut off water supply prior to installation Protect y...

Страница 17: ...xible hose and rethread checking to make sure the connection is secure Make sure to use pipe tape 2 B Remove supply lines and flush lines 2 A Remove aerator and soak clean with a non abrasive agent i e half hot water and half vinegar 1 B Contact Vigo Technical Support for replacement 1 A Remove cartridge from housing wash thoroughly with hot water and reseat in housing 3 B Remove supply line and c...

Страница 18: ...h access is not available all expenses to provide said access will be the responsibility of the owner This warranty does not apply to Products that have not been installed or operated in accordance with instructions supplied by VIGO and all applicable rules regulations and legislation pertaining to such installations This warranty does not apply unless the VIGO Product is installed by fully insure...

Отзывы: