background image

12 ··············· 

INSTRUCTION MANUAL

CONTROL AND FUNCTIONS

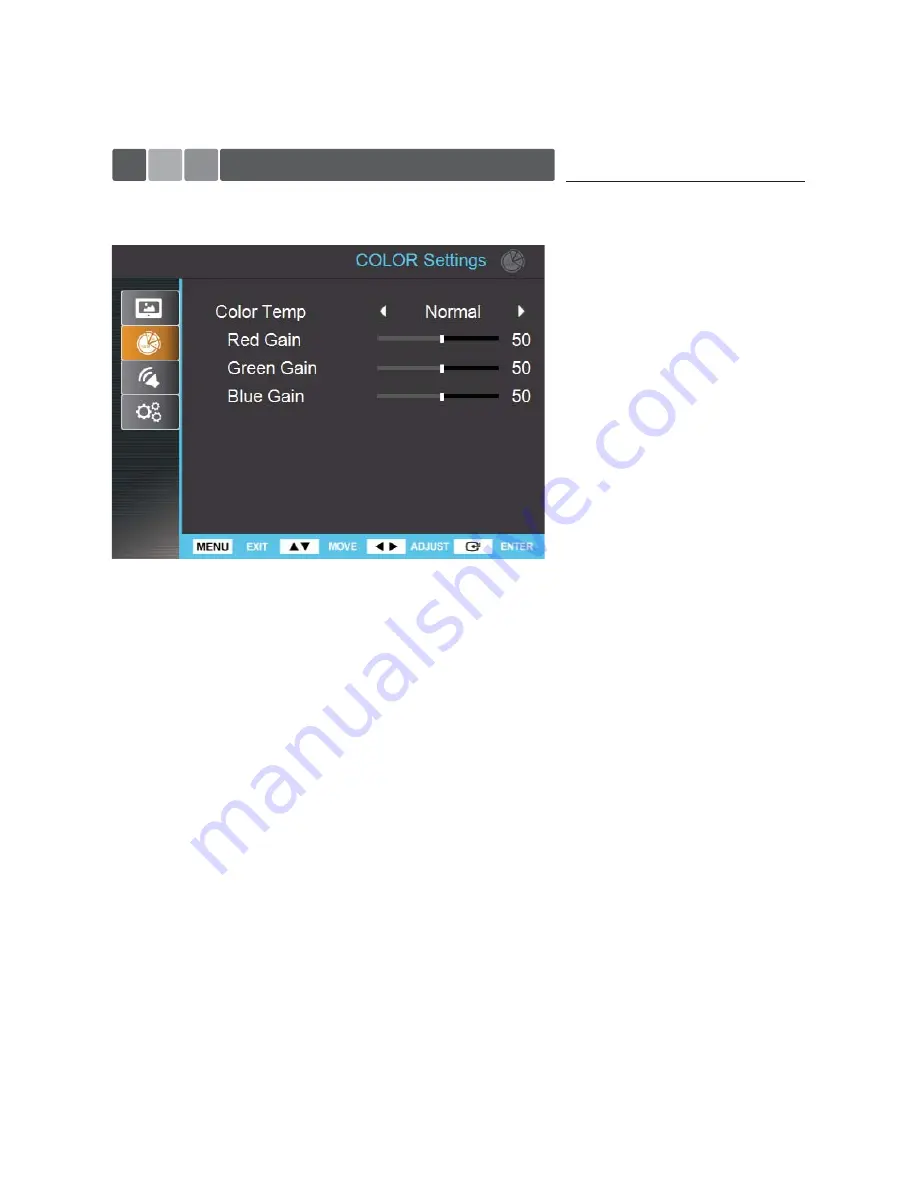
 Color Settings Menu Description

 Color Temp

  - used to control color temperature.
  - users can choose Cool, Normal, Warm, User
  - in User mode, users can define RGB Gain values for own purpose.

 Gain Red/Green/Blue

   - changes only in User mode.
   - used to set R/G/B Gain level from 0 to 100.

Содержание VZ-215IPM

Страница 1: ...21 5 INCH IPM SERIES TFT LED MONITOR Please read this manual thoroughly before use and keep it handy for future reference INSTRUCTION MANUAL ...

Страница 2: ......

Страница 3: ...STALLATION CONNECTING WITH EXTERNAL EQUIPMENT REMOTE FUNCTIONS CONTROL AND FUNCTIONS LAUNCHER PROGRAM GUIDE MOUNTING GUIDE POWER MANAGEMENT SPECIFICATIONS TROUBLE SHOOTING GUIDE 2 3 4 5 6 7 8 9 14 15 17 18 19 20 21 This Monitor was Manufactured by ISO 9001 Certified Factory CONTENTS ...

Страница 4: ...plug does not fit into your outlet consult an electrician for replace ment of the bsolete outlet 10 Protect the power cord from being walked on or pinched particularly at plugs convenience receptacles and the point where they exit from the apparatus 11 Only use attachment accessories specified by the manufacturer 12 Use only with the cart stand tripod bracket or table specified by the manufacturer...

Страница 5: ...tenance servicing instructions in the literature accompanying the appliance The apparatus shall not be exposed to dripping or splashing and that no objects filled with liquids such as vases shall be placed no the apparatus Minimum distances e g 10cm around the apparatus for sufficient ventilation WARNING To reduce the risk of fire or electric shock do not expose the apparatus to rain or moisture T...

Страница 6: ... by qualified personnel DO NOT USE IN HOSTILE ENVIRONMENTS To prevent shock or fire hazard do not expose the unit to rain or moisture This unit is designed to be used in the office or home Do not subject the unit to vibrations dust of corrosive gases KEEP IN A WELL VENTILATED PLACE Ventilation holes are provided on the cabinet to prevent the temperature from rising Do not cover the unit or place a...

Страница 7: ...ommunications However there is no guarantee that interference will not occur in a particular installation If this equipment does cause harmful interference to radio or television reception which can be determined by turning the equipment off and on the user is encouraged to try to correct the interference by one or more of the following measures Reorient or relocate the receiving antenna Increase ...

Страница 8: ...Place the monitor with its front facing downward on a soft cloth 2 Assemble the Stand Base into the Stand Body in the correct direction using the included screws in the accessory box B Positioning your display Adjust the position of the panel in various ways for maximum comfort Tilt Range 3 75 3 Once assembled take the monitor up carefully and face the front side Stand Base Stand Body 3 75 FS4x10 ...

Страница 9: ...CONNECTING WITH EXTERNAL EQUIPMENT INSTRUCTION MANUAL 07 1 PGM 2 DC 12V IN 3 MICRO SD CARD 4 USB1 USB2 5 MICRO USB 6 ETHERNET IN RJ45 Rear Connection 1 2 3 4 5 6 ...

Страница 10: ...r Down from the Android OS 16 Not using 17 1 POWER Turns the power ON or OFF There will be a few seconds delay before the display appears 2 MUTE Mutes the sound 3 MENU Activates and exits the On Screen Display 4 EXIT Exits the On Screen Display 5 VOL 6 UP DOWN Moves upwards or downwards in the OSD menu 7 ENTER Enters an OSD submenu or accepts your selection 8 INFO Displays the information about in...

Страница 11: ... or status 3 Move downwards in the OSD Menu 4 Move upwards in the OSD Menu 5 Change the set of the OSD Menu Decreases the level of audio volume When there is no OSD Menu 6 Change the set of the OSD Menu Increases the level of audio volume When there is no OSD Menu 7 I Turns the power on or off There will be a few seconds delay before the display appears Turned on Blue color Turned off LED Off 8 LE...

Страница 12: ...t OSD menu pop up on the screen Press down down up up 2 Unlock When activating Lock function press the down down up up in order 1 Lock Press the 7 8 9 0 button on the remote controller in order 2 Unlock When activating Lock function press the 7 8 9 0 button on the remote controller in order Main menu includes 1 Picture Settings 2 Color Settings 3 Audio Settings 4 System Settings ...

Страница 13: ...o move from the menu you may press the Up Down Key on the Side or Use the Up Down button on the Remote Control 3 To enter the menu press the Enter Key or the Enter Button 4 To Step back to the previous menu press the Menu Key or Menu Button Menu turns to blue when selected Grey menus are not yet activated OSD MENU DESCRIPTION All picture sound settings and setup for the monitor can be adjusted in ...

Страница 14: ...ings Menu Description Color Temp used to control color temperature users can choose Cool Normal Warm User in User mode users can define RGB Gain values for own purpose Gain Red Green Blue changes only in User mode used to set R G B Gain level from 0 to 100 ...

Страница 15: ...ROL AND FUNCTIONS Audio Settings Menu Description Volume used to control volume level of the internal speaker from 0 to 100 Mute used to turn off entire audio volume to turn back on the audio volume to previous level select Off ...

Страница 16: ...ge Sets the language of the OSD menu English German Spanish French Italian Dutch Polish Portuguese Russian Turkish OSD Timeout Adjust OSD displaying time Off 10 20 30 40 50 60 Backlight to control backlight of screen from 0 to 100 Reset used to reset the monitor to factory default setting ...

Страница 17: ...INSTRUCTION MANUAL 15 LAUNCHER PROGRAM GUIDE Main Screen 1 ONVIF Viewer Shortcut of IP camera Viewer 2 VMS or Favorites Folder 3 Application You can see the whole APP 4 Background ...

Страница 18: ...o open it Long clicking the app will remove it If you click the background more than 1 second You can change the background to other background Password can be changed by populating fields and accessing the Change Login menu Upon reboot this feature will automatically resume the last app that was used in the event that power was lost Password The button to access all apps requires a password defau...

Страница 19: ...E Open Settings in the All Apps section Click on the Ethernet tab Enable Ethernet A static IP Address can also be added in this section DHCP is the default setting Navigation bar Hide Ethernet Settings Volume Down Back Home Multi Menu Volume Up ...

Страница 20: ...ing by using the VESA 100 standard wall mount not included in the delivery Attention You must use four M4x10 screws to assemble this monitor and the wall mount bracket WARNING If user use longer than M4x10 it may cause the damage on the unit Please follow instructed bolt size length 100 100 M4x10 screws ...

Страница 21: ... Mode Power Consumption Turned On 25W Turned Off 1W LED Indicator The power management feature of the monitor is comprised of two stages Turned on Blue and turned off Red Mode LED Monitor Operation Turned On Blue Normal Operation Turned Off Red Not Operation ...

Страница 22: ...ion H x V 1920X1080 60Hz Frequency Horizontal 31 80kHz Vertical 50 75Hz Input Signal Active Display Area H x V 476 64mm x 268 11mm Packing Dimensions W x H x D 580mm x 440mm x 145mm 22 83 x 17 32 x 5 71 Weight Net 4 31kg 9 50 lbs Gross 5 68kg 12 52 Ibs Electrical Ratings 12V 3 3A 100 240V 50 60Hz NOTE Technical specifications are subject to change without notice Maximum support 64GB Recommands San...

Страница 23: ...nment or human health from uncontrolled waste disposal please separate this from other types of wastes and recycle it responsibly to promote the sustainable reuse of material resources Household users should contact either the retailer where they purchased this product or their local government office for details of where and how they can take this item for environmentally safe recycling Business ...

Страница 24: ...MEMO ...

Страница 25: ...MEMO ...

Страница 26: ...MEMO ...

Страница 27: ......

Страница 28: ...P N L39ME0421 Rev 0 ...

Отзывы: